KDC-X799 KDC-BT762HD CD-RECEIVER INSTRUCTION MANUAL AMPLI-TUNER LECTEUR DE CD MODE D’EMPLOI REPRODUCTOR DE DISCOS COMPACTOS RECEPTOR DE FM/AM MANUAL DE INSTRUCCIONES Take the time to read through this instruction manual. Familiarity with installation and operation procedures will help you obtain the best performance from your new CD-receiver. For your records Record the serial number, found on the back of the unit, in the spaces designated on the warranty card, and in the space provided below.
CAUTION Use of controls or adjustments or performance of procedures other than those specified herein may result in hazardous radiation exposure. In compliance with Federal Regulations, following are reproductions of labels on, or inside the product relating to laser product safety. JVC KENWOOD Corporation 2967-3, ISHIKAWA-MACHI, HACHIOJI-SHI, TOKYO, JAPAN THIS PRODUCT COMPLIES WITH DHHS RULES 21CFR SUBCHAPTER J IN EFFECT AT DATE OF MANUFACTURE.
IC (Industry Canada) Notice CAUTION This device complies with Industry Canada licence-exempt RSS standard(s). Operation is subject to the following two conditions: (1) This device may not cause interference, and (2) this device must accept any interference, including interference that may cause undesired operation of the device. The term “IC: ” before the certification/ registration number only signifies that the Industry Canada technical specification were met.
CONTENTS BEFORE USE BEFORE USE 2 BASICS 3 GETTING STARTED 4 HD Radio™ tuner 5 CD / USB / iPod / ANDROID 6 Pandora® 8 iHeartRadio® 9 SiriusXM® Radio 10 AUX 12 BLUETOOTH® 13 AUDIO SETTINGS 19 DISPLAY SETTINGS 20 MORE INFORMATION 21 TROUBLESHOOTING 22 SPECIFICATIONS 24 INSTALLATION / CONNECTION 26 How to read this manual • Operations are explained mainly using buttons on the faceplate. • [XX] indicates the selected items.
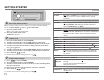
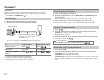
BASICS Faceplate Remote control (RC-406) Volume knob (turn/press) Display window Remote sensor (Do not expose to bright sunlight.) Pull out the insulation sheet when using for the first time. Detach button Attach Detach How to reset How to replace the battery Your preset adjustments will also be erased. To On the faceplate On the remote control Turn on the power . Press • Press and hold to turn off the power. Press and hold SRC to turn off the power. ( Pressing SRC does not turn on the power.
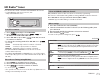
GETTING STARTED Default: XX AUDIO CONTROL SP SELECT 1 DISPLAY EASY MENU Cancel the demonstration When you turn on the power (or after you reset the unit), the display shows: “CANCEL DEMO” “PRESS” “VOLUME KNOB” 1 Press the volume knob. [YES] is selected for the initial setup. 2 Press the volume knob again. “DEMO OFF” appears. 2 Set the clock 1 2 3 4 Press the volume knob to enter [FUNCTION]. Turn the volume knob to select [CLOCK], then press the knob.
HD Radio™ tuner You can tune in to both conventional and HD Radio broadcasts. • To find HD Radio stations in your area, visit . Select an HD Radio multicast channel Many HD Radio stations offer more than one channel programming. This service is called multicasting. While receiving HD Radio multicast channels.... Press S / T to select your desired channel (HD1 to HD8). “LINKING” appears while linking to a multicast channel. Other settings 1 Press the volume knob to enter [FUNCTION].
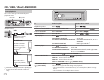
CD / USB / iPod / ANDROID Start playback The source changes automatically and playback starts. Label side M Eject disc USB input terminal USB CA-U1EX (max.: 500 mA) (optional accessory) To On the faceplate On the remote control Playback / pause Press Press Reverse / Fast-forward*4 Press and hold S / T. Press and hold S / Select a track/file Press S / T. Press S / Select a folder*5 Press J / K. Press Repeat play*6 Press repeatedly.
CD / USB / iPod / ANDROID *3 When connecting an Android device, “Press [VIEW] to install KENWOOD MUSIC PLAY APP” is shown. Follow the instructions to install the application. You can also install the latest version of KENWOOD MUSIC PLAY application on your Android device before connecting. ( 21) *4 For ANDROID: Applicable only when [BROWSE MODE] is selected. ( [ANDROID SETUP]) *5 For CD: Only for MP3/WMA/AAC files. This does not work for iPod/ ANDROID.
Pandora® Preparation: Install the latest version of the Pandora application on your device (iPhone/ iPod touch), then create an account and log in to Pandora. • Select [ON] for [PANDORA SRC]. ( 4) Create and save a new station 1 Press and hold the volume knob. 2 Turn the volume knob to select [FROM TRACK] or [FROM ARTIST], then Start listening 1 Open the Pandora application on your device. 2 Connect your device to the USB input terminal. press the knob.
iHeartRadio® Preparation: Install the latest version of iHeart Link for KENWOOD application on your device (iPhone/ iPod touch), then create an account and log in to iHeartRadio. • Select [ON] for [IHEART SRC]. ( 4) Search for a station . 1 Press 2 Turn the volume knob to select a category, then press the Start listening 1 Open the iHeart Link application on your device. 2 Connect your device to the USB input terminal. 3 Turn the volume knob to the desired station, then press the knob. knob.
SiriusXM® Radio Only SiriusXM® brings you more of what you love to listen to, all in one place. Get over 140 channels, including commercial-free music plus the best sports, news, talk, comedy and entertainment. Welcome to the world of satellite radio. A SiriusXM Vehicle Tuner and Subscription are required. For more information, visit www.siriusxm.com. Preparation: 1 Connect the optional SiriusXM Vehicle Tuner (commercially available).
SiriusXM® Radio SiriusXM Keymode SmartFavorites and TuneStart™ Press and hold to change the keymode (channel or replay). (Default: Channel keymode) “ ” lights up when replay keymode is selected. When channel keymode is selected... To On the faceplate On the remote control Select a channel Press S / T. Press S / Change a channel rapidly Press and hold S / T. Press and hold S / . Store a channel of the current band Press and hold one of the number buttons (1 to 6).
AUX SiriusXM® Radio Default: XX CHANNEL LOCK CODE SET To unlock settings: 1 Turn the volume knob to select a number. 2 Press S / T to move to the entry position. 3 Repeat steps 1 and 2 to enter the current pass code. (Initial pass code is 0000.) 4 Press the volume knob to confirm. 1 Turn the volume knob to select a number. 2 Press S / T to move to the entry position. 3 Repeat steps 1 and 2 to enter a new 4-digit pass code. 4 Press the volume knob to confirm.
BLUETOOTH® BLUETOOTH — Connection Pair a Bluetooth device Supported Bluetooth profiles – Hands-Free Profile (HFP) – Serial Port Profile (SPP) – Phonebook Access Profile (PBAP) – Advanced Audio Distribution Profile (A2DP) – Audio/Video Remote Control Profile (AVRCP) Supported Bluetooth codecs – Sub Band Codec (SBC) – Advanced Audio Coding (AAC) – aptX Codec (aptX) Connect the microphone MIC (Microphone input terminal) Microphone (supplied) Rear panel Adjust the microphone angle When connecting a Bluet
BLUETOOTH® BLUETOOTH — Mobile phone Improve the voice quality While talking on the phone... 1 Press the volume knob to enter [FUNCTION]. 2 Turn the volume knob to make a selection (see the following table), then press the knob. 3 Repeat step 2 until the desired item is selected or activated. 4 Press and hold to exit. . To return to the previous setting item, press Receive a call When there is an incoming call: – All the buttons and display flash.
BLUETOOTH® Make the settings for receiving a call 1 Press to enter Bluetooth mode. 2 Turn the volume knob to make a selection (see the following table), then press the knob. 3 Repeat step 2 until the desired item is selected or activated. 4 Press and hold to exit. To return to the previous setting item, press . Default: XX SETTINGS AUTO ANSWER 1 — 30: The unit answers incoming call automatically in the selected time (in seconds). ; OFF: Cancels.
BLUETOOTH® 1 Turn the volume knob to select a number (0 to 9) or character ( , #, +). 2 Press S / T to move the entry position. Repeat steps 1 and 2 until you finish entering the phone number. 3 Press the volume knob to call. (or using RC-406) 1 Press the number buttons (0 to 9) to enter the phone number. 2 Press to call. Delete a contact to enter Bluetooth mode. 1 Press 2 Turn the volume knob to select [CALL HISTORY], then press the knob. 3 Turn the volume knob to select a contact.
BLUETOOTH® Other settings 1 Press the volume knob to enter [FUNCTION]. 2 Turn the volume knob to make a selection (see the following table), then press the knob. 3 Repeat step 2 until the desired item is selected/activated or follow the instructions stated on the selected item. 4 Press and hold to exit. To return to the previous setting item, press . Default: XX Selects the phone or audio device to connect or disconnect. “ ” appears in front of the device name when connected.
BLUETOOTH® BLUETOOTH — Audio Internet radio via Bluetooth Listen to Pandora Preparation: Select [ON] for [PANDORA SRC]. ( 4) You can listen to Pandora on your smart phone (Android OS) through Bluetooth on this unit. 1 Open the Pandora application on your device. 2 Connect your Bluetooth audio player via Bluetooth connection. ( 13) 3 Press repeatedly to select PANDORA. The source switches and broadcast starts automatically. You can operate Pandora in the same way as Pandora for iPod/iPhone.
AUDIO SETTINGS While listening to any source... 1 Press the volume knob to enter [FUNCTION]. 2 Turn the volume knob to select [AUDIO CONTROL], then press the knob. 3 Turn the volume knob to make a selection (see the following table), then press the knob. 4 Repeat step 3 until the desired item is selected or activated. 5 Press and hold to exit. (or using RC-406) 1 Press AUD to enter [AUDIO CONTROL].
AUDIO SETTINGS DISPLAY SETTINGS LPF SUBWOOFER THROUGH: All signals are sent to the subwoofer. ; 85HZ/ 120HZ/ 160HZ: Audio signals with frequencies lower than 85 Hz/ 120 Hz/ 160 Hz are sent to the subwoofer. 1 Press the volume knob to enter [FUNCTION]. 2 Turn the volume knob to select [DISPLAY], then press the knob.
MORE INFORMATION General • This unit can only play the following CDs: • Detailed information and notes about the playable audio files are stated in an online manual on the following web site: www.kenwood.com/cs/ce/audiofile/ Playable files • Playable audio file: MP3 (.mp3), WMA (.wma), AAC (.m4a) • Playable disc media: CD-R/CD-RW/CD-ROM • Playable disc file format: ISO 9660 Level 1/2, Joliet, Long file name.
TROUBLESHOOTING Remedy Symptom Remedy • Adjust the volume to the optimum level. • Check the cords and connections. “NO DISC” Insert a playable disc into the loading slot. “TOC ERROR” Make sure the disc is clean and inserted properly. “MISWIRING CHECK WIRING THEN PWR ON” appears. Turn the power off, then check to be sure the terminals of the speaker wires are insulated properly. Turn the power on again. “PLEASE EJECT” Reset the unit.
TROUBLESHOOTING Remedy Symptom Remedy • Switch off the developer options on the Android device. • Reconnect the Android device. • If this does not solve the problem, the connected Android device does not support [BROWSE MODE]. ( 21) “NO STATIONS” No stations are found. “NOT CONNECTED” Link to the application is impossible. “IHEARTLINK UP” Make sure you have installed the latest version of the iHeart Link for KENWOOD application on your device. Playback is intermittent or sound skips.
SPECIFICATIONS TROUBLESHOOTING No Bluetooth device is detected. Bluetooth pairing cannot be made. Echo or noise is heard during a phone conversation. Phone sound quality is poor. Sound is being interrupted or skipped during playback of a Bluetooth audio player. The connected Bluetooth audio player cannot be controlled. • Search from the Bluetooth device again. • Reset the unit. ( 3) • Make sure you have entered the same PIN code to both the unit and Bluetooth device.
Frequency Response (±1 dB) 20 Hz — 20 kHz Total Harmonic Distortion (1 kHz) 0.01 % : 110 dB : 105 dB Frequency Response (±3 dB) 20 Hz — 20 kHz Input Maximum Voltage 1 000 mV Input Impedance 30 kΩ Maximum Output Power 50 W × 4 85 dB Full Bandwidth Power (at less than 1 % THD) 22 W × 4 MP3 Decode Compliant with MPEG-1/2 Audio Layer-3 Speaker Impedance 4Ω—8Ω WMA Decode Compliant with Windows Media Audio Tone Action AAC Decode AAC-LC “.m4a” files USB Standard USB 1.1, USB 2.
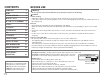
INSTALLATION / CONNECTION Warning • The unit can only be used with a 12 V DC power supply, negative ground. • Disconnect the battery’s negative terminal before wiring and mounting. • Do not connect Battery wire (yellow) and Ignition wire (red) to the car chassis or Ground wire (black) to prevent a short circuit. • Insulate unconnected wires with vinyl tape to prevent a short circuit. • Be sure to ground this unit to the car’s chassis again after installation.
Wiring connection Rear/ front/ subwoofer output MIC (Microphone input terminal) ( 13) Fuse (10 A) Antenna terminal To the optional SiriusXM Vehicle Tuner (commercially available) ( 10) When connecting to an external amplifier, connect its ground wire to the car’s chassis to avoid damaging the unit. Part list for installation (A) Faceplate White To front speaker (left) If no connections are made, do not let the wire come out from the tab.
• HD Radio Technology manufactured under license from iBiquity Digital Corporation. U.S. and Foreign Patents. HD Radio™ and the HD, HD Radio, and “Arc” logos are proprietary trademarks of iBiquity Digital Corp. • “Made for iPod,” and “Made for iPhone” mean that an electronic accessory has been designed to connect specifically to iPod, or iPhone, respectively, and has been certified by the developer to meet Apple performance standards.