KDC-MPV7020 KDC-6020 KDC-5020 KDC-5020R CD-RECEIVER INSTRUCTION MANUAL © B64-2244-00 (M)
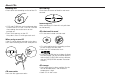
English Contents Safety precautions......................3 About CDs...................................5 Notes on playing MP3 ................6 General features .........................8 Power Selecting the Source Volume Attenuator Loudness System Q Audio Control Speaker Setting Switching Display Station/Disc Naming (SNPS/DNPS) TEL Mute Auxiliary Input Display Setting Non-fading Output Theft Deterrent Faceplate Tuner features (KDC-5020R).....
Safety precautions 2WARNING 2CAUTION To prevent injury or fire, take the following precautions: To prevent damage to the machine, take the following precautions: • Insert the unit all the way in until it is fully locked in place. Otherwise it may fall out of place when jolted. • When extending the ignition, battery, or ground wires, make sure to use automotivegrade wires or other wires with a 0.75mm2 (AWG18) or more to prevent wire deterioration and damage to the wire coating.
English Safety precautions About RDS NOTE • If you experience problems during installation, consult your Kenwood dealer. • If the unit fails to operate properly, press the Reset button. The unit returns to factory settings when the Reset button is pressed. If the unit still fails to operate properly after the Reset button has been pressed, contact your local KENWOOD dealer for assistance. • Press the reset button if the disc auto changer fails to operate correctly. Normal operation should be restored.
About CDs Handling CDs CD cleaning • Don’t touch the recording surface of the CD. Clean from the center of the disc and move outward. Removing CDs • CD-R and CD-RW are easier to damage than a normal music CD. Use a CD-R or a CD-RW after reading the caution items on the package etc. • Don’t stick tape etc. on the CD. Also, don’t use a CD with tape stuck on it. When removing CDs from this unit pull them out horizontally. CDs that can’t be used • CDs that aren’t round can’t be used.
English Notes on playing MP3 Entering ID3 tag This unit can play MP3(MPEG1, 2, 2.5 Audio Layer 3). Note, however, that the MP3 recording media and formats acceptable are limited. When writing MP3, pay attention to the following restrictions. The Displayable ID3 tag is ID3 version 1.x. For the character code, refer to the List of Codes. Acceptable media The MP3 recording media acceptable to this unit are CD-ROM, CD-R, and CD-RW. When using CD-RW, do full format not quick format to prevent malfunction.
MP3 playing order When a Track Search is executed with file ¡$ being played ... When selected for play, Album Search, Track Search, or for Album Select, files and folders are accessed in the order in which they were written by the CD writer. Because of this, the order in which they are expected to be played may not match the order in which they are actually played.
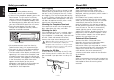
English General features u/d ¢ SRC FM FM Release button Power Turning ON the Power Press the [SRC] button. OFF DAB MENU When the power is ON, the (page 24) is displayed as "CODE ON" or "CODE OFF". SCAN RDM REP M.RDM DISP NAME AUTO GSM AUD NF LOUD 4 ATT / LOUD AM / Q / NF AUD DISP/NAME Turning OFF the Power Press the [SRC] button for at least 1 second. Selecting the Source KDC-MPV7020/6020 Press the [SRC] button.
• User memory: The values set on the
English General features Speaker Setting Fine-tuning so that the System Q value is optimal when setting the speaker type. 1 Enter Standby Press the [SRC] button. Select the "ALL OFF" display. 2 Enter Speaker Setting mode Press the [Q] button. 3 Select the Speaker type Press the [4] or [¢] button. Each time the button is pressed the below. Speaker type OFF For 5 & 4 in. speaker For 6 & 6x9 in.
"N" "C" "E" Station/Disc Naming (SNPS/DNPS) Attaching a title to a Station (KDC-MPV7020/6020/5020 only) or CD. 1 Receive/play the station/disc you want to attach a title to 6 7 • A title can't be attached to a MD. KDC-MPV7020/6020: • Disc Naming can't be done during CD text display. KDC-5020/5020R: • Disc Naming can't be done during CD text or clock display. 2 Enter name set mode Press the [NAME] button for at least 2 seconds. "NAME SET" is displayed.
English General features Auxiliary Input Display Setting Theft Deterrent Faceplate Selecting the display when this device is switched to Auxiliary input source. 1 Removing the Faceplate Select Auxiliary input source Press the [SRC] button. Select the "AUX" display. 2 Enter Auxiliary input display setting mode Press the [DISP] button for at least 2 seconds. The presently selected AUX Name is blinks. 3 Select the Auxiliary input display Press the [4] or [¢] button.
Tuner features Function of the KDC-5020R Tuning SRC FM MENU Selecting the station. ¢ 1 Select tuner source Press the [SRC] button. Select the "TUNER" display. 2 Select the band Press the [FM] or [AM] button. Each time the [FM] button is pressed it switches between the FM1, FM2, and FM3 bands. 3 Tune up or down band Press the [4] or [¢] button. OFF DAB PTY MENU SCAN RDM REP M.RDM DISP NAME TI AUD LOUD 4 AM #1 – 6 During reception of stereo stations the "ST" indicator is ON.
Tuner features English Function of the KDC-5020R • When Auto Memory Entry is done in the FM2 band, the RDS stations preset in the FM1 band aren't put in the memory. Likewise, when it is done in the FM3 band, RDS stations preset in FM1 or FM2 aren't put in the memory. Station Preset Memory Putting the station in the memory. 1 Select the band Press the [FM] or [AM] button. 2 Select the frequency to put in the memory Press the [4] or [¢] button.
RDS features Function of the KDC-5020R Traffic Information Switching to traffic information automatically when a traffic bulletin starts even when you aren't listening to the radio. ¢ FM PTY Press the [TI] button. Each time the button is pressed the Traffic Information function turns ON or OFF. When it's ON, "TI" indicator is ON. When a traffic information station isn't being received the "TI" indicator blinks.
RDS features English Function of the KDC-5020R 21. 22. 23. 24. 25. 26. 27. 28. 29. 30. 31. PTY (Program Type) Selecting the Program Type and searching for a station. 1 Enter PTY mode Press the [PTY] button. During PTY mode the "PTY" indicator is ON. This function can't be used during a traffic bulletin or AM reception. 2 Select the Program Type Press the [FM] or [AM] button. Each time the button is pressed the Program Type switches as shown below. No. Program Type Display 1. Speech "SPEECH" 2.
Tuner features Function of the KDC-MPV7020/KDC-6020/KDC-5020 Presetting the Program Type 1 Select the Program Type to preset Refer to (page 16). 2 Preset the Program Type Press the [#1] — [#6] button for at least 2 seconds. SRC FM MENU ¢ OFF DAB MENU Calling up the preset Program Type SCAN RDM REP M.RDM DISP NAME AUTO AME AUD 1 Enter PTY mode Refer to (page 16). 2 Call up the Program Type Press the [#1] — [#6] button.
Tuner features English Function of the KDC-MPV7020/KDC-6020/KDC-5020 Tuning Mode Choose the tuning mode. Press the [AUTO] button. Each time the button is pressed the Tuning mode switches as shown below. Tuning mode Display Operation Auto seek "Auto 1"/ Automatic search for a station. "AUTO 1" Preset station "Auto 2"/ Search in order of the stations seek "AUTO 2" in the Preset memory. Manual "Manual"/ Normal manual tuning control.
Function of the KDC-MPV7020/KDC-6020 Auto Memory Entry Putting a station with good reception in the memory automatically. 1 Select the band for Auto Memory Entry Press the [FM] or [AM] button. 2 Enter Menu mode Press the [MENU] button for at least 1 second. "MENU" is displayed. 3 Select the Auto Memory Entry mode Press the [FM] or [AM] button. Select the "A-Memory" display. 4 Preset Tuning Calling up the stations in the memory. 1 Select the band Press the [FM] or [AM] button.
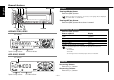
English CD/MP3/External disc control features SRC FM 38 ¢ Release button Playing CD & MP3 When there is no disc inserted OFF DAB MENU SCAN RDM REP M.RDM DISP NAME AUTO GSM AUD NF 1 Drop open the faceplate Press the Release button. 2 3 Insert a disc. LOUD 4 SCAN RDM REP #5 M.RDM / #3 AM Press the faceplate on the right side, and return it to its former position. • When the faceplate has been dropped open, it might interfere with the shift lever or something else.
• Disc #10 is displayed as "0". • The functions that can be used and the information that can be displayed will differ depending on the external disc players being connected. Fast Forwarding and Reversing 3 Fast Forwarding Hold down on the [¢] button. Release your finger to play the disc at that point. Press the faceplate on the right side, and return it to its former position. 3 in. (8cm) disc can't be played. Using an adapter and inserting them into this unit can cause damage.
English CD/MP3/External disc control features Repeat play Track Repeat (In CD/MD) (In MP3) Album Repeat (In Disc Changer) (In MP3 media) OFF Direct Track Search (Function of remote) Doing Track Search by entering the track number. 1 Enter the track number Press the number buttons on the remote. 2 Do Track Search Press the [4] or [¢] button. Canceling Direct Track Search Press the [38] button. Direct Album Search (Function of disc changers with remote) Doing Disc Search by entering the disc number.
Press the [M.RDM] button. Each time the button is pressed the Magazine Random Play turns ON or OFF. When it's ON, "MRDM ON" is displayed. 3 Decide the folder to play Press the [38] button. The Album Select mode releases, and the MP3 in the folder being displayed is played. The methods for moving to other folders in the album select mode are different from those in the album search mode. See (page 6) for details. When the [¢] button is pressed, the next song select starts.
English Menu system SRC FM MENU ¢ Menu System Setting during operation beep sound etc. functions. The Menu system basic operation method is explained here. The reference for the Menu items and their setting content is after this operation explanation. OFF DAB PTY MENU SCAN RDM REP M.RDM DISP NAME AUD TI GSM 1 Enter Menu mode Press the [MENU] button for at least 1 second. "MENU" is displayed. 2 Select the menu item Press the [FM] or [AM] button.
"APPROVED" is displayed. The unit can be used. When the Security Code function is activated it can't be released. Note, your Security Code is the 4 digit number entered in your "Car Audio Passport" in this package. 1 Enter Standby Press the [SRC] button. Select the "ALL OFF" display. 2 Enter Menu mode Press the [MENU] button for at least 1 second. When "MENU" is displayed, "Security"/ "SECURITY" is displayed. 3 Enter Security Code mode Press the [4] or [¢] button for at least 1 second.
English Menu system removed, warning potential thieves. Manual Clock Adjustment Display "DSI ON" "DSI OFF" This adjustment can be done when the (page 26) is set as OFF. 1 Select Clock Adjustment mode Press the [FM] or [AM] button. Select the "CLK ADJ" display. 2 Enter Clock Adjust mode Press the [4] or [¢] button for at least 1 second. The clock display blinks.
"DisplayB" "DisplayC" Circle Display is clock. Silent display type. Blue fine adjustment 1 Press the [#3] button for at least 2 seconds. 2 Press the [4] or [¢] button. When the blue fine adjustment is completed, press the [#3] button. Function of the KDC-MPV7020 Illumination Color Setting You can set the display to a desired color. 1 Select Illumination Color Setting Mode Press the [FM] or [AM] button. Select the "COL" display.
Function of the KDC-5020R Function of the KDC-MPV7020/KDC-6020 Switching preout Local Seek Only stations whose reception is good are searched for in auto seek tuning. Switching the preout between the rear and non-fading. (In nonfading it outputs without effect from the fader control.) Display "SWPRE R" "SWPRE NF" Display "LO.S OFF" "LO.S ON" Setting Rear preout. Non-fading preout. Setting The local seek function is OFF. The local seek function is ON.
Display "CRSC ON" "CRSC OFF" Setting The CRSC is ON. The CRSC is OFF. Sometimes stations in the same network broadcast different programs or use different program service names. Strong electrical fields (such as from power lines) may cause unstable sound quality when CRSC is turned ON. In such a situation, turn it OFF.
English Menu system Basic Operations of remote Function of the KDC-MPV7020/KDC-6020/KDC-5020 Text Scroll Setting the displayed text scroll. Display "SCL AUTO" "SCL MANU" Setting Repeats scroll. Scrolls when the display changes. 4/¢ The text scrolled is shown below. • CD text • Folder name/ File name/ Song title/ Artist name/ Album name • MD title FM/AM/DISC+/DISC– 38 Function of the KDC-5020R Text Scroll [#0] — [#9] Setting the displayed text scroll.
Loading and Replacing the battery Use one lithium battery (CR2025). Insert the batteries with the + and – poles aligned properly, following the illustration inside the case. In Tuner source [FM]/ [AM] buttons Select the band. Each time the [FM] button is pressed it switches between the FM1, FM2, and FM3 bands. [4]/ [¢] buttons Tune up or down band. [#0] — [#9] buttons Press buttons [#1] — [#6] to recall preset stations. 2WARNING Store unused batteries out of the reach of children.
English Accessories (KDC-MPV7020/6020/5020) External view ......... Number of items External view ......... Number of items 1 3 .........1 .........4 2WARNING If you connect the ignition wire (red) and the battery wire (yellow) to the car chassis (ground), you may cause a short circuit, that in turn may start a fire. Always connect those wires to the power source running through the fuse box. 2CAUTION 2 .........2 4 .........4 5 .........
Connecting Wires to Terminals (KDC-MPV7020/6020/5020) REAR 10 Rear left output (White)/ 49 Non-fading left output (White) (KDC-MPV7020/6020 only) NON FADING 11 Rear right output (Red)/ 12 Non-fading right output (Red) (KDC-MPV7020/6020 only) AUX right input (Red) (KDC-MPV7020/6020 only) AUX AUX left input (White) (KDC-MPV7020/6020 only) To KENWOOD disc changer/ DAB control input/KPA-SD100/ KPA-HD100/KPA-SS100 25 13 Front right output (Red) FRONT 14 Front left output (White) To connect these leads,
English Accessories (KDC-5020R) External view ......... Number of items External view ......... Number of items 1 4 .........4 .........1 2WARNING If you connect the ignition wire (red) and the battery wire (yellow) to the car chassis (ground), you may cause a short circuit, that in turn may start a fire. Always connect those wires to the power source running through the fuse box. 2CAUTION 2 .........2 5 .........2 3 .........4 6 .........
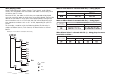
Connecting Wires to Terminals (KDC-5020R) 4 Rear right output (Red) Connector Function Guide REAR 10 Rear left output (White) Pin Numbers for Cable Colour ISO Connectors External Power Connector A–4 A–5 A–7 A–8 5 Front right output (Red) FRONT 12 Front left output (White) Antenna Cord (ISO) 1 FM/AM antenna input 3 Speaker Connector B–1 B–2 Wiring harness B–3 (Accessory1) 16 B–4 B–5 B–6 B–7 B–8 Antenna Conversion Adaptor (ISO–JASO) (Accessory6) 2 Fuse (10A) 13 KENWOOD disc changer input 14 To conne
English Connecting Wires to Terminals (KDC-5020R) 2WARNING Connecting the ISO Connector (see p.23) The pin arrangement for the ISO connectors depends on the type of vehicle you drive. Make sure to make the proper connections to prevent damage to the unit. The default connection for the wiring harness is described in 1 below. If the ISO connector pins are set as described in 2 or 3, make the connection as illustrated.
Installation ■ Installation ■ Installing in Japanese-Made Cars Firewall or metal support Screw (M4X8) (commercially available) 1 Refer to the section "Removing the hard rubber frame" (page 38) and then remove the hard rubber frame. 2 Align the holes in the unit (two locations on each side) with the vehicle mounting bracket and secure the unit with the accessory screws. T N 8 mm MAX.
English Installation ■ Removing the hard rubber frame ■ Removing the Unit 1 1 Refer to the section “Removing the hard rubber frame” and then remove the hard rubber frame. 2 3 Remove the screw (M4 × 8) on the back panel. Engage the catch pins on the removal tool and remove the two locks on the lower level. Lower the frame and pull it forward as shown in the figure. Catch Insert the two removal tools deeply into the slots on each side, as shown.
Troubleshooting Guide What might seem to be a malfunction in your unit may just be the result of slight misoperation or miswiring. Before calling service, first check the following table for possible problems. General ? The power does not turn ON.01 ✔ The fuse has blown. ☞ After checking for short circuits in the wires, replace the fuse with one with the same rating. ? The TEL mute function does not work.15 ✔ The TEL mute wire is not connected properly.
English Troubleshooting Guide ? Even though Synchronize Clock is ON, the clock can’t be adjusted.35 ✔ The received RDS station isn’t sending time data. ☞ Receive another RDS station. ? The Dimmer function doesn’t work. 38-1 ✔ The Dimmer wire isn’t connected correctly. ☞ Check the Dimmer wire connection. ? The display color changes subtly. 38-2 ✔ This is because thetemperature is different than the temperature when the setting was done. ☞ The display color condition changes subtly according.
? The disc won’t insert.65 ✔ There’s already another disc inserted. ☞ Press the [0] button and remove the disc. ? ? Direct Track Search and Direct Album Search can’t be done.66-1 ✔ Another function is ON. ☞ Turn Random Play or other functions OFF. ? Track Search can't be done.66-2 ✔ For the albums first or last song. ☞ For each album, Track Search can't be done in the backward direction for the first song or in the forward direction for the last song. ✔ The recording condition is bad.
English Troubleshooting Guide The messages shown below display your systems condition. EJECT: No disc magazine has been loaded in the changer. The disc magazine is not completely loaded.E01 ➪ Load the disc magazine properly. No CD in the unit. ➪ Insert the CD. MECHA ER: Something is wrong with the disc magazine. Or the unit is malfunctioning for some reason.E99 ➪ Check the disc magazine. And then press the reset button on the unit.
Specifications Specifications subject to change without notice. FM tuner section (KDC-MPV7020/6020/5020) CD player section Frequency range (50 kHz space) ..............87.5 MHz – 108.0 MHz (200 kHz space) ............87.9 MHz – 107.9 MHz Usable sensitivity (S/N = 30dB) ....................9.3dBf (0.8 µV/75 Ω) Quieting Sensitivity (S/N = 50dB) ...............15.2dBf (1.6 µV/75 Ω) Frequency response (±3 dB) .................................30 Hz – 15 kHz Signal to Noise ratio (MONO) ........................