KDC-X702 KDC-BT772HD KMR-D772BT KDC-X502 KDC-BT572U CD-RECEIVER INSTRUCTION MANUAL AMPLI-TUNER LECTEUR DE CD MODE D’EMPLOI REPRODUCTOR DE DISCOS COMPACTOS RECEPTOR DE FM/AM MANUAL DE INSTRUCCIONES For your records Record the serial number, found on the back of the unit, in the spaces designated on the warranty card, and in the space provided below. Refer to the model and serial numbers whenever you call upon your Kenwood dealer for information or service on the product.
CAUTION Use of controls or adjustments or performance of procedures other than those specified herein may result in hazardous radiation exposure. In compliance with Federal Regulations, following are reproductions of labels on, or inside the product relating to laser product safety. JVC KENWOOD Corporation 2967-3, ISHIKAWA-MACHI, HACHIOJI-SHI, TOKYO, JAPAN THIS PRODUCT COMPLIES WITH DHHS RULES 21CFR SUBCHAPTER J IN EFFECT AT DATE OF MANUFACTURE.
IC (Industry Canada) Notice This device complies with Industry Canada’s licence-exempt RSSs. Operation is subject to the following two conditions: (1) This device may not cause interference; and (2) This device must accept any interference, including interference that may cause undesired operation of the device.
SOFTWARE LICENSE AGREEMENT Article 3 The software embedded in the Product (hereinafter the "Licensed Software") provided by Licensor is copyrighted to or sublicensable by the Licensor, and this Agreement provides for the terms and conditions which Users shall follow in order to use the Licensed Software. 1. The User shall use the Licensed Software by agreeing with the terms of this Software License Agreement.
Article 8 Termination In case the User falls under any of the events described in the following items, the Licensor may immediately terminate this Agreement or claim that the User compensates for the damage incurred by the Licensor due to such event: (1) when the User violated any provision of this Agreement; or (2) when a petition has been filed against the User for an attachment, provisional attachment, provisional disposition or any other compulsory execution.
CONTENTS BEFORE USE BEFORE USE 2 IMPORTANT BASICS 3 GETTING STARTED 4 • To ensure proper use, please read through this manual before using this product. It is especially important that you read and observe Warning and Caution in this manual. • Please keep the manual in a safe and accessible place for future reference.
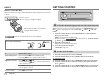
BASICS Faceplate Attach Volume knob Display window Lights up when Bluetooth connection is established. ( 21) Detach button Auxiliary cable from the rear of the unit. Detach How to reset USB 1 cable from the rear of the unit. (For / / USB 2 cable from the rear of the unit. Note: The highlighted area on the faceplate flashes when the unit enters searching status. To On the faceplate Turn on the power . Press • Press and hold to turn off the power.* Adjust the volume Turn the volume knob.
GETTING STARTED BASICS Remote control (RC-406) This unit can be remotely controlled with an optionally purchased remote control. Remote sensor (Do not expose to bright sunlight.) 1 Pull out the insulation sheet when using for the first time. : Remote control functions are not available.
GETTING STARTED To set the date 7 Turn the volume knob to select [DATE FORMAT], then press the knob. 8 Turn the volume knob to select [DD/MM/YY] or [MM/DD/YY], then press the knob. 9 Turn the volume knob to select [DATE SET], then press the knob. 10 Turn the volume knob to make the settings, then press the knob. Day Month Year or Month Day Year 11 Press and hold to exit. .
HD Radio™ tuner (for GETTING STARTED Register the marine remote ID (for ) / ) You can tune in to both conventional and HD Radio broadcasts. • To find HD Radio stations in your area, visit . Applicable only when you connect Kenwood Marine Remote Control unit (KCA-RC55MR, optional accessory) to this unit. • For connection, 42, Connecting external components. • Refer also to the supplied instruction manual of the Kenwood Marine Remote Control unit for more information.
HD Radio™ tuner (for / ) Receive an emergency alert message Direct Access Tuning (using the remote control) 1 Press DIRECT to enter Direct Access Tuning. 2 Press the number buttons to enter a frequency. 3 Press to search for a station or channel. • To cancel, press or DIRECT. • If no operation is done for 10 seconds after step 2, Direct Access Tuning is automatically canceled. Select an HD Radio multicast channel Many HD Radio stations offer more than one channel programming.
HD Radio™ tuner (for / RADIO (for ) / / ) Default: XX TUNER SETTING IF BAND AUTO: Increases the tuner selectivity to reduce interference noises from adjacent FM stations. (Stereo effect may be lost.) ; WIDE: Subjects to interference noises from adjacent FM stations, but sound quality will not be degraded and the stereo effect will remain. AUTO MEMORY YES: Automatically starts memorizing 6 stations with good reception. ; NO: Cancels. • Selectable only if [NORMAL] is selected for [PRESET TYPE].
RADIO (for / / ) Other settings 1 Press the volume knob to enter [FUNCTION]. 2 Turn the volume knob to select an item (see the following table), then press the knob. 3 Repeat step 2 until the desired item is selected or activated. 4 Press and hold to exit. To return to the previous setting item, press . Default: XX TUNER SETTING AUTO MEMORY YES: Automatically starts memorizing 6 stations with good reception. ; NO: Cancels. • Selectable only if [NORMAL] is selected for [PRESET TYPE].
CD/USB/iPod/ANDROID Start playback The source changes automatically and playback starts. CD M Eject disc Label side Selectable source: • / ANDROID 2 • / USB USB 1 cable from the rear of the unit (USB input terminal). CA-U1EX (max.: 500 mA) (optional accessory) / / : You can also connect to the USB 2 cable from the rear of the unit (USB input terminal).
CD/USB/iPod/ANDROID *4 *5 *6 *7 For ANDROID: Applicable only when [BROWSE MODE] is selected. For CD: Only for MP3/WMA/AAC files. This does not work for iPod/ANDROID. For iPod/ANDROID: Applicable only when [MODE OFF]/[BROWSE MODE] is selected. For CD: Only for MP3/WMA/AAC files. Select control mode While in iPod 1/iPod 2/iPod USB source, press 5 repeatedly. MODE ON : Control iPod using the iPod itself. However, you can still play/ pause, file skip, fast-forward or reverse from this unit.
CD/USB/iPod/ANDROID For ANDROID 1/ANDROID 2/ANDROID source 1 Press J / K to enter character search. 2 Turn the volume knob to select the character. ^A^: Upper case letters (A to Z) _A_: Lower case letters (a to z) -0-: Numbers (0 to 9) ***: Character other than A to Z, 0 to 9 3 Press the volume knob to start searching. • To return to the root folder/first file/top menu, press 5. (Not applicable for BT AUDIO source.) • To return to the previous setting item, press . • To cancel, press and hold .
AUX Pandora® Preparation: Select [ON] for [BUILT-IN AUX] for [SOURCE SELECT]. ( 5) Preparation: Install the latest version of the Pandora application on your device (iPhone/iPod touch), then create an account and log in to Pandora. • Select [ON] for [PANDORA SRC] in [SOURCE SELECT]. ( 5) Start listening 1 Connect a portable audio player (commercially available). 3.
Pandora® To On the faceplate Playback/pause Press Skip a track Press T. Press . Thumbs up or thumbs down* Press J / K. Press / . On the remote control Press Bookmark current song information . . * If thumbs down is selected, the current track is skipped. Press and hold the volume knob. “BOOKMARKED” appears and the information is stored to your device. • The bookmark is available on your Pandora account but not on this unit. Delete a station While listening to PANDORA...
iHeartRadio® Preparation: Install the latest version of iHeartAuto application on your device (iPhone/iPod touch), then create an account and log in to iHeartRadio. • Select [ON] for [IHEART SRC] in [SOURCE SELECT]. ( 5) Start listening 1 Open the iHeartAuto application on your device. 2 Connect your device to the USB input terminal. To On the faceplate Playback/pause Press Skip a track for custom station Press T. Press Thumbs up or thumbs down Press J / K.
Spotify Preparation: Install the latest version of the Spotify application on your device (iPhone/ iPod touch), then create an account and log in to Spotify. • Select [ON] for [SPOTIFY SRC] in [SOURCE SELECT]. ( 5) Start listening 1 Open the Spotify application on your device. 2 Connect your device to the USB input terminal. USB 1 cable from the rear of the unit.
SiriusXM® Radio Spotify Search for a song or station 1 Press . 2 Turn the volume knob to select a list type, then press the knob. The list types displayed differ depending on the information sent from Spotify. 3 Turn the volume knob (or press J / K on the remote control) to select the desired song or station. 4 Press the volume knob (or press on the remote control) to confirm. You can browse through the list quickly by turning the volume knob quickly.
SiriusXM® Radio Start listening 1 Press 2 Press 3 Press repeatedly to select SIRIUS XM. repeatedly to select a band. . “ ” lights up. 4 Turn the volume knob to select a category, then press the knob. If “ALL CHANNELS” is selected, all the available channels will be shown. 5 Turn the volume knob to select a channel, then press the knob. (or) Press S / T to search for a channel manually. • Pressing and holding S / T changes the channel rapidly.
SiriusXM® Radio SmartFavorites and TuneStart™ User stored channels are recognized as SmartFavorite channels*. The SiriusXM Vehicle Tuner automatically buffers the broadcast content in the background. • SmartFavorites feature is available with SXV200 or later SiriusXM Vehicle Tuner. * SXV300 (and later) SiriusXM Vehicle Tuner can use all 18 stored channels as SmartFavorites. The SXV200 SiriusXM Vehicle Tuner can use 6 stored channels from the current band as SmartFavorites.
SiriusXM® Radio CHANNEL EDIT*1 CHANNEL CLEAR*1 1 Turn the volume knob to select a category, then press the knob. 2 Turn the volume knob to select a channel you want to lock, then press the knob. “L” appears in front of the channel number. 3 Press and hold to exit. YES: Clears all the locked channels. ; NO: Cancels. TUNE START*2 ON: All qualified music channels in the SmartFavorite will start playback from the beginning of the song. ; OFF: Cancels.
BLUETOOTH® Pair and connect a Bluetooth device for the first time 1 Press to turn on the unit. 2 Search and select this unit model name (KDC-X7**/KDC-BT7**HD/ KMR-D7**BT/KDC-X5**/KDC-BT5**U) on the Bluetooth device. “PAIRING” “PASS XXXXXX” Device name “PRESS” “VOLUME KNOB” appears on the display. • For some Bluetooth devices, you may need to enter the Personal Identification Number (PIN) code immediately after searching. 3 Press the volume knob to start pairing.
BLUETOOTH® Connect with a remote device by One-touch (NFC) (for / / BLUETOOTH — Mobile phone ) Near Field Communication (NFC) enables short-range wireless communication between the unit and remote devices such as smartphones. By holding an NFC-compatible remote device near to the N-Mark on the unit (right side of the panel), the unit and remote device proceed to complete pairing and established the BLUETOOTH connection automatically. 1 Activate the NFC function on the remote device.
BLUETOOTH® To On the faceplate While talking on the phone... 1 Press the volume knob to enter [FUNCTION]. 2 Turn the volume knob to select an item (see the following table), then press the knob. 3 Repeat step 2 until the desired item is selected or activated. 4 Press and hold to exit. While talking on the first incoming call... Answer another incoming call and hold the current call Press Reject another incoming call Press . . Press . Press .
BLUETOOTH® Default: XX CALL HISTORY (Applicable only if the phone supports PBAP.) 1 Press the volume knob to select a name or a phone number. • “INCOMING”, “OUTGOING”, or “MISSED” is shown on the lower part of the display to indicate the previous call status. • Press DISP to change the display category (NUMBER or NAME). • “NO DATA” appears if there is no recorded call history. 2 Press the volume knob to call. PHONE BOOK (Applicable only if the phone supports PBAP.
BLUETOOTH® VOICE Speak the name of the contact you want to call or the voice command to control the phone functions. ( Make a call using voice recognition) BATTERY LVL LOW/MID/FULL*: Shows the strength of the battery. NO SIGNAL/SIGNAL LVL LOW/MID/MAX*: Shows the strength of the current received signal. Make a call from memory to enter Bluetooth mode. 1 Press 2 Press one of the number buttons (1 to 6). 3 Press the volume knob to call. “NO MEMORY” appears if there is no contacts stored.
BLUETOOTH® RECONNECT ON: The unit automatically reconnect when the last connected Bluetooth device is within range. ; OFF: Cancels. AUTO PAIRING ON: The unit automatically pair supported Bluetooth device (iPhone/ iPod touch/Android device) when it is connected through USB input terminal. Depending on the operating system of the connected device, this function may not work. ; OFF: Cancels. INITIALIZE YES: Initializes all the Bluetooth settings (including stored pairing, phonebook, and etc.).
BLUETOOTH® To On the faceplate Select a file from a folder/list Refer to “Select a file from a folder/list” on page 11. Switch between connected Bluetooth audio devices Press 5.* Default: XX On the remote control REMOTE APP ( Not available ) SELECT IOS YES: Selects iPhone/iPod to use the application via Bluetooth or connected via USB input terminal. ; NO: Cancels.
BLUETOOTH® Listen to iPhone/iPod via Bluetooth You can listen to the songs on the iPhone/iPod via Bluetooth on this unit. Press repeatedly to select iPod BT. • You can operate the iPod/iPhone in the same way as iPod/iPhone via USB input terminal. ( 10) • If you plug in an iPhone/iPod to the USB input terminal while listening to iPod BT source, the source automatically change to iPod 1/iPod 2/ iPod USB. Press to select iPod BT if the device is still connected via Bluetooth.
AUDIO SETTINGS While listening to any source... 1 Press AUDIO to enter [AUDIO CONTROL] directly. 2 Turn the volume knob to select an item (see the following table), then press the knob. 3 Repeat step 2 until the desired item is selected or activated. 4 Press and hold to exit. (or using the remote control) 1 Press AUD to enter [AUDIO CONTROL]. 2 Press J / K to select an item, then press To return to the previous setting item, press . .
AUDIO SETTINGS SPEAKER SIZE FRONT The frequency and slope settings are automatically set for the crossover of the selected speaker. SIZE TWEETER 3.5"/4"/4.75"/5"/6.5"/6.75"/7"/4×6/5×7/6×8/ 6×9/7×10: Selects according to the connected speaker size for optimum performance. SMALL/MIDDLE/LARGE: Selects according to the size range of the connected tweeter for optimum performance. ; NONE: Not connected. REAR 3.5"/4"/4.75"/5"/6.5"/6.
AUDIO SETTINGS Digital Time Alignment settings Digital Time Alignment sets the delay time of the speaker output to create a more suitable environment for your vehicle. • For more information, Determining the value for [DISTANCE] and [GAIN] of [DTA SETTINGS].
DISPLAY SETTINGS Zone identification for color and brightness settings Default: XX DISPLAY COLOR SELECT To make your own color, select [CUSTOM R/G/B]. The color you have made will be stored in [CUSTOM R/G/B]. 1 Press the volume knob to enter the detailed color adjustment. 2 Press S / T to select the color (R/G/B) to adjust. 3 Turn the volume knob to adjust the level (0 to 9), then press the knob. Set the dimmer Press and hold DISP (DIM) to turn on or off the dimmer.
TROUBLESHOOTING CD/USB/iPod HD Radio tuner/ Radio Remedy Symptom Remedy Sound cannot be heard. • Adjust the volume to the optimum level. • Check the cords and connections. Elapsed playing time is not correct. This is caused by how the tracks are recorded. “MISWIRING CHECK WIRING THEN POWER ON” appears. Turn the power off, then check to be sure the terminals of the speaker wires are insulated properly. Turn the power on again. “LOADING” appears when you enter search mode by pressing .
TROUBLESHOOTING • The source does not change to “USB” when you connect a USB device while listening to another source. • “USB ERROR” appears. The USB port is drawing more power than the design limit. Turn the power off and unplug the USB device. Then, turn on the power and reattach the USB device. If this does not solve the problem, turn the power off and on (or reset the unit) before replacing with another USB device. “NO MUSIC” “iPod ERROR” ANDROID Cannot playback at [BROWSE MODE].
TROUBLESHOOTING Symptom Symptom Remedy USB is disconnected from the head unit. Please make sure the device is connected properly through USB. No Bluetooth device is detected. • Search from the Bluetooth device again. • Reset the unit. ( 3) “CONNECTING” • Connected via USB input terminal: The device is connecting to the head unit. Please wait. • Connected via Bluetooth: The Bluetooth is disconnected. Please check Bluetooth connection and make sure both the device and the unit are paired and connected.
TROUBLESHOOTING Bluetooth® Symptom Remedy “DEVICE FULL” The number of registered devices has reached its limit. Retry after deleting an unnecessary device. ( 25, DEVICE DELETE) “N/A VOICE TAG” Make sure the same voice as the registered voice tag is used. “NOT SUPPORT” The connected phone does not support Voice Recognition feature or phonebook transfer. “NO ENTRY”/“NO PAIR” There is no registered device connected/found via Bluetooth. “ERROR” Try the operation again.
REFERENCES Playable files • Playable audio file: For disc: MP3 (.mp3), WMA (.wma), AAC (.aac) For USB mass storage class device: MP3 (.mp3), WMA (.wma), AAC (.aac), AAC (.m4a), WAV (.wav), FLAC (.flac) • Playable disc media: CD-R/CD-RW/CD-ROM • Playable disc file format: ISO 9660 Level 1/2, Joliet, Long file name.
REFERENCES About Bluetooth • Depending on the Bluetooth version of the device, some Bluetooth devices may not be able to connect to this unit. • This unit may not work with some Bluetooth devices. • Signal conditions vary, depending on the surroundings. • / / : Compatible remote device for NFC function: Remote devices with a NFC function (OS: Android™ 2.3.3 or later, excluding Android 3.x). If the OS version of your remote device is older than Android 4.1.
INSTALLATION/CONNECTION REFERENCES Source name Warning Display information iPod 1/iPod 2/iPod USB/ iPod BT or ANDROID 1/ ANDROID 2/ANDROID When [MODE OFF]/[BROWSE MODE] is selected ( 11): Song title (Artist) Song title (Album name) Song title (Date)* Playing time (Date)* (back to the beginning) PANDORA 1/ PANDORA 2/PANDORA/ PANDORA BT Station name (Date)* Shared/Radio station (Date)* Song title (Artist) Song title (Album title) Song title (Date)* Playing time (Date)* (back to the beginning) IHEARTRA
INSTALLATION/CONNECTION Part list for installation (A) Faceplate Installing the unit (in-dash mounting) (B) Trim plate Do the required wiring. ( 41) Hook on the top side (C) Mounting sleeve (D) Wiring harness (E) Extraction key (F) Screws (supplied for / Orientate the trim plate as illustrated before fitting. Bend the appropriate tabs to hold the mounting sleeve firmly in place.
INSTALLATION/CONNECTION Wiring connection IMPORTANT : We recommend installing the unit with a commercially available custom wiring harness specific for your car and leave this job to professionals for your safety. Consult your car audio dealer. Antenna terminal When connecting to an external amplifier, connect its ground wire to the car’s chassis to avoid damaging the unit. Fuse (10 A) White To front speaker (left) If no connections are made, do not let the wire come out from the tab.
INSTALLATION/CONNECTION Connecting external components MIC (Microphone input terminal) ( 20) (For ) To Kenwood Marine Remote Control unit, KCA-RC55MR (optional accessory) ( 6) Output terminals Expansion port (12 V 500 mA) To the optional SiriusXM Vehicle Tuner (commercially available) ( 17) 42 (For / USB 2 cable (DC 5 V / 1.5 A) USB 1 cable (DC 5 V 1.5 A) ) Auxiliary cable ENGLISH JS_KWD_KDC_X702_KN_EN_9.
SPECIFICATIONS 87.9 MHz — 107.9 MHz (200 kHz space) Laser Diode GaAIAs Usable Sensitivity 7.2 dBf (0.63 μV/75 Ω) (S/N = 30 dB, Dev 22.5 kHz) Digital Filter (D/A) 8 times over sampling Spindle Speed 500 rpm — 200 rpm (CLV) Wow & Flutter Below measurable limit Frequency Response (±1 dB) 20 Hz — 20 kHz Total Harmonic Distortion (1 kHz) 0.01 % Quieting Sensitivity 15.2 dBf (1.
44 Preout Level/Load (CD) Frequency Range 2.402 GHz — 2.480 GHz Output Power +4 dBm (MAX), 0 dBm (AVE) Power Class 2 Maximum Communication Range Line of sight approx. 10 m (32.8 ft) Profile HFP 1.6 (Hands-Free Profile) A2DP (Advanced Audio Distribution Profile) AVRCP 1.
SPECIFICATIONS • Microsoft and Windows Media are either registered trademarks or trademarks of Microsoft Corporation in the United States and/or other countries. • HD Radio Technology manufactured under license from iBiquity Digital Corporation. U.S. and Foreign Patents. For patents see http://dts.com/patents. HD Radio™ and the HD, HD Radio, and “ARC” logos are registered trademarks or trademarks of iBiquity Digital Corporation in the United States and/or other countries.
H?) RadioQD This HD Radio receiver enables: HD2/HD3) Dig;tal Sound) w iHeart RADIO (((Siriusxm,>) READY pandora® Oualcomm· aptX"' GspotifY" m Ill Program Info) • • Designed for Emergency Alerts) •• TM JS_KWD_KDC_X702_KN_C_9.