DDX6033BT DDX6033BTM DDX6033 DDX4033BT DDX4033BTM DDX4033 DDX4033M MONITOR WITH DVD RECEIVER INSTRUCTION MANUAL This instruction manual is used to describe models listed below. Model availability and features (functions) may differ depending on the country and sales area. • Region 2 (DVD Region Code 2 area) • Region 3 (DVD Region Code 3 area) • Region 4 (DVD Region Code 4 area) © 2012 JVC KENWOOD Corporation EN_GET0908-001A_MX.
Contents Before use ..........................................3 Sound adjustment.......................... 40 How to reset your unit .............................................3 Using the sound equalization .........................40 Adjusting the crossover frequency ...............41 INTRODUCTIONS Initial Settings ...................................5 Initial setup ......................................................................5 Updating the system..............................................
Before use WARNINGS: (To prevent accidents and damage) • DO NOT install any unit or wire any cable in a location where; – it may obstruct the steering wheel and gearshift lever operations. – it may obstruct the operation of safety devices such as air bags. – it may obstruct visibility. • DO NOT operate the unit while driving. If you need to operate the unit while driving, be sure to look around carefully. • The driver must not watch the monitor while driving.
The marking of products using lasers For Turkey Bu ürün 28300 sayılı Resmi Gazete’de yayımlanan Atik Elektrikli ve Elektronik Eşyalarin Kontrolü Yönetmeliğe uygun olarak üretilmiştir. The label is attached to the chassis/case and says that the component uses laser beams that have been classified as Class 1. It means that the unit is utilizing laser beams that are of a weaker class. There is no danger of hazardous radiation outside the unit.
INTRODUCTIONS Initial Settings Initial setup When you power on the unit for the first time or reset the unit, the initial setting screen appears. • You can also change the settings on the screen. (☞ page 48) 1 For DDX6033BT/DDX6033BTM/ DDX6033: *1 For DDX4033BT/DDX4033BTM/ DDX4033/DDX4033M: Language Select the text language used for on-screen information.
Updating the system 3 You can update the system by connecting a USB device containing the update file. 1 Create an update file, copy it to a USB device, and connect it to the unit. To connect a USB device, ☞ page 80. 2 On : 4 Application Version DVD Version Updates the System application. Updates the DVD System application. It may take a while. If the update has been complete successfully, “Update Completed” appears. Reset the unit.
Setting the security function You can set a security code to protect your receiver system against theft. Registering the security code 2 Enter a four-digit number (1), then confirm the entry (2). Deletes the last entry 1 Display the security code setting screen. On : Cancels the setting 3 Repeat step 2 to confirm your security code. Now, your security code is registered. • When the unit is being reset or disconnected from battery, you are required to enter the security code.
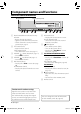
Component names and functions DDX6033BT/DDX6033BTM/DDX6033 Monitor panel Screen (Touch panel) 1 Reset button/Power indicator/Security indicator • Resets the unit. (☞ page 3) • Lights up while the unit is turned on. • Flashes when the security function is activated. (☞ page 7) 2 ATT button (Press) • Attenuates the sound. V.OFF button (Hold) • Turns off/on the screen. (☞ page 12) 3 VOLUME (down) button (☞ page 11) • Decreases the volume. 4 VOLUME (up) button (☞ page 11) • Increases the volume.
DDX4033BT/DDX4033BTM/DDX4033/DDX4033M Screen (Touch panel) Monitor panel 1 Loading slot 2 0 (Eject) button • Ejects the disc. 3 Reset button/Power indicator/Security indicator • Resets the unit. (☞ page 3) • Lights up while the unit is turned on. • Flashes when the security function is activated. (☞ page 7) 4 Remote sensor 5 MENU button • Turns off the power. (Hold) • Turns on the power. (Press) • Displays the screen. (Press) (☞ page 13) 6 AV/AV OUT button • Displays the current source screen.
Setting the clock 1 Display the 4 Set the clock time. screen. On the source control screen: NAV *1 Radio Data System *2 2 Display the screen. OFF Synchronizes the clock time with the connected navigation unit. Synchronizes the clock time with FM Radio Data System. Sets the clock manually. (☞ below) When selecting : 3 Display the screen. 1 Adjust the hour 2 Adjust the minute [Reset]: Sets the minute to “00.
Common operations Turning on the power Adjusting the volume DDX6033BT/DDX6033BTM/ DDX6033 To adjust the volume (00 to 35) DDX6033BT/DDX6033BTM/DDX6033 DDX4033BT/DDX4033BTM/ DDX4033/DDX4033M Decrease Increase DDX4033BT/DDX4033BTM/DDX4033/ DDX4033M Turning off the power Increase DDX6033BT/ DDX6033BTM/DDX6033 (Hold) Decrease DDX4033BT/ DDX4033BTM/DDX4033/ DDX4033M (Hold) Adjusting the panel angle (Only for DDX6033BT/DDX6033BTM/ DDX6033) You can change the panel angle. 1 Select an angle (0 – 6).
Putting the unit in standby 1 Turning off the screen DDX6033BT/ DDX6033BTM/DDX6033 (Hold) DDX4033BT/ DDX4033BTM*1 (Hold) DDX4033/DDX4033M*2 2 (Hold) The screen is turned off. To turn on the screen, press MENU. • You can also turn on the screen by touching the display. *1 This operation works only when is set to [V-OFF]. (☞ page 51) *2 This operation works only when is set to [V-OFF]. (☞ page 51) 12 English EN_GET0908-001A_MX.
Switching screens Source control screen • Pressing MENU on the monitor panel also displays . *1 Appears only when a navigation unit is connected. Displays the navigation screen. *1 (☞ page 39) • Changes the AV source. • Displays the screen. Changes the detailed settings. ☞ page 15 • You can arrange the items to display on the screen on
AV SOURCE OPERATIONS Selecting the playback source • To display all sources and items, ☞ page 15. • You can change the items (other than [SETUP]) to display on the screen. (☞ page 15) NAV*1*2 (☞ page 39) Displays the navigation screen when a navigation unit is connected. MirrorLink*2*3(☞ page 28) Displays your smartphone screen on the touch panel. Plays a disc. DISC (☞ page 16) Switches to the radio broadcast. TUNER (☞ page 30) Plays an iPod/iPhone.
Displaying all sources and items On : Customizing the screen You can arrange the items to display on the screen. 1 DDX6033BT (Region 3)/DDX6033BTM/ DDX4033BT (Region 3)/DDX4033BTM DDX6033/DDX4033 (Region 3)/ DDX4033M On : 2 3 Select the position to place the icon (1), then select the item you want to display on the selected position (2). DDX6033BT (Region 4)/DDX4033BT (Region 4) 4 Repeat step 3 to place icons for other items.
Disc operations Playing a disc • If a disc does not have a disc menu, all tracks on it will be played repeatedly until you change the source or eject the disc. Inserting a disc DDX6033BT/DDX6033BTM/DDX6033 Label side DDX4033BT/DDX4033BTM/DDX4033/ DDX4033M Label side Ejecting a disc DDX6033BT/DDX6033BTM/DDX6033 DDX4033BT/DDX4033BTM/DDX4033/ DDX4033M • You can eject a disc when playing another AV source.
Playable disc types Disc type Recording format, file type, etc.
Playback operations To display the source control screen, ☞ page 14. For DVD/DVD-VR/VCD/DivX/MPEG1/MPEG2/JPEG Media type Playing time • DVD Video: Title no./Chapter no. • DVD-VR: Program no. (or Playlist no.)/Chapter no.*1 • DivX/MPEG1/MPEG2: Folder no./ Track no. • JPEG: Folder no./File no. • VCD: Track no. ☞ page 39 File type (for DivX/MPEG1/MPEG2/JPEG) Playback mode [ ] [ ]*2 [3 8] [7]*3 [4] [¢] Selects playback mode. (☞ page 21) Starts/pauses playback. Stops playback. • Selects a chapter/track.
For CD/MP3/WMA/WAV/AAC While playing, the jacket picture is shown if the file has the tag data including the jacket picture. Media type • MP3/WMA/WAV/AAC: Folder no./Track no. • CD: Track no. Playback status (3: play / 8: pause ) Playing time Track/file information • Pressing [<] scrolls the text if not all of the text is shown. ☞ page 39 File type Playback mode [ ][ [ ] *1 ] [3 8] [ ] [ ]*1 Selects playback mode. (☞ page 21) Displays the folder/track list. (☞ below) Starts/pauses playback.
Video menu operations You can display the video menu screen during video playback. • Available items on the screen differ depending on the types of the loaded disc and playback files. • The operation buttons disappear by touching the screen or when no operation is done for about 5 seconds. ZOOM Aspect Picture Adjust Audio Subtitle Angle MENU T MENU Highlight CUR • The screen for MPEG1/MPEG2 differs from the above. 20 Displays the picture size selecting screen. (☞ page 45) Selects the aspect ratio.
Only for VCD 1 • To deactivate the PBC function, press [7] then the direct selecting buttons to select a track number. Selecting playback mode For DVD/DVD-VR Selects Repeat playback mode For VCD (without PBC)/CD/DivX/MPEG1/ MPEG2/MP3/WMA/WAV/AAC 2 Selects Repeat playback mode* Selects Random playback mode* Direct selecting buttons (☞ below) ZOOM Aspect Picture Adjust MENU Audio Direct Return Displays the picture size selecting screen. (☞ page 45) Selects the aspect ratio.
settings Selectable setting/item Initial: Underlined Menu Language Select the initial disc menu language; Initial English (☞ page 71). Subtitle Language Select the initial subtitle language or erase the subtitle (OFF); Initial English (☞ page 71). Audio Language Select the initial audio language; Initial English (☞ page 71). Down Mix When playing back a multi-channel disc, this setting affects the signals reproduced through the front and/or rear speakers.
USB operations Playing a USB device • This unit can play JPEG/DivX/MPEG1/ MPEG2/MP3/WMA/WAV/AAC files stored in a USB mass storage class device. • This unit can recognize a total of 5 000 files and 250 folders (a maximum of 999 files per folder). • Make sure all important data has been backed up to avoid losing the data. Connecting a USB device You can connect a USB mass storage class device such as a USB memory, Digital Audio Player etc. to the unit.
• To display the source control screen, ☞ page 14. • To change settings for video playback, ☞ page 20. • DivX/MPEG1/MPEG2/MP3/WMA/WAV/AAC: Folder no./Track no. • JPEG: Folder no./File no. Playback status (3: play / 8: pause ) Playing time Only for MP3/WMA/ WAV/AAC: While playing, the jacket picture is shown if the file has the tag data including the jacket picture. Track/file information (for MP3/WMA/WAV/ AAC) • Pressing [<] scrolls the text if not all of the text is shown.
Listening to the iPod/iPhone device Preparation • Connect iPod/iPhone. (☞ page 80) – When connecting iPhone/iPod touch, turn off App beforehand; otherwise the playback may not be started after connection.
iPod/iPhone playback operations from the unit • To display the source control screen, ☞ page 14. • To change settings for video playback, ☞ page 20. Current track number/total track number While playing, Artwork (the picture displayed on the screen of iPod/iPhone) is shown if the song contains the Artwork.*1 Playback status (3: play / 8: pause ) ☞ page 39 Playback mode [MODE] Enter the [ ] settings. (☞ page 25) [38] Starts/pauses playback. [4] [¢] Selects Repeat playback [ ] mode.
Selecting an audio/video file from the menu Controlling playback from the iPod/iPhone You can play back the audio/video files or use App by operating iPod/iPhone itself instead of the unit. 1 2 Select the menu (audio or video) (1), a category (2), then a desired item (3). • Select the item in the selected layer until a desired file starts playing.
Using the smartphone — MirrorLink (Only for DDX6033BT/DDX6033BTM/ DDX4033BT/DDX4033BTM) You can connect the SMARTPHONE ADAPTER unit (KCA-ML100: optional accessory) to the NAV I/F input terminal, and a smartphone (not supplied) to the SMARTPHONE ADAPTER unit so that you can view the smartphone screen. (☞ page 81) This product offers the “MirrorLink” function that virtually “mirrors” applications on your smartphone screen directly on the touch panel screen.
Updating the firmware 5 Place the SD cover over the slot. Check the firmware version, and if necessary, update the firmware. (You do not need to connect your smartphone.) • Do not turn off the power during update. 6 Press the reset button of the 1 Visit the website (http:// 7 2 kenwood.com/cs/ce/), download the update data, and save it to the root folder of an SD or SDHC card. Use a ball-point pen or the like to remove the SD cover.
Listening to the radio Band no./preset no./the station frequency currently tuned in Text information • Pressing [<] scrolls the text if not all of the text is shown. Standby reception indicators (☞ page 33) ☞ page 39 RDS indicator ST/MONO indicator LO.S indicator (☞ page 31) AF indicator (☞ page 34) Seek mode indicator EON indicator: Lights up when a Radio Data System station is sending EON signals. • The ST indicator lights up when receiving an FM stereo broadcast with sufficient signal strength.
Changing the display information • This feature is available only for Region 2/3 models. Setting the antenna control • This feature is available only for Region 2/3 models. You can store the antenna automatically when the source is changed from the tuner to another. • The antenna is extended regardless of the setting when the source is the tuner.
Storing stations in memory You can preset six stations for each band. The following features are available only for FM Radio Data System stations. Automatic presetting—AME (Auto Memory) Searching for FM Radio Data System program—PTY Search 1 • This feature is available only for Region 2/3 models. You can search for your favorite programs being broadcast by selecting the PTY code. 2 1 (Hold) Local stations with the strongest signals are searched and stored automatically.
Activating/deactivating TI/News Standby Reception • This feature is available only for Region 2/3 models. TI Standby Reception News Standby Reception 1 TI indicator NEWS indicator TI indicator TI Standby Reception Lights in white The unit will temporarily switch to Traffic Information (TI) if available. Lights in orange Not yet activated. Tune in to another station providing the Radio Data System signals. Goes off Deactivated.
Tracing the same program— Network-Tracking Reception • This feature is available only for Region 2/3 models. When driving in an area where FM reception is not sufficient enough, this unit automatically tunes in to another FM Radio Data System station of the same network, possibly broadcasting the same program with stronger signals. When shipped from the factory, NetworkTracking Reception is activated. Automatic TI station seek— Auto TP Seek • This feature is available only for Region 2/3 models.
Pandora® operations (Only for DDX6033BT (Region 4)/DDX4033BT (Region 4)/DDX4033 (Region 4)) Pandora application requires a data connection on your smartphone with service currently available in Australia and New Zealand. • You can operate Pandora using the remote controller. Only playing, pausing, and skipping are available. • Install the latest version of the Pandora application on your iPhone/iPod touch/Android/ BlackBerry.
Selecting a device to connect for Pandora reception (Only for DDX6033BT (Region4)/DDX4033BT (Region 4)) 3 Select a station from the list. On the Station List: You can connect the device for Pandora reception either with Bluetooth connection or wired connection. Select the connecting method. • For Bluetooth connection, ☞ page 54. • For wired connection, ☞ page 80. Shuffle Plays all the songs in the registered stations randomly. By Date Sorts the list in reverse chronological order.
Requirements for Pandora® iPhone or iPod touch • Use an Apple iPhone or iPod touch running under iOS3 or later. • Install the latest version of the Pandora application on your iPhone or iPod touch. (Search for “Pandora” in the Apple iTunes App Store to find and install the most current version.) • Connect iPhone/iPod touch to this unit with a KCA-iP202. Android™ • Visit the Google play and search for Pandora to install. • Bluetooth must be built in and the following profiles must be supported.
Using other external components AV-IN To display the source control screen, ☞ page 14. AV-IN name ( ☞ below) ☞ page 39 [MODE] [MENU] Changes the AV-IN name. • Press [2] or [3] to select an AV-IN name. • This setting does not affect the source name “AV-IN 1”/ “AV-IN 2” displayed on . Displays the screen. You can connects external components to the AV-IN1 and iPod/AV-IN2 input terminals. Preparation: If you want to use “AV-IN2”, select [AV-IN2] for setting.
Using the external navigation unit You can connect a navigation unit (KNA-G630/KNA-G630CN: optional accessory) to the navigation input terminal so that you can view the navigation screen. (☞ page 81) The navigation guidance comes out of the front speakers even when you listen to an audio source. Preparation: Select
Sound adjustment Using the sound equalization • The adjustment is memorized for each source until you adjust the sound again. If the source is a disc, the adjustment is stored for each of the following categories. – DVD/DVD-VR/VCD – CD – DivX/MPEG1/MPEG2/MP3/WMA/WAV/AAC • You cannot adjust the sound when the unit is in standby. Selecting a preset sound mode 1 2 Set to [OFF] (1), then press [Tone] (2). On : 2 3 Adjust the level of each band 3 Select a sound mode.
Adjusting the sound precisely 1 Perform steps 1 and 2 of “Selecting a preset sound mode,” then... Adjusting the crossover frequency 1 On : 2 2 3 Adjust the sound of each band. Selects the band Flat Changes level of Bass/ Middle/Treble to 0. Frequency Selects frequency. Level Adjusts level. Q Factor Adjusts the width of the frequency. Bass EXT Activates/deactivates bass. SW Level Adjusts subwoofer level.* The adjustments are stored and is activated.
Changing the display design You can change the background and panel color. 1 To select a panel color On : Variable color illumination • Illumination color changes gradually. 2 For making your own color adjustment, ☞ below Making your own color adjustment • You can make your own color adjustment only when is selected. 3 Select an item to change 1 ([Background] or [Panel Color]). 4 Select a background/panel 2 color.
Using your favorite scene as the background While playing a video or JPEG, you can capture an image and use the captured image as a background. • You cannot capture copyrighted content and images from iPod/iPhone, or videos/ JPEG from smartphone. • When using a JPEG file as the background, make sure that the resolution is 800 x 600 pixels. • The color of the captured image may look different from that of the actual scene. 1 Play a video or JPEG. 2 Display the screen.
Setting for video playback You can change the setting for video playback. Picture adjustment You can adjust the picture quality. 1 Display the adjustment menu. 3 Adjust the picture (–15 to +15). Adjusts the brightness Adjusts the contrast Adjusts the blackness Adjusts the color Adjusts the tint* Adjusts the sharpness * Adjustable only when the incoming signal is NTSC. 2 Select [DIM ON] (dimmer on) or [DIM OFF] (dimmer off). 44 English EN_GET0908-001A_MX.
Changing the aspect ratio You can change the aspect ratio for video playback. 1 Zooming picture You can zoom the picture ( to ). • When is set to or (☞ the left column), the picture is zoomed with the aspect ratio of the setting. 1 2 2 4:3 signal 16:9 signal FULL*: For 16:9 original pictures JUST: For 4:3LB original pictures [5] [∞] [2] [3] : Moves the zooming frame.
Using a rear view camera • To use a rear view camera, the REVERSE lead connection is required. For connecting a rear view camera, ☞ page 81. 1 Activating the rear view camera To display the picture from the rear view camera manually On : DDX6033BT/ DDX6033BTM/DDX6033 (Hold) DDX4033BT/ DDX4033BTM*1 DDX4033/ DDX4033M*2 2 (Hold) To deactivate, select [OFF]. Displaying the picture from the rear view camera The rear view screen is displayed when you shift the gear to the reverse (R) position.
Using the steering remote controller You can assign the functions to the keys of the remote controller on the steering wheel. • This function is available only when your vehicle is equipped with the electrical steering remote controller. • You can only register/change the functions while you are parked. • If your steering remote controller is not compliant, learning may not be completed and an error massage may appear.
Setting menu items • You cannot change
Menu item Dimmer Selectable setting/item ♦ Auto ♦ ON ♦ OFF ♦ NAV : Dims the screen and button illumination when you turn on the headlights. • The ILLUMI lead connection is required. (☞ page 79) : Activates dimmer. : Cancels. : Activates or deactivates dimmer according to the day/night display setting of the connected navigation unit. User Customize Change the display design (background and panel color).
Menu item Selectable setting/item Initial: Underlined AV Input You can determine the use of the iPod/AV-IN2 input terminal. : Select to play an AV component connected ♦ AV-IN2 to the iPod/AV-IN2 input terminal. : Select when connecting the iPod/iPhone ♦ iPod using the USB Audio and Video cable for iPod/iPhone. (☞ page 80) R-CAM Interrupt ♦ ON NAV I/F Input *1 Only for DDX6033BT/ DDX6033BTM/ DDX4033BT/ DDX4033BTM ♦ NAV ♦ MirrorLink : Enables to select “NAV” as the source.
System Menu item Selectable setting/item Initial: Underlined Clock Adjust the clock time. (☞ page 10) Beep ♦ ON ♦ OFF : Activates the key-touch tone. : Cancels. Remote Sensor ♦ ON ♦ OFF : Activates the remote sensor. : Cancels. SETUP Memory You can memorize, recall, clear, or lock the settings you have made. (☞ page 52) Bluetooth Setup Only for DDX6033BT/ DDX6033BTM/ DDX4033BT/ DDX4033BTM Configures settings for using a Bluetooth device, such as connection and other general operations.
Memorizing/recalling the settings You can memorize the settings changed in the menu and recall the memorized settings anytime. • The memorized settings are kept even when the unit is reset. 1 Locking the settings You can lock the settings to prevent them from being changed. • is shown beside the settings that can be locked. 1 On : On : 2 2 To unlock the setting, press [Unlock]. Adjusting the touch position • To cancel, press [No]. 3 Select an operation.
BLUETOOTH OPERATIONS (Only for DDX6033BT/DDX6033BTM/DDX4033BT/DDX4033BTM) Information for using Bluetooth® devices • While driving, do not perform complicated operations such as dialing the numbers, using phonebook, etc. When you perform these operations, stop your car in a safe place. • Some Bluetooth devices may not be connected to this unit depending on the Bluetooth version of the device. • This unit may not work for some Bluetooth devices.
Connecting Bluetooth devices Registering a new Bluetooth device When you connect a Bluetooth device to the unit for the first time, make pairing between the unit and the device for registration. Pairing allows Bluetooth devices to communicate each other. • The pairing method differs depending on the Bluetooth version of the device. – For the device with Bluetooth 2.1: You can pair the device and the unit using SSP (Secure Simple Pairing) which only requests confirmation. – For the device with Bluetooth 2.
Deleting a registered Bluetooth device 4 Operate the Bluetooth device to complete pairing. When pairing is complete, the device is listed on . To use the paired device, connect the device on (☞ below). 1 Display the screen. (☞ page 54) 2 Connecting a registered Bluetooth device 1 Display the screen. (☞ page 54) 3 Select a device to delete (1), then delete the registration (2).
Setting up Bluetooth You can perform general operations such as connection and initialization through on the menu. Displaying the screen 1 3 On : 2 menu items Menu items Selectable setting/item Initial: Underlined Paired Device List Press [Enter] to show the list of the registered devices. You can connect the device or delete the registration (☞ page 55). PIN Code Changes the PIN code of the unit.
Using the Bluetooth mobile phone Receiving a call Adjusting the volume of microphone When a call comes in... Rejects the call Call information (if acquired) • Phone operation is not available while the picture from the rear view camera is displayed. (☞ page 46) When is set to [On] The unit answers the incoming call automatically. (☞ page 62) Ending a call While talking... While talking... • This adjustment does not affect the volume level of the other sources.
Adjusting the echo cancel level Direct number entry Deletes last entry While talking... 1 Making a call Hold: Adds “+” Presets the entered phone number on the preset list (☞ page 60) On : • You can enter up to 32 numbers. Voice dialing • Available only when the connected mobile phone has the voice recognition system. 2 Select a method to make a call.
Using the phonebook/call lists 1 2 Select the initial. • If the initial is not a letter or number, press [Others]. Outgoing From dialled call list. Incoming Missed Phonebook From received call list. From missed call list. From phonebook. • For copying the phonebook, ☞ page 60. 3 Select a phone number from the list. To display the details of an entry When is selected... 1 Display the details of the desired entry. 2 2 Select a phone number to call.
Presetting the phone numbers You can preset up to 6 phone numbers. 1 On : Copying the phonebook You can copy the phonebook memory of a mobile phone into the unit (up to 400 entries). 1 2 Select an item from phonebook/call lists. On : 2 3 3 Select a phone number. (Hold) PIN code (initial: 0000) 4 Select a preset number to store into. Numbers of the phonebook entries copied • You can also preset the phone number entered on screen by pressing [Preset].
Deleting the phone number entries in the unit 1 Display the phonebook/call list you want to delete. (☞ page 59) 2 About mobile phones compatible with Phone Book Access Profile (PBAP) If your mobile phone supports PBAP, you can display the phonebook and call lists on the touch panel screen when the mobile phone is connected.
Settings for Bluetooth mobile phone 1 3 On : 2 Menu items Selectable setting/item Phone Device Shows the connected phone device name. Auto Response ♦ ON ♦ OFF SMS Notify ♦ ON ♦ OFF Initial: Underlined : The unit answers the incoming calls automatically in 5 seconds. : The unit does not answer the calls automatically. Answer the calls manually. : The unit informs you of the arrival of a message by ringing and displaying “Receiving Message.
Using the Bluetooth audio player • To register a new device, ☞ page 54. • To connect/disconnect a device, ☞ page 55. Playback status * (3: play / 8: pause) Playing time * Tag data (current track title/ artist name/album title) * • Pressing [<] scrolls the text if not all of the text is shown. ☞ page 39 • The operation buttons, indications and information displayed on the screen differ depending on the connected device. [3] [8] [4][¢] [MENU] Starts playback. Pauses. • Selects a track.
USING THE REMOTE CONTROLLER Overview DDX6033BT (Region 3)/DDX6033BTM/DDX6033 (Region 3)/DDX4033BT (Region 3)/ DDX4033BTM/DDX4033 (Region 3)/DDX4033M: This unit can be operated using the Remote Controller (RC-DV340) supplied with this unit. DDX6033BT (Region 4)/DDX4033BT (Region 4)/DDX4033 (Region 4): Optional Remote Controller KNA-RCDV331 is designed for controlling this unit. Refer to the instruction manual that comes with the remote controller.
Operations from the remote controller Common operations (AUD mode) Source switching Switches to the source to be played. Hangs up the incoming/current call. ENTER Enters options. Hands-free communication When a call comes in, it answers the call. Volume control Adjusts the volume. Function Switches the control screen. Volume attenuating Press the key once to lower the volume. Press again to restore the previous volume. NAV/V.SEL Switches to the navigation screen.
DVD/VCD (DVD mode) Track search and file search Selects the track or file to be played. VCD 1.X, VCD 2.X (PBC OFF) Track number Cancel VCD 2.X (PBC ON) Track number Cancel Play/Pause Pauses the track. Press again to resume playing. Once you have switched to the direct search feature, specify the search number from the numeric keypad, and then press [ENTER] key. Numeric keypad Stop Memorizes the last point where the disc stopped. • Specify the number to search in direct search.
SUBTITLE Switches the subtitle language. ZOOM Switches the zoom ratio each time you press this key. Track search and file search Selects the track or file to be played. Play/Pause Pauses the track. Press again to resume playing. Direct search Picture Angle Switches the picture angle each time you press this key. Pressing this key switches the features that can be searched directly. Music Disc AUDIO Switches the voice language each time you press this key.
Radio (AUD mode) Band switching Switches to bands received by the unit. • To use preset tuning, press the number of a programmed broadcast station. ( 1 – 6 ) • Press the direct tuning key first, then specify the frequency of the station to receive. MNO iPod (AUD mode) Station selection Switches to broadcast stations received by the unit. Music/Video search Selects the music/video to be played. Seek mode switching Switches the Seek mode (AUTO1, AUTO2, MANU). Play/Pause Pauses the music/video.
REFERENCE Maintenance Caution on cleaning the unit Do not use any solvent (for example, thinner, benzine, etc.), detergent, or insecticide. This may damage the monitor or the unit. Recommended cleaning method: Gently wipe the panel with a soft, dry cloth. Moisture condensation Moisture may condense on the lens inside the unit in the following cases: • After starting the heater in the car. • If it becomes very humid inside the car. Should this occur, the unit may malfunction.
More about this unit File playback Playing DivX files • This unit can play back DivX files with the extension code <.divx>, <.div>, or <.avi> (regardless of the letter case—upper/ lower). • Audio stream should conform to MP3 or Dolby Digital. • The file encoded in the interlaced scanning mode may not be played back correctly. Playing MPEG1/MPEG2 files • This unit can play back MPEG1/MPEG2 files with the extension code <.mpg>, <.mpeg>, or <.mod>.
Sound signals emitted through the rear terminals Through the analog terminals (Speaker out/Front Preout/Rear Preout) 2-channel signal is emitted. When playing multi-channel encoded disc, multi-channel signals are downmixed.
Troubleshooting What appears to be trouble is not always serious. Check the following points before calling a service center. • For operations with the external components, refer also to the instructions supplied with the adapters used for the connections (as well as the instructions supplied with the external components). If the following messages appear General Message “No Signal” Remedy/Cause • Start the playback on the external component connected to AV-IN1 or iPod/AV-IN2 input terminal.
Pandora (Only for DDX6033BT/DDX4033BT/DDX4033) Message “Check Device” Remedy/Cause “Cannot Skip” • Pandora application on your iPhone/iPod touch/smartphone is not started up. • Pandora application is not installed in the connected device. • Error occurs on the Pandora application. • You have not been signed in the Pandora. The version of the Pandora application on your iPhone/iPod touch/ smartphone is not the latest. Update the version of your Pandora application. No more songs can be skipped.
If there seems to be a problem AV-IN1/ AV-IN2 DivX/MPEG1/MPEG2/ JPEG/MP3/WMA/WAV/AAC Disc in general TUNER General Symptom Remedy/Cause No sound comes out of the speakers. • Adjust the volume to the optimum level. • Check the cords and connections. No picture is displayed on the screen. Turn on the screen. (☞ page 12) The unit does not work at all. Reset the unit. (☞ page 3) The remote controller* does not work. Replace the battery. AME automatic presetting does not work.
USB iPod/iPhone Symptom Remedy/Cause No sound comes out of the speakers. • Disconnect the iPod/iPhone, then connect it again. • Select another source and then reselect “iPod”. The iPod/iPhone does not turn on or does not work. • • • • Sound is distorted. Deactivate the equalizer either on this unit or the iPod/iPhone. A lot of noise is generated. Turn off (uncheck) the “VoiceOver” feature of the iPod. For details, visit .
Bluetooth (only for DDX6033BT/DDX6033BTM/ DDX4033BT/DDX4033BTM) Symptom Remedy/Cause Phone sound quality is poor. • Reduce the distance between the unit and the Bluetooth mobile phone. • Move the car to place where you can get a better signal reception. The sound is interrupted or skipped while using a Bluetooth audio player. • Reduce the distance between the unit and the Bluetooth audio player. • Disconnect the device connected for Bluetooth phone. • Turn off, then turn on the unit.
Accessories/Installation Procedure Accessories 1 WARNING 5 ..........1 2 ..........6 6* 2 • If you connect the ignition wire (red) and the battery wire (yellow) to the car chassis (ground), you may cause a short circuit, that in turn may start a fire. Always connect those wires to the power source running through the fuse box. • Do not cut out the fuse from the ignition wire (red) and the battery wire (yellow). The power supply must be connected to the wires via the fuse. ¤ ..........1 (2m) 3 *1 ...
• Insulate unconnected wires with vinyl tape or other similar material. To prevent a short circuit, do not remove the caps on the ends of the unconnected wires or the terminals. • Connect the speaker wires correctly to the terminals to which they correspond. The unit may be damaged or fail to work if you share the · wires or ground them to any metal part in the car.
Connecting Wires to Terminals Extension cable (Accessory 7) Bluetooth Microphone (Accessory 6) DDX6033BT/ DDX6033BTM/DDX4033BT/ DDX4033BTM only Connect to vehicle's steering remote harness. Contact your Kenwood dealer for details. Subwoofer Preout (monaural) Purple/White (Reverse sensor wire) Connect to vehicle's reverse lamp harness when using the optional rear view camera.
Connecting a USB device/iPod/iPhone For DDX6033BT/DDX6033BTM/DDX6033 iPod (commercially available) USB device (commercially available) CA-U1EX* (Optional Accessory) USB terminal (0.8 m) KCA-iP202 (Optional Accessory) (1.8 m) iPod/Audio Visual input 2 (iPod/AV-IN2) (iPod/AV Input 2 switchable) * Use CA-U1EX for extending the cable if necessary.
Connecting Other Products Navigation System (Optional Accessory) ⁄ Navigation units that can be connected to this unit (as of December, 2012): • KNA-G630 • KNA-G630CN For latest information, access the www.kenwood.com/cs/ce/. Rear View Camera Input • Visual input (Yellow) Audio/Visual Output • Visual output (Yellow) • Audio output (3.
Installing the Unit For Volkswagen 1 Attach accessory 3 to the unit. Accessory 3 ⁄ • Make sure that the unit is installed securely in place. If the unit is unstable, it may malfunction (eg, the sound may skip). Installing the Microphone Unit (DDX6033BT/ DDX6033BTM/DDX4033BT/ DDX4033BTM only) 1 Check the installation position of the microphone (accessory 6). 2 Remove oil and other dirt from the installation surface. 3 Install the microphone.
Specifications Monitor section Picture Size : 6.95 inches (diagonal) wide 156.6 mm (W) × 81.6 mm (H) (DDX6033BT/DDX6033BTM/DDX6033) : 6.1 inches (diagonal) wide 136.2 mm (W) × 72 mm (H) (DDX4033BT/DDX4033BTM/DDX4033/ DDX4033M) Display System : Transparent TN LCD panel Drive System : TFT active matrix system Number of Pixels : 1,152,000 (800H × 480V × RGB) Effective Pixels : 99.
FM tuner section Frequency Range 200 kHz: 87.9 MHz – 107.9 MHz (Region 4 models only) 50 kHz: 87.5 MHz – 108.0 MHz Usable Sensitivity (S/N: 26 dB) : 9.3 dBf (0.8 μV/75 Ω) Quieting Sensitivity (S/N: 46 dB) : 15.2 dBf (1.6 μV/75 Ω) Frequency Response (± 3.
• “DVD Logo” is a trademark of DVD Format/Logo Licensing Corporation registered in the US, Japan and other countries. • The “AAC” logo is a trademark of Dolby Laboratories. • Microsoft and Windows Media are either registered trademarks or trademarks of Microsoft Corporation in the United States and/or other countries. • Manufactured under license from Dolby Laboratories. Dolby and the double-D symbol are trademarks of Dolby Laboratories. • Manufactured under license under U.S.
KS-UBT1 (USB Bluetooth adapter) Instruction Manual Specifications CAUTION Changes or modifications not approved by us could void the user’s authority to operate the equipment. • This adapter has been designed exclusively for use with Kenwood car receivers. Do not use this adapter with any other car receiver. • The Bluetooth® word mark and logos are registered trademarks owned by Bluetooth SIG, Inc. and any use of such marks by JVC KENWOOD Corporation is under license.
Declaration of Conformity with regard to the R&TTE Directive 1999/5/EC Manufacturer: JVC KENWOOD Corporation 3-12 Moriya-cho, Kanagawa-ku, Yokohama-shi, Kanagawa, 221-0022, Japan EU Representative’s: Kenwood Electronics Europe BV Amsterdamseweg 37, 1422 AC UITHOORN, The Netherlands English Hereby, JVC KENWOOD declares that this unit KS-UBT1 is in compliance with the essential requirements and other relevant provisions of Directive 1999/5/EC.
EN_GET0908-001A_MX.