COMPACT HI-FI COMPONENT SYSTEM AX-7 INSTRUCTION MANUAL KENWOOD CORPORATION B60-5613-00 00 MA (E, X) OC 0508 *5613/01-07/EN 1 06.1.
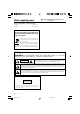
Caution : Read this page carefully to ensure safe operation. Before applying power Units are designed for operation as follows. Australia .............................................. AC 240 V only Europe . ............................................... AC 230 V only Preparations Products with the symbol (crossed-out wheeled bin) cannot be disposed as household waste. Old electrical and electronic equipment should be recycled at a facility capable of handling these items and their waste byproducts.
IMPORTANT SAFETY INSTRUCTIONS Read Instructions – All the safety and operating instructions should be read before the product is operated. Retain Instructions – The safety and operating instructions should be retained for future reference. Heed Warnings – All warnings on the product and in the operating instructions should be adhered to. Follow Instructions – All operating and use instructions should be followed. Read this page carefully to ensure safe operation.
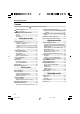
Before applying power Contents Caution : Read the pages marked carefully to ensure safe operation. Before applying power .......................................2 Listening to external input sources ...................... 46 Safety precautions ......................................................... 2 Adjusting the external input level (TAPE/VIDEO1, VIDEO2, TV, AUX) .......................................................................... 46 IMPORTANT SAFETY INSTRUCTIONS ...................
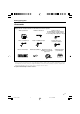
Before applying power Accessories Unpacking Unpack the unit carefully and make sure that all the accessories are present. AM loop antenna (1) FM indoor antenna (1) Remote control unit (1) Audio cords (White, Red)(2) Batteries (R03/AAA) (2) Preparations Video cord (Yellow) (1) Speaker cords (4) (Included with the speaker package) For front speakers (red line : 2m) (2) For surround speakers (blue line : 2m) (2) System control cord (ø3.5mm - ø3.
Before applying power Special features Compact high fidelity component system with built-in DVD player Built-in multi-player for DVD video, video CD, and CD playback. Preparations MP3/WMA playback function and JPEG playback function Music files recorded in the compressed format MP3/WMA can be played back. Image files recorded in JPEG format can be played back. MP3/WMA files can be enjoyed while images are displayed.
Before applying power RDS (Radio Data System) tuner This model is equipped with an RDS tuner that provides several convenient tuning functions: RDS Auto Memory, to automatically preset up to 40 RDS stations broadcasting different programs; station name display, to show you the name of the current broadcast station; and PTY search to let you tune stations by program type. PTY (Program Type) search Tune the stations by specifying the type of program you want to hear.
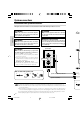
System connections Connection of the system accessories This figure shows the method of connection between the main unit and provided accessories. CAUTION CAUTION Preparations Connect the components as shown in the diagram. Only plug the AC power cord into an AC wall outlet once connections are completed. Malfunction of microcomputer CAUTION The magnet in the speaker may cause color irregularity to the TV or PC monitor. Place the speakers farther away from the TV set or PC monitor.
System connections Microphone for Room Equalizer (not for recording) Connect this only for setting the auto room equalizer, and keep it disconnected at other times.
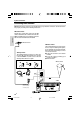
System connections Connecting to the antennas AM/FM radio stations cannot be received without the proper antenna connections. Connect the antennas properly according to the following instructions. Preparations FM outdoor antenna Lead the 75Ω coaxial cable connected to the FM outdoor antenna into the room and connect it to the FM 75Ω terminal. Please remove the indoor antenna after an outdoor antenna has been installed.
System connections Connecting to a TV with video (composite) or S-video input terminal Make sure the DVD player is connected directly to the TV and not to a VCR, otherwise the DVD image could be distorted by the copy protection system. Audio cord C-AX7 Basic section AUDIO OUT Video cord VIDEO IN S Video cord (Commercially available) Preparations For playback of the TV sound via this equipment, connect the audio output of the TV to the TV input terminals of this unit.
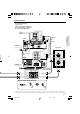
System connections Connection of other accessories (Commercially available parts) CAUTION Preparations Connect the components as shown in the diagram. Only plug the power cord into an AC wall outlet once connections are completed. Cassette tape deck Audio IN Audio OUT Receiver DVD player etc. TV game machine etc.
Controls and indicators Main amplifier unit (M-AX7) Preparations 1 2 3 4 % 4 CHANNEL SELECTOR key Used for switching the amplifier between 4 channels (25 W x 4) and 2 channels (50 W x 2). ¢ Used for setting the unit to On or Standby. 3 POWER ON/OFF switch Basic section 1 STANDBY indicator 2 (POWER) key 5 5 Displays Display (C-AX7) The displays given in this manual are approximations only. They may differ from what actually appears on the display. 4 2 3 5 6 7 V.F.S. 1 2 3 P.B.C.
Controls and indicators Preamplifier unit (C-AX7) & # @ Preparations ^ % $ Knowledge section Application section Basic section 12 3 4 5 6 7 1 STANDBY/TIMER indicator ¢ (POWER) key 9 Used for setting the unit to On or Standby. 3 PHONES / D.AUDIO OUT jack Connect headphones with a stereo mini-plug (optionally available) to it. ∞ This is also the output terminal to separately sold digital audio equipment. In this case, set D.AUDIO OUT to REC OUT ON. p 4 D.
Controls and indicators @ VOLUME knob ¢ Used for volume adjustment. Used to switch the function of the INPUT SEL./MULTI CONTROL knob to the sound setting function. # INPUT SEL. / MULTI CONTROL knob D.AUDIO OUT INPUT LEVEL AUTO MEMORY DIMMER SET LEVEL METER A.P.S. SET TIME ADJUST TIMER SET AUTO ROOM EQ • Some of the items may not be displayed depending on selected input source. SET key During MODE operation: Used to confirm the selected item. During SOUND operation: Used to confirm the selected item.
Controls and indicators Operation of remote control unit The keys on the remote control unit with the same names as on the main unit have the same function as the keys on the main unit. 2 RANDOM key R Used for setting playback of tracks in a random order. T REPEAT key 1 8 Used for setting repeated playback. Y A3B (REPEAT) key 2 Used for repeated playback of any interval. ° TIME DISP. key Preparations Used for changing time displays.
Controls and indicators TUNING (1 / ¡) keys DVD/CD : › Used for fast-forward or fast-reverse the played music. TUNER : q Used for receiving a radio station. 8 ¢ (POWER) key Used for setting the unit to On or Standby. 9 DISPLAY key ° Used for changing the CD-TEXT displays. Used for displaying the day of week and the time. Ø TIMER key r PTY key Used for entering PTY mode or searching a program type. W CLEAR key Used for clearing a programed track(s).
Types of playable discs The system this unit is using does not only play music from CD but can also play the discs listed below to offer you high-quality entertainment of video of movies and live concerts. Playable Disc DVD VIDEO (DVD-R/RW, DVD+R/RW) CD (CD-R, CD-RW) VCD Logo mark on disc Disc size Played sides Contents Preparations 8cm Video + Audio One or both One or both Approx. 41 min. (1 side, 1 layer) Approx. 75 min. (1 side, 2 layers) Approx. 82 min. (2 sides, 1 layer) Approx. 150 min.
Region Codes Every player of this model has a certain region code assigned to it based on the country where the player is used. When the player is used to play back DVD VIDEO discs, it can only play the DVD VIDEO discs carrying the region codes matching the region code of the player. The region code for this player is described on the rear panel of the player. Region codes in the world The DVD players are given a region code according to the country or area it is marketed, as shown in the following map.
Video Formats The TV picture display and disc signal systems can be divided roughly into two TV formats (NTSC and PAL). They are variable depending on countries and areas. This unit has a function for output of disc video in NTSC format after conversion to PAL format. For details, refer to “NTSC → PAL” in “VISUAL” setting on page 78. TV formats in major countries : TV Format Preparations NTSC PAL Major Countries & Areas Japan, Taiwan, Korea, USA, Canada, Mexico, Philippines, Chile, etc. China, U.K.
Playable files with this unit Discs with MP3/WMA or JPEG files which can be played back on this unit Preparations Playback of compressed files in the formats MP3, WMA, and JPEG is possible. Depending on the disc properties, the recording status, etc., playback may not be possible on this unit. ÷ The following file types can be played back on this unit. MP3 : Bit Rate, 32 kbps to 320 kbps Sampling frequency; 32/44.1/48 kHz (128 kbps/44.
Playable files with this unit Disc structure Structure of DVD Video discs DVD Video Preparations Title1 Chapter1 Chapter2 Title2 Chapter1 3,4,5... Chapter2 3,4... A title is the largest unit for images or tracks. A title is composed of several chapters. Structure of CD and Video CD Video discs Basic section CD, Video CD Track1 Track2 4,5,6... Track3 CD and Video CD discs are divided into so-called tracks.
Clock adjustment As the clock is not only used to show the time of the day but also used in timer operations, be sure to set the clock adjustment in advance. Turn POWER ON. ¢ 1 Select "TIME ADJUST". 1 Press the MODE key, turn the INPUT SEL./ 1 2 3 4 5 MULTI CONTROL knob to select "TIME ADJUST". Then press the SET key. L 30 10 5 3 1 0 (-dB) R 2 Adjust the day of week. Preparations ÷ The time display starts to blink.
Basic use method Preparation : Set the POWER switch of the M-AX7 to the ON position. The unit is switched ON or STANDBY Adjusting volume 2. Preparations Muting the sound temporarily Start playback DVD TUNER CONTROL PRE-AMPLIFIER SOUND SELECTOR standby / timer 1. Select a desired input source. INPUT SEL. / MULTI CONTROL VOLUME 3. MODE SET 0 PHONES D.AUDIO OUT D.AUDIO IN Basic section Listening through headphones MAIN UNIT Application section Muting the sound temporarily 1.
Basic use method 3. Adjusting volume. MAIN UNIT Volume level Decrease volume Increase volume L 30 10 5 REMOTE 3 1 0 (-dB) R Increase volume ÷ The display shows a reference value. Listening through headphones Preparations Decrease volume Muting the sound temporarily (MUTE) Insert the headphones plug into the PHONES jack. Press the MUTE key. MAIN UNIT REMOTE OUT ÷ Press the MUTE key again to resume the original volume. ÷ It is also canceled when the volume is changed.
Basic use method UsingAutoRoomEqualizerfunction Preparations A very loud test sound is produced during the measurement. Please take into consideration that it may disturb your neighborhood, especially, when you measure it at the night time. Auto Room Equalizer function automatically performs the following adjustments with the provided microphone by measuring sound characteristics for the best listening environment according to your room conditions and speakers layout. 1. Sound delay from speakers 2.
Basic use method To cancel the measurement Turn the VOLUME knob on the main unit or press the VOLUME % / fi key on the remote control unit. Changing measured Room Equalizer Characteristics according to situation (ROOM EQ MODE) 1 Press the ROOM EQ MODE key on the remote control unit. or Memorizing the measurement (Memorizing your favorite sound º) The following mode items can be selected: "NORMAL": This mode reproduces the sound "WIDE": "NIGHT": 27 EN *5613/23-38/EN 27 06.1.
Basic use method Using Digital Sound Equalizer function D-BASS Setting The D-BASS effect can be added according to the source. Preparations 1 Press the SOUND SELECTOR key, turn the INPUT SEL./MULTI CONTROL knob to select “D-BASS”. Then press the SET key. [press the D-BASS key on the remote]. In this unit, TREBLE and BASS sounds can be adjusted to your preferences. (TONE) In addition, frequency characteristics of the TREBLE and BASS sounds can be adjusted with the three types of Low, Mid and High.
Basic use method Making your favorite sounds (MANUAL EQ ) 5 The TREBLE setting is displayed. 6 Press the MULTI CONTROL @ / # key on the remote to select a frequency type (Low: 5kHz, Mid: 7kHz, High: 10kHz) This unit is equipped with 7-band equalizer. It enables you to make your favorite frequency response curve with frequencies from super bass to super high range. º 1 Press the MANUAL EQ key on the remote control unit. SEL./MULTI CONTROL knob [press the MULTI CONTROL key on the remote].
Basic use method Memorizing your favorite sound Preparations 1 Press the MODE key, turn the INPUT SEL./ MULTI CONTROL knob to Select "SOUND PRESET". Then press the SET key. ÷ The indicator "1", "2" and "3" on the display blinks. ÷ "PRESET" and "1", "2", and "3" is displayed on the character information display. ÷ The sound of three patterns from 1 to 3 can be preset regardless of sound type. ÷ Information for Room EQ setting is memorized.
Basic use method Enjoying surround sound V.F.S. setting With the V.F.S. (Virtual Front Surround) function it is possible to enjoy natural surround sound with rich ambience without installing surround speakers at the rear. The built-in CLEAR VOICE function even clearer playback of voices. 1 Press the SOUND SELECTOR key, turn the INPUT SEL./MULTI CONTROL knob to select “SURROUND”. Then press the SET key. Please connect front surround speakers if you want to enjoy surround sound.
Basic use method CLEAR VOICE setting Preparations 1 Press the SOUND SELECTOR key, turn the INPUT SEL./MULTI CONTROL knob to select “SURROUND”. Then press the SET key. 2 Turn the INPUT SEL./MULTI CONTROL knob to select "CLEAR VOICE". Then press the SET key. Basic section When 2 channels (stereo) has been selected, switching is done automatically to 4 channels. When using the remote control, press the CLEAR VOICE key instead of the operations 1 and 2.
Playback of DVD/CD When a disc is placed into the DVD/CD player in advance, the unit will be switched on automatically by pressing the DVD/CD 6 key on the remote control, and playback will start. To play back a desired track 1. To start playback/ To pause playback To stop playback Fast forward and backward To skip tracks DVD TUNER CONTROL PRE-AMPLIFIER SOUND SELECTOR standby / timer Preparations To stop playback VOLUME INPUT SEL. / MULTI CONTROL MODE SET 0 PHONES D.AUDIO OUT D.
Playback of DVD/CD Switching to pause or still (stationary picture) During playback, press the 6 key [DVD/CD 6 key on the remote]. REMOTE MAIN UNIT ÷ "Pause" or "Still" is displayed on the TV. ÷ When the DVD setting "IPB display" is ON, "Still (I)", "Still (P)", or "Still (B)" is displayed on the TV when still is used during DVD playback. (f) ÷ Press the 6 key [DVD/CD 6 key on the remote] to resume normal playback To stop playback CD playback Preparations Press the 7 (STOP) key.
Playback of DVD/CD To skip playback Press the 4/1, ¡/¢ key [4, ¢ key on the remote]. MAIN UNIT To skip forward To skip backward To skip forward To play back from desired title, chapter or track Press the numeric keys as shown below. To select No. 23 : +10, +10, 3 To select No. 30 : +10, +10, +10, 0 To select No. 311 (MP3/WMA, JPEG) : +100, +100, +100, +10, 1 Remote control unit only Press the numeric keys. Basic section At the time of DVD Video ÷ With operation during stop, the title is selected.
Playback of DVD/CD Viewing JPEG images JPEG images recorded on CD-R/CD-RW discs can be viewed. When the images are mixed with MP3/ WMA data, the music can be heard while displaying the JPEG images. ÷ When the 6 key [DVD/CD 6 on the remote] is pressed, the JPEG images are displayed in sequence from the first one at the specified slide interval (initial value: 10 sec). ÷ JPEG images not fitting into the screen are displayed reduced. The aspect ratio is not changed.
Playback of DVD/CD Playback with selection from the directory 3 Use the cursor (%/fi/@/#) keys to select the Remote control unit only 1 Load a disc with recorded JPEG images. image to be viewed. 2 Press the FOLDER/FILE SEARCH key. ÷ Sequential display is made starting with the selected image. Preparations 4 Press the ENTER key. Directory display example Keys not effective on that screen cannot be selected. Icon area To the previous page. Operation guide area To the next page.
Playback of DVD/CD Changing the display contents of the display The display contents of the display on the main unit are switched each time this is pressed. 1 2 3 4 5 Remote control unit only During playback, press the DISPLAY key.
Receiving broadcast station When the TUNER /BAND key is pressed, the unit will automatically be switched on and reception status will be reached. Presetting radio stations manually (Manual preset) (3) w PTY r Presetting radio stations manually (Manual preset) (2, 4) w 1. Tuning in to a non-preset radio station (Auto tuning, Manual tuning) (2) q DVD TUNER CONTROL PRE-AMPLIFIER SOUND SELECTOR standby / timer INPUT SEL. / MULTI CONTROL Preparations Select the tuner input.
Receiving broadcast station MAIN UNIT 3. Tuning (Preset Call) ÷ If radio stations have already been stored with AUTO MEMORY (Auto memory function) or manual presetting, select a station using the 4/1, ¡/¢ key [the 4 / ¢ key on the remote]. Each press of the key switches the preset stations in sequence. 1 2 3 4 5 REMOTE TUNED ST. AUTO L FM 30 10 5 3 1 0 (-dB) Basic section Preparations MHz R The indicator TUNED lights up when a station is received. The indicator ST.
Receiving broadcast station Tuning in to a non-preset radio station (Auto tuning, Manual tuning) Select the tuning mode according to the radio wave receiving condition. Auto tuning: When the receiving condition is good. Manual tuning: When the receiving condition is poor. (Weak radio waves) 1 Select the tuner input. ÷ In MANUAL mode, FM stations are received in monaural. MAIN UNIT REMOTE Each press of the Tuning Mode key [AUTO/MONO key on the remote] changes the tuning types.
Receiving broadcast station Presetting radio stations manually (Manual preset) 1 Perform the procedure in "Tuning in to a non-preset radio station (Auto tuning, Manual tuning)" to receive the station to be preset. q Up to 40 stations can be memorized. ÷ To memorize an RDS station, wait for the station name to appear on the display before performing step 2. 2 Press the ENTER key during reception. 1 2 3 4 5 Preparations TUNED ST.
RDS (Radio Data System) RDS is a system which transmits useful information (in the form of digital data) for FM broadcasts along with the broadcast signal. Tuners and receivers designed for RDS reception can extract the information from the broadcast signal for use with various functions such as automatic display of the station name. Before using RDS For reception of RDS stations, the auto memory function must be used to preset the stations.
RDS (Radio Data System) Searching for a desired program type (PTY search) By specifying the type of program (genre) you want to listen to, the tuner automatically searches for a station which is currently broadcasting a program of the specified type. Preparations Set the reception band to FM. Preset RDS stations with the AUTO MEMORY function. ‚ 1 Select the PTY search mode. Press the PTY key on the remote control unit. 1 2 3 4 5 TUNED ST.
RDS (Radio Data System) 3 Start the search. Press the ENTER key on the remote control unit. Display while searching for a Rock Music broadcast. Program type name display. Blinks. 1 2 3 4 5 PTY PS display when an RDS station is received. Goes off. PS name display. 1 2 3 4 5 TUNED ST. AUTO FM Preparations ÷ No sound is heard while the PTY indicator is blinking.
Listening to external input sources 1 Select an external input source. Turn INPUT SEL./MULTI CONTROL knob [press the INPUT SELECTOR key on the remote]. Preparations MAIN UNIT REMOTE Select below item; "TAPE/VIDEO1" "VIDEO2" "TV" "AUX" 2 Play the connected equipment. 3 Adjust the volume.
Listening to the sound of a Kenwood digital audio player When this unit is connected with a special cable to a Kenwood digital audio player compatible with digital audio link, the digital audio player can be operated from this unit or its remote control. To stop playback 2. To stop playback DVD MD TUNER CONTROL PRE-AMPLIFIER SOUND SELECTOR standby / timer INPUT SEL.
Listening to the sound of a Kenwood digital audio player [Connecting a model compatible with digital audio link] The following operations can be performed from the main unit. [Connecting to any other digital audio player] Perform digital audio player playback, volume adjustment, and other operations. To start playback / To pause playback During playback, press the 6 key [D.AUDIO 6 key on the remote].
Recording to a digital audio player When a digital audio player with direct encoding function is connected, the sound played back by this unit can be recorded by the digital audio player. 2. SOUND SELECTOR INPUT SEL. / MULTI CONTROL Preparations DVD MD TUNER CONTROL PRE-AMPLIFIER standby / timer VOLUME MODE Select an input source SET 0 PHONES D.AUDIO OUT D.AUDIO IN 1. Use a commercial cord with stereo mini plugs to connect the D.
Recording to a digital audio player 4. D.AUDIO setting Switch the output of the D.AUDIO (PHONES) terminal of this unit from headphones output to digital audio recording output. ÷ The Rec Out indicator (LED) lights up. 2 Confirm "REC OUT ON" and set by pressing the SET key. ÷ Operation at the time of "REC OUT ON" causes return to "HEADPHONE". ÷ Please note that the volume may become high when switching "D.AUDIO OUT" while using headphones.
Option settings for external recording Setting D.EQ RecMode (digital equalizer recording mode) 1 Press the MODE key, turn the INPUT SEL./ MULTI CONTROL knob to select “D.EQ RecMode”. Then press the SET key. "DIGITAL EQ REC": The sound is recorded with the MANUAL EQ settings. ª Switching as shown below is done each time the knob is turned. "D.EQ ON" : The digital equalizer effect is reflected in the recorded sound. "D.EQ OFF" : The digital equalizer effect is not reflected in the recorded sound.
Various disc playback features Listening to the desired sequence (program playback) Use the following procedure to program desired tracks in a desired order. (up to 32 tracks) Select the DVD/CD input. 1 Select PGM mode. Preparations Press the P.MODE key on the remote control unit. Press the key in the stop mode. 1 2 3 4 5 L 30 10 5 3 1 0 (-dB) R PGM The indicator lights up. 2 Select track numbers in the order you want to play them.
Various disc playback features To add a track to an existing program 1 Select the track number to be added with the Numeric keys on the remote control unit. Press the key in the stop mode. Press the Numeric keys as shown below; To select track No. 23: +10, +10, 3 To select track No. 30: +10, +10, +10, 0 Preparations ÷ Up to 32 tracks can be programmed. When "PGM FULL" is displayed, no more tracks can be programmed. ÷ If you made a mistake, press the CLEAR key and enter the track No. again.
Various disc playback features Playing tracks in a random order (random playback) As tracks (files) each time are selected randomly, music can be enjoyed without getting tired of it. ÷ When P.B.C. is ON for a Video CD, set it to OFF. ‰ ÷ Random playback is not possible at the time of program playback mode. Please perform operation after program playback has been canceled. E ÷ Use the remote control for operation. Preparations Select the DVD/CD input. 1 Confirm that the PGM indicator is not lit.
Various disc playback features Repeated playback Desired title, chapter, track or disc can be played back repeatedly. ÷ When P.B.C. is ON for a Video CD, set it to OFF. ‰ ÷ Repeat playback may not be possible for DVD or Video CD. ÷ Use the remote control for operation. ÷ Operation of repeat playback also is possible using the on-screen display. OŒ„ Select the DVD/CD input. Each time the key is pressed, the setting changes as shown below.
Various disc playback features Repeated playback of any interval (A-B Repeat play) The A-B repeat function lets you mark a segment to repeat between the beginning “A” and the end “B” of the segment you want to replay. ÷ A-B Repeat play may not be possible for DVD Video or Video CD. ÷ A-B repeat playback is not possible during program playback mode and during random playback. Please perform operation after program playback or random playback has been canceled. ER ÷ Use the remote control for operation.
Various disc playback features Menu playback of a DVD Call the top menu screen or the menu screen of the DVD video and select the item to be played back at the menu screen. ÷ When the DVD video is playing and the menu screen already is displayed, perform the operation from step 2. ÷ Use the remote control for operation. ÷ For some discs, menu playback is not possible. Select the DVD/CD input. and call the menu screen.
Various disc playback features Operation using the on-screen display The on-screen display can be displayed on the TV screen and various operations can be performed or time displays can be seen. ÷ The on-screen display is not displayed when the menu screen is displayed for a DVD Video. U ÷ Use the remote control for operation. Select the DVD/CD input. Basic operation with on-screen display screen display.
Various disc playback features Operation of the on-screen display for DVD Video MAIN Title Folder 11 Chapter 1 1Title icon 7 2 TOTAL 52:132 : 1 P l ay 3 Set 4 Off E IT EXIT “MAIN” On-screen display 5 6 Selecting the title number Select the title icon and select the title number from the submenu. 2Chapter icon The chapter number is displayed. Selecting the chapter number Select the chapter icon and select the chapter number from the submenu.
Various disc playback features Folder 1 SOUND 1 ENG Digital 3/ 2.1ch Off 7 Preparations 7 Sound icon Off 8 E IT EXIT “SOUND” On-screen display 9 9 Cinema voice icon The stream number, the sound signal, the audio language, and the number of channels are shown. Switching the audio language Select the sound icon and select the audio language from the submenu. 8 V.F.S. icon Cinema voice mode ON/OFF is displayed.
Various disc playback features Operation of the on-screen display for CD/VCD MAIN Track Folder 11 SINGLE 0:00 1 P l ay 2 1Track icon Set Off E IT EXIT “MAIN” On-screen display 4 5 3 Time search (CD/Video CD with P.B.C. OFF) The track number is displayed. Selecting the track number (CD/VCD with P.B.C. OFF) 2Time display icon 3 Memory playback icon (CD/Video CD with P.B.C. OFF) The time display is displayed. Changing the time display (CD/VCD with P.B.C.
Various disc playback features Operation of the on-screen display for MP3/WMA, JPEG Folder Folder 11 MAIN File 1 1 2 1Folder icon Selecting the folder number Preparations 0:00 5 Select the repeat icon and select the repeat playback mode from the submenu. Off : Repeat playback is canceled. File : The file being played will be repeated. Folder : The folder being played will be repeated. Disc : The disc being played will be repeated. 2File icon The file number is displayed.
Various disc playback features Adjusting the picture quality This unit permits adjustment of the picture quality. ÷ When the TV has a function for adjustment of the picture quality, use the TV for adjustment of the picture quality. ÷ Perform the operation during playback of video software. Adjust the picture quality 2 Press the MULTI CONTROL %/fi key to select the picture quality and press the ENTER key. "Normal" : Playback with normal picture "Fine" : A clear picture quality with quality.
Various disc playback features Hierarchical structure of VCD menus (P.B.C. function) When an item is selected on the menu screen during playback of a P.B.C.-compatible VCD, another menu with more details items may be displayed. When a number of menus are connected in multiple layers in this way, it is said that the menus have a hierarchical structure. In this structure, the desired scene can be reached by repeating item selections on the menu screens.
Timer operation Sleep timer (SLEEP) The unit is turned OFF automatically after the specified period has elapsed. Timer playback (PROG. 1, PROG. 2) Á Playback of the selected input source starts at the specified time. AI timer playback (PROG. 1, PROG. 2) Á When timer playback starts, the volume level increases gradually until the unit volume level is reached. Preparations Sleep timer Set the number of minutes after which the unit is to be turned OFF. Press the SLEEP key repeatedly to set the time.
Timer operation Setting the timer program (PROG. TIMER) In each of PROG. 1 and PROG. 2, the timer data including the operating period and played contents can be programmed and set to be activated or deactivated. Adjust the clock before setting the timer £ Connect the related equipment under reference to "System connections" 8~@ 1 Make preparations for timer. Application section Basic section Preparations Listening to DVD/CD Listening to external input sources Listening to radio Set a disc.
Timer operation 3 Select the program timer ON/OFF. 1 Turn the INPUT SEL./MULTI CONTROL 1 2 3 4 5 knob to select "PROG.1 ON" or "PROG.1 OFF". L 1 30 10 5 3 1 0 (-dB) R ÷ If "OFF" is selected, the key function return to ordinary mode. 2 Press the SET key. Preparations 4 Select an execution day of the programmed timer. 1 Turn the INPUT SEL./MULTI CONTROL knob to select the day of week. Then press the SET key.
Timer operation 6 Set the desired Timer operation. 1 Select the mode. (1) Turn the INPUT SEL./MULTI CONTROL knob to select "PLAY" or "AI PLAY". Switching as shown below is done each time the knob is turned. "PLAY"(Timer play back) "AI PLAY" (Timer play with gradually increasing Preparations volume) (2) Press the SET key. 2 Adjust the volume level. Basic section (1) Turn the INPUT SEL./MULTI CONTROL knob to adjust the volume level. (2) Press the SET key. 3 Select input source.
Timer operation 7 Put the unit in standby mode. Press the ÷ When the unit enters the Standby mode, the STANDBY/TIMER indicator lights in green. ÷ If there is a power failure or the AC power cord is unplugged after the timer reservation has been activated, the STANDBY/TIMER indicator blinks in green. In this case, the clock setting should be restarted from the beginning. (POWER) key. Once the timer setting procedure has been performed, the timer program can be deactivated or activated easily.
Setting DIMMER functions Select DIMMER mode. Press the DIMMER key on the remote control unit to select DIMMER mode. Each time the key is pressed, the mode switches. Preparations ÷ The brightness of the display part of the main amplifier M-AX7 also is switched. Procedure on the main unit 1 Press the MODE key, turn the INPUT SEL./ MULTI CONTROL knob to select "DIMMER SET". Then press the SET key. 1 2 3 4 5 L 30 10 5 3 1 0 (-dB) Basic section R 2 Turn the INPUT SEL.
Switching the level meter 1 Select "LEVEL METER". Press the MODE key, turn the INPUT SEL./ MULTI CONTROL knob to select "LEVEL METER". Then press the SET key. 2 3 4 5 TUNED ST. AUTO L 30 10 5 3 1 0 (-dB) R ÷ The character information display and level meter start to blink. Preparations 2 Switch between ON and OFF. 1 Select ON or OFF. ÷ The display is switched each time the knob is turned, and "ON" or "OFF" flashes. 2 3 4 5 L 30 10 5 3 1 0 (-dB) R 2 Press the SET key.
Changing DVD/CD settings Use the SETUP MENU to change the DVD/CD settings. The SETUP MENU has the following three types. SET UP MENU SET UP MENU EXIT EXIT Preparations EXIT SOUND MAIN Rating VISUAL PCM Down Conversion This sets viewing limitations for DVD video. (This functions only for DVD Video software compatible with parental control.) TV Aspect ratio Down-sampling conversion On or Off is set for digital output at the time of 96 kHz high sampling rate.
Changing DVD/CD settings Basic operation at the SET UP MENU The basic operation methods at the SET UP MENU are explained. Use the various screens ("MAIN", "SOUND", "VISUAL") of the SET UP MENU to make the required settings. ÷ Set the source to DVD/CD. ÷ Perform operation with the remote control in stopped condition. ÷ The resume function may be canceled when settings are changed. 1 Press the DVD SETUP key.
Changing DVD/CD settings “MAIN” setting Make settings for matching the connected TV, for parental control, for the position of the on-screen display, on-screen messages, and IPB display. ÷ Refer to page 73 for the operation method. Press the ENTER key Preparations \ Setting item “Rating” (The screen for input of the password is displayed when the viewing level is changed. (g) Initial setting : “Level 8” “8 No Limit”: Select for playback of all DVD software like for adults, general, for children, etc.
Changing DVD/CD settings Entering the password ÷ Setting of "Rating" is not possible at the time of program playback mode. Perform the operation for "Rating" after canceling program playback (E). When no password has been set: 1 Press the MULTI CONTROL %/fi keys to select the viewing level as "0" to "7". Then press the ENTER key. 3 Please make a memo of the set password, store it safely. Then press the ENTER key.
Changing DVD/CD settings “SOUND” setting Set the audio output method when related system equipment has been connected to the digital audio output terminal of this unit. The setting for sound output during DVD or Video CD search and for the dynamic range control function also are made here. ÷ Refer to page 73 for the operation method.
Changing DVD/CD settings “VISUAL” setting Select this to change the display language for the "SET UP MENU" screen of this unit, the display language for the disc menu, the audio language, the subtitle language, etc. (When the selected language is not included on a DVD disc, the language specified by the disc will be used. In case of a disc with language setting at the disc menu, the language set at the menu screen of the disc will be used.) Setting of still mode setting also is done.
Changing DVD/CD settings Setting item “Subtitle Language” Setting contents “Auto”: Select this for automatic setting of the subtitle language corresponding to the "audio language" setting. Initial setting : Auto “English” “French” “Spanish” “German” “Italian” “Other ----”: Select this for selection of the language with the code number of the "DVD Preparations menu language code list". “Still Mode” “Auto”: Select this for automatic switching of frame still pictures and field still pictures.
Speaker setting For an even better surround effect it is necessary to match the speaker distances and volumes correctly. At the time of speaker setting, the difference in the speaker distances can be compensated by adjusting the volume for each speaker and the sound delay time. System selection Speaker arrangement example: Front surround system FSL 1 Press the SP SETUP key on the remote control, press the MULTI CONTROL @/# keys to select “SPEAKER MODE”.
Speaker setting Setting the volume balance Setting the speaker distance 1 Press the SP SETUP key on the remote con- 1 Press the SP SETUP key on the remote con- Each time the key is pressed, the mode switches. Each time the key is pressed, the mode switches. Preparations trol, press the MULTI CONTROL @/# keys to select “SP LEVEL”. SPEAKER MODE SP LEVEL SP DISTANCE 2 Press the ENTER key. SPEAKER MODE SP LEVEL SP DISTANCE 2 Press the ENTER key.
Important items Reference Condensation (of dew) may occur inside the unit when there is a great difference in temperature between this unit and the outside. This unit may not function properly if condensation occurs. In this case, leave the unit for a few hours and restart the operation after the condensation has dried up.
Important items Never play a cracked or warped disc Disc handling precautions Handling Hold the disc so that you do not touch the playing surface. During playback, the disc rotates at high speed in the player. Therefore, to avoid danger, never use a cracked or deformed disc or a disc repaired with tape or adhesive agent. Please do not use discs which are not round because they may cause malfunction.
In case of difficulty What seems to be a malfunction is not always so. Before calling for service, check the following table according to the symptom of your trouble. Resetting the microcomputer The microcomputer may fall into malfunction (impossibility to operate, erroneous display, etc.) when the AC power cord is unplugged while unit is ON or due to an external factor. In this case, execute the following procedure to reset the microcomputer and return it to normal condition.
In case of difficulty Tuner section Preparations Symptom Remedy Radio stations cannot be received. ÷ Connect antennas. ÷ Select a band. ÷ Tune to the frequency of the desired station. Noise interferes. ÷ Install the outdoor antenna in an apart position from the road. ÷ Switch the suspected electric appliance OFF. ÷ Install the TV or the system at an increased distance between them. A station has been preset but it cannot be received by pressing the P.CALL key.
In case of difficulty DVD/CD player section Remedy The voice (or subtitle) language cannot be changed. ÷ The DVD disc being played does not contain the recording of more than one audio (or subtitle) language. The viewing angle cannot be changed. ÷ The DVD disc being played does not contain the recording of more than one angle. The parental level cannot be changed. ÷ If you have forgotten the password, return the setting contents D to the factory default condition.
In case of difficulty Displayed messages Preparations Displayed Message Meaning CAN’T SETUP ÷ The microphone for ROOM EQ is not connected or headphones are connected. NO DISC ÷ A DVD or CD is not inserted in the unit. TEXT FULL ÷ The disc has the text data of more than 1.5 k byte. NO PLAY ÷ The TOC* of the DVD or CD cannot be read. READING ÷ The TOC* information is being read. PGM FULL ÷ An attempt is made to select a 33rd track during programing of CD. W R.
Specifications D.AUDIO OUT ................................ 1V / 32 Ω (10 kΩ) DIGITAL OUT (Optical out, PCM/Bitstreem) ............. -21~ -15 dBm (Wave length 660 nm) Main amplifier (M-AX7) [Audio section] During stereo operation Effective output power (1 kHz, 10% T.H.D., at 6 Ω) ...... 50 W + 50 W (RMS) S/N ratio .............................................................. 105 dB Total harmonic distortion ..................................... 0.
For your records Record the serial number, found on the back of the unit, in the spaces designated on the warranty card, and in the space provided below. Refer to the model and serial numbers whenever you call upon your dealer for information or service on this product. Model Serial Number *5613/81-88/EN 88 06.1.