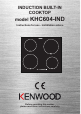
INDUCTION BUILT-IN COOKTOP model KHC604-IND Instructions for use - Installation advice Before operating this cooker, please read these instructions carefully
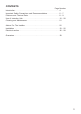
CONTENTS Page Introduction . . . . . . . . . . . . . . . . . . . . . . . . . . . . . . . . . . . . . . . . . . . . . . Important Safety Precautions and Recommendations . . . . . . . . . . . . Features and Tecnical Data . . . . . . . . . . . . . . . . . . . . . . . . . . . . . . . . . Use of Induction Hob . . . . . . . . . . . . . . . . . . . . . . . . . . . . . . . . . . . . . .
Dear Customer, Thank you for purchasing a Kenwood Induction Hob. The safety precautions and recommendations in these instructions are for your own safety and that of others. They will also provide a means by which to make full use of the features offered by your appliance. Please keep this booklet in a safe place. It may be useful in future, either to yourself or to others in the event that doubts should arise relating to its operation.
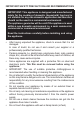
IMPORTANT SAFETY PRECAUTIONS AND RECOMMENDATIONS IMPORTANT: This appliance is designed and manufactured solely for the cooking of domestic (household) food and is not suitable for any non domestic application and therefore should not be used in a commercial environment. The appliance guarantee will be void if the appliance is used within a non domestic environment i.e. a semi commercial, commercial or communal environment. Read the instructions carefully before installing and using the appliance.
• • • • • • • • • • • • • • 6 Do not use the appliance whilst in barefoot. If you should decide not to use this appliance any longer (or decide to substitute another model), before disposing of it, it is recommended that it be made inoperative in an appropriate manner in accordance to health and environmental protection regulations, ensuring in particular that all potentially hazardous parts be made harmless, especially in relation to children who could play with unused appliances.
• • • WARNING: If the hob is cracked or otherwise damaged by falling objects etc., disconnect the appliance from the electrical power supply to avoid the possibility of electric shock and call Customer Service. WARNING: When correctly installed, your product meets all safety requirements laid down for this type of product category.
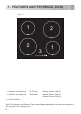
1 - FEATURES AND TECHNICAL DATA Fig. 1.1 1 2 2 1 3 1. Induction cooking zone Ø 160 mm Normal Power: 1400 W 2. Induction cooking zone Ø 200 mm Normal Power: 2300 W Booster Power: 3000 W 3. Touch controls Note: The Nominal and Booster Power may change depending on the size and material of the pan set on the cooking zone.
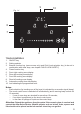
Fig. 1.4 10 8 6 7 5 1 2 3 4 TOUCH CONTROLS 1. ON/OFF key 2. Setting selector 3. Booster function key (some zones only) and Child Lock selection key (to be set in combination with other keys, see chapter CHILD LOCK SAFETY) 4. Pause function key 5. Front right cooking zone display 6. Rear right cooking zone display 7. Front left cooking zone display 8. Rear left cooking zone display 9. Automatic cooking timer key/display 10.
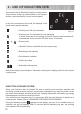
2 - USE OF INDUCTION HOB The ceramic hob is fitted with induction cooking zones. These zones, shown by painted disks on the ceramic surface, are controlled by a touch control system. In the front central area of the hob, the displays of the touch control system indicate: = Cooking zone Off (not activated) Fig. 2.1 = Cooking zone On (activated but not operating). If all the zones are in zero setting, the touch control system switches off automatically (touch controls Off) after about 10 seconds.
REMAINING HEAT INDICATORS When the temperature of a cooking zone is still hot, the relevant remaining heat indicator lights up on the display to alert you of the hot surface. Avoid touching the hob surface over the cooking area. Please pay special attention to children. When the is lit on the display, it is still possible to start cooking again; just operate the cooking zone as indicated in the chapter POWER IGNITION AND ADJUSTMENT OF A COOKING ZONE.
HOW TO SWITCH ON/OFF THE COOKTOP Switching ON Fig. 2.2 until the touch control Touch the key system is lit (fig. 2.2). The displays of the cooking zones read “ 0 ”. Notes: • If the safety Child Lock protection is active, the cooktop can be used only after having deactivated this protection (see chapter CHILD LOCK SAFETY). • Auto switch-Off: If a cooking zone is not turned On within 15 seconds, the cooktop will automatically switch off.
BOOSTER FUNCTION This function allows the cooking zone to operate at the “Booster” maximum power (above the nominal power) for maximum 5 minutes; it could be used, for example, to rapidly heat up large amount of water. –– The “Booster” function is always limited to a maximum of 5 minutes. –– This function is NOT available on the smaller cooking zones (Ø 160 mm).
OPERATION TIME LIMIT OF THE COOKING ZONES Each cooking zone is automatically switched Off after a maximum preset time if no operation is performed. The maximum preset time limit depends on the set power level, as illustrated in this schedule. Each operation on the cooking hob by using the touch controls will reset the maximum operation time at its initial value.
COOKING ZONE POWER LEVEL COOKING ZONE Ø 160 mm (Watt power) COOKING ZONE Ø 200 mm (Watt power) 42 70 70 120 112 180 168 276 252 420 392 645 588 960 896 1470 1400 2300 not available 3000 EXAMPLES OF COOKING POWER SETTING Cooking zone not operating 0 1 to 2 Melting Reheating Sauces, butter, chocolate, gelatine Dishes prepared beforehand 2 to 3 Simmering Defrosting Rice, pudding, sugar syrup Dried vegetables, fish, frozen products 3 to 4 Steam Vegetables, fish, meat 4 to 5
PROGRAM FOR AUTOMATIC SWITCHING OFF OF A COOKING ZONE Fig. 2.6 This function permits to set a timer from “ 1 ” to “ 99 ” minutes for automatic turning Off the cooking zone/s. With the cooktop switched On: • Select the cooking zone and set the desired power level. • Within 8 seconds, touch the timer key “ CL ” (the led indicating the programmed zone starts blinking) and set the timer: –– The display reads “ 0- ”: set the second digit of the timer by using the setting selector.
The program for automatic switch Off can be cancelled at any time: • Select the programmed cooking zone by touching the relevant display of the cooking zone. • Touch one time the timer key and then, within 8 seconds, the timer display will switch Off. • IMPORTANT: Remember to switch Off the zone manually. PAUSE MODE When at least one cooking zone is in operation, the cooking may be paused (fig. 2.10).
MAXIMUM USABLE POWER FOR THE COOKING ZONES The left and right cooking zones are controlled by two separate power boards. Where a power board manages two zones (front/rear LH zones; front/rear RH zones) the maximum total power per each power board is 3700 W. Should the cooking zones of one power board require more than 3700 W, the last selected power level has priority and the power of the other cooking zone is automatically reduced to the remaining power available.
ERROR CODES ON THE DISPLAYS OF THE COOKING ZONES Error code Erxx or Ex (not E2 or EH) or display not operative E2 or EH E6 or display not operative Example What to do 1. Switch Off the cooktop and disconnect it from the mains. 2. Wait for about 1 minute, then reconnect the cooktop and turn on the cooking zones. 3. Wait for about 1 minute and if the error message does not appear again the cooking zones can be used. 4. If the error message does not disappear repeat step from 1 to 3. 5.
ADVICE FOR SAFE USE OF THE HOB • Before switching on make sure that you have the correct cooking zone for the hotplate chosen. It is advisable to put the pan on the hotplate before switching on and to take it away after switching off. • Use cookware with flat and even bottoms. Uneven bottoms can scratch the glass ceramic surfaces. Be careful that the bottom is clean and dry. • Do not leave wet or damp lids on the hob. • The glass-ceramic surface and pans must be clean.
3 - CLEANING AND MAINTENANCE GENERAL ADVICE • • • • • Before you begin cleaning, you must ensure that the appliance is switched off and disconnected from the electrical power supply. It is advisable to clean when the appliance is cold. Avoid leaving alkaline or acidic substances (lemon juice, vinegar, etc.) on the surfaces. Avoid using cleaning products with a chlorine or acidic base. Do not use a steam cleaner because the moisture can get into the appliance thus make it unsafe.
Advice for the installer 4 - INSTALLATION CAUTION: • This appliance must be installed in accordance with these installation instructions. • This appliance shall only be serviced by authorised personnel. • This appliance is to be installed only by an authorised person in compliance with the current electrical regulations and in observation of the instructions supplied by the manufacturer. Failure to comply with this condition will render the guarantee invalid.
FITTING REQUIREMENTS This cooktop can be built into a working surface 30 to 40 mm thick and 600 mm deep. In order to install the ceramic hob into the kitchen fixture, a hole with the dimensions shown in figure 4.1 has to be made, keeping in consideration the following: • The cooktop shall not be installed directly above a dishwasher, fridge, freezer, washing machine or clothes dryer, as the humidity may damage the cooktop electronics.
650 mm 450 mm Fig. 4.2 500 m m Fig. 4.3 Fig. 4.
FASTENING THE COOKTOP Each cooktop is provided with an installation kit including brackets and screws for fastening the cooktop to benches from 30 to 40 mm thick. The kit includes four “F” brackets and four self-threading screws “S” (fig. 4.6). • Cut the unit according to the dimensions in fig. 4.1. • Turn the hob upside down and rest the glass side on a soft surface. • Spread the seal “G” around the edge of the hob (fig. 4.5).
5 - ELECTRICAL SECTION IMPORTANT: The appliance must be installed in accordance with the manufacturer’s instructions. Incorrect installation, for which the manufacturer accepts no responsibility, may cause damage to persons, animals and things. The connection of the appliance to earth is mandatory. The manufacturer declines all responsibility for any inconvenience resulting from the inobservance of this condition.
CONNECTION OF THE POWER SUPPLY CABLE Important! This cooktop must be connected to the electricity supply only by an authorised person. To connect the feeder cable to the hob it is necessary to carry out the following operations: • Unhook the terminal board cover “A” by inserting a screwdriver into the two hooks “B” (fig. 5.1). Open completely the terminal block cover “A”. • Unscrew the screw “C”, then unhook the cable clamp “D” by inserting a screwdriver into the hook “E”.
Fig. 5.1 1 2 B A 1 2 B C G D E F D Fig. 5.
6 - GUARANTEE Your new “KENWOOD” product comes with 12-month guarantee covering all parts and labour. If your appliance proves to be defective as a result of faulty materials or workmanship during the guarantee period, these parts will be repaired or replaced free of charge. AFTER SALES SERVICE Should you require service, spares or product information and advice: • Please Telephone 0843 362 1934.
The manufacturer cannot be held responsible for possible inaccuracies due to printing or transcription errors in the present booklet. The manufacturer reserves the right to make all modifications to its products deemed necessary for manufacture or commercial reasons at any moment and without prior notice, without jeopardising the essential functional and safety characteristics of the appliances.