KMM-BT522HD KMM-BT240U KMM-BT322U KMM-BT222U KMM-BT322 KMR-M322BT DIGITAL MEDIA RECEIVER INSTRUCTION MANUAL RÉCEPTEUR MULTIMÉDIA NUMÉRIQUE MODE D’EMPLOI RECEPTOR DE MEDIOS DIGITALES MANUAL DE INSTRUCCIONES For your records Record the serial number, found on the back of the unit, in the spaces designated on the warranty card, and in the space provided below. Refer to the model and serial numbers whenever you call upon your Kenwood dealer for information or service on the product.
FCC WARNING This equipment may generate or use radio frequency energy. Changes or modifications to this equipment may cause harmful interference unless the modifications are expressly approved in the instruction manual. The user could lose the authority to operate this equipment if an unauthorized change or modification is made. FCC NOTE This equipment has been tested and found to comply with the limits for a Class B digital device, pursuant to Part 15 of the FCC Rules.
IC (Industry Canada) Notice This device complies with Industry Canada’s licence-exempt RSSs. Operation is subject to the following two conditions: (1) This device may not cause interference; and (2) This device must accept any interference, including interference that may cause undesired operation of the device.
SOFTWARE LICENSE AGREEMENT Article 3 The software embedded in the Product (hereinafter the "Licensed Software") provided by Licensor is copyrighted to or sublicensable by the Licensor, and this Agreement provides for the terms and conditions which Users shall follow in order to use the Licensed Software. 1. The User shall use the Licensed Software by agreeing with the terms of this Software License Agreement.
Article 8 Termination In case the User falls under any of the events described in the following items, the Licensor may immediately terminate this Agreement or claim that the User compensates for the damage incurred by the Licensor due to such event: (1) when the User violated any provision of this Agreement; or (2) when a petition has been filed against the User for an attachment, provisional attachment, provisional disposition or any other compulsory execution.
CONTENTS BEFORE USE BEFORE USE 2 IMPORTANT BASICS 3 GETTING STARTED 4 • To ensure proper use, please read through this manual before using this product. It is especially important that you read and observe Warning and Caution in this manual. • Please keep the manual in a safe and accessible place for future reference.
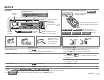
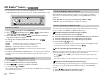
BASICS Faceplate Remote control (RC-406) (supplied for Display window Volume knob Remote sensor (Do not expose to bright sunlight.) Lights up when Bluetooth connection is established.*1 ( 18) : USB cable from the rear of the unit. Detach button Attach ) Detach Flashes when the unit enters searching status.*1 How to reset Reset the unit within 5 seconds after detaching the faceplate. Pull out the insulation sheet when using for the first time.
GETTING STARTED 1 Select the display language and cancel the demonstration When you turn on the power for the first time (or [FACTORY RESET] is set to [YES], 5), the display shows: “SEL LANGUAGE” “PRESS” “VOLUME KNOB” 1 Turn the volume knob to select [ENG] (English) or [SPA] (Spanish), then press the knob. [ENG] is selected for the initial setup. Then, (except for ) the display shows: “CANCEL DEMO” “PRESS” “VOLUME KNOB”. 2 Press the volume knob. [YES] is selected for the initial setup.
GETTING STARTED Register the marine remote ID (for TUNER SETTING PRESET TYPE NORMAL: Memorizes one station for each preset button in each band (FM1/ FM2/FM3/AM). ; MIX: Memorizes one station or SiriusXM channel for each preset button, regardless of the selected band or SiriusXM channel. SYSTEM KEY BEEP ON: Activates the keypress tone. ; OFF: Deactivates. SOURCE SELECT PANDORA SRC (Except for ) ON: Enables PANDORA FRONT/PANDORA REAR/PANDORA in source selection. ; OFF: Disables.
HD Radio™ tuner (for ) You can tune in to both conventional and HD Radio broadcasts. • To find HD Radio stations in your area, visit . Select an HD Radio multicast channel Many HD Radio stations offer more than one channel programming. This service is called multicasting. While receiving HD Radio multicast channels.... Press S / T to select your desired channel (HD1 to HD8). “LINKING” appears while linking to a multicast channel.
HD Radio™ tuner (for RADIO (for ) / / / / ) 3 Press the volume knob to display the information related to the message. 4 Press again to exit. • “NO LIST” appears when the list is empty. • This feature can store up to four messages in the list. • To clear the message list, set [FACTORY RESET] to [YES]. ( 5) Other settings Search for a station 1 Press the volume knob to enter [FUNCTION]. 2 Turn the volume knob to select an item (see the following table), then press the knob.
RADIO (for / / / Other settings / PTY SEARCH 1 Press the volume knob to enter [FUNCTION]. 2 Turn the volume knob to select an item (see the following table), then press the knob. 3 Repeat step 2 until the desired item is selected/activated or follow the instructions stated on the selected item. 4 Press and hold to exit. . To return to the previous setting item, press Default: XX TUNER SETTING AUTO MEMORY YES: Automatically starts memorizing 6 stations with good reception. ; NO: Cancels.
USB/iPod/ANDROID Start playback The source changes automatically and playback starts. USB input terminal USB CA-U1EX (max.: 500 mA) (optional accessory) iPod/iPhone : You can also connect to the USB cable from the rear of the unit (USB input terminal). KCA-iP102/KCA-iP103 (optional accessory)*1 or accessory of the iPod/iPhone*2 ANDROID*3 USB cable*2 (commercially available) *1 KCA-iP102 : 30-pin type, KCA-iP103 : Lightning type *2 Do not leave the cable inside the car when not using.
USB/iPod/ANDROID Select control mode While in iPod FRONT/iPod REAR/iPod USB source, press 5 repeatedly. MODE ON : Control iPod using the iPod itself. However, you can still play/ pause, file skip, fast-forward or reverse from this unit. MODE OFF : Control iPod from this unit. While in ANDROID FRONT/ANDROID REAR/ANDROID source, press 5 repeatedly. BROWSE MODE : Control Android device from this unit via KENWOOD MUSIC PLAY application installed in the Android device.
USB/iPod/ANDROID Direct Music Search (using the remote control) 1 Press DIRECT. 2 Press the number buttons to enter a file number. 3 Press to search for music. or DIRECT. • To cancel, press • Not available if Random Play is selected. • Not applicable for iPod FRONT, iPod REAR, iPod USB, ANDROID FRONT, ANDROID REAR and ANDROID source. AUX Preparation: Select [ON] for [BUILT-IN AUX] for [SOURCE SELECT]. ( 5) Start listening 1 Connect a portable audio player (commercially available).
Pandora® (except for ) Preparation: Install the latest version of the Pandora application on your device (iPhone/iPod touch), then create an account and log in to Pandora. • Select [ON] for [PANDORA SRC] in [SOURCE SELECT]. ( 5) 4 Press and hold one of the number buttons (1 to 5) to store. To select a stored station: Press one of the number buttons (1 to 5). 1 Open the Pandora application on your device. 2 Connect your device to the USB input terminal.
iHeartRadio® (except for ) Preparation: Install the latest version of iHeartAuto application on your device (iPhone/iPod touch), then create an account and log in to iHeartRadio. • Select [ON] for [IHEART SRC] in [SOURCE SELECT]. ( 5) Start listening 1 Open the iHeartAuto application on your device. 2 Connect your device to the USB input terminal.
Spotify Preparation: Install the latest version of the Spotify application on your device (iPhone/ iPod touch), then create an account and log in to Spotify. • Select [ON] for [SPOTIFY SRC] in [SOURCE SELECT]. ( 5) 1 Open the Spotify application on your device. 2 Connect your device to the USB input terminal. On the remote control Repeat play*4 Press repeatedly. REPEAT ALL/REPEAT ONE*5/ REPEAT OFF (Not available) Press repeatedly.
SiriusXM® Radio (for / / Only SiriusXM® brings you more of what you love to listen to, all in one place. Get over 140 channels, including commercial-free music plus the best sports, news, talk, comedy and entertainment. Welcome to the world of satellite radio. A SiriusXM Vehicle Tuner and Subscription are required. For more information, visit . Preparation: 1 Connect the optional SiriusXM Vehicle Tuner (commercially available).
SiriusXM® Radio (for / / ) SiriusXM Keymode SmartFavorites and TuneStart™ Press and hold to change the keymode (channel or replay). (Default: Channel keymode) “ ” lights up when replay keymode is selected. When channel keymode is selected... To On the faceplate On the remote control Select a channel Press S / T. Press S / Change a channel rapidly Press and hold S / T. Press and hold S/ . Store a channel of the current band Press and hold one of the number buttons (1 to 6).
SiriusXM® Radio (for / / ) SiriusXM settings TUNE START*2 ON: All qualified music channels in the SmartFavorite will start playback from the beginning of the song. ; OFF: Cancels. SIGNAL LEVEL Shows the strength (NO SIGNAL/WEAK/GOOD/ STRONG) of the current received signal. BUFFER USAGE Shows the memory usage (0% to 100%) for Replay buffer. SXM RESET YES: Resets stored channel and lock setting to default. ; NO: Cancels. 1 Press the volume knob to enter [FUNCTION].
BLUETOOTH® BLUETOOTH — Connection Pair and connect a Bluetooth device for the first time 1 Press to turn on the unit.
BLUETOOTH® Auto Pairing When you connect iPhone/iPod touch/Android device to the USB input terminal, pairing request (via Bluetooth) is automatically activated. Press the volume knob to pair once you have confirmed the device name. Automatic pairing request is activated only if: – Bluetooth function of the connected device is turned on. – [AUTO PAIRING] is set to [ON]. ( 22) – KENWOOD MUSIC PLAY application is installed on the Android device ( 9) and [BROWSE MODE] is selected.
BLUETOOTH® To On the faceplate While talking on the first incoming call... Answer another incoming call and hold the current call Press Reject another incoming call Press End current call and activate held call Press Swap between the current call and held call Press . Default: XX On the remote control Press . . Press . . Press . MIC GAIN –10 to +10 (–4): The sensitivity of the microphone increases as the number increased.
BLUETOOTH® Make a call PHONE BOOK (Applicable only if the phone supports PBAP.) 1 Turn the volume knob quickly to enter alphabet search mode (if the phonebook contains many contacts). The first menu (ABCDEFGHIJK) appears. • To go to the other menu (LMNOPQRSTUV or WXYZ1*), press / . • To select the desired first letter, turn the volume knob or press S / T, then press the knob. Select “1” to search with numbers and select “*” to search with symbols.
BLUETOOTH® Make a call using voice recognition 1 Press and hold to activate the voice recognition of the connected phone. 2 Speak the name of the contact you want to call or the voice command to control the phone functions. • Supported Voice Recognition features vary for each phone. Refer to the instruction manual of the connected phone for details. • This unit also supports the intelligent personal assistant function of iPhone.
BLUETOOTH® BLUETOOTH — Audio Bluetooth test mode You can check the connectivity of the supported profile between the Bluetooth device and the unit. • Make sure there is no Bluetooth device paired. 1 Press and hold . “PLEASE PAIR YOUR PHONE PIN 0000” appears. 2 Search and select this unit model name (KMM-BT5**HD/KMM-BT3**U/KMM-BT3**/ KMM-BT2**U/KMR-M3**BT) on the Bluetooth device. 3 Operate the Bluetooth device to confirm pairing. “TESTING” flashes on the display.
BLUETOOTH® Settings to use KENWOOD Remote application KENWOOD Remote application is designed to control the KENWOOD car receiver’s operations from the iPhone/iPod (via Bluetooth or via USB input terminal) or Android smartphone (via Bluetooth). Preparation: Install the latest version of KENWOOD Remote application on your device before connecting. For more information, visit . 1 Press the volume knob to enter [FUNCTION].
AUDIO SETTINGS BLUETOOTH® Listen to iHeartRadio (except for ) Preparation: Select [ON] for [IHEART SRC] in [SOURCE SELECT]. ( 5) 1 Open the iHeartAuto application on your device. 2 Connect your device via Bluetooth connection. ( 18) 3 Press repeatedly to select IHEARTRADIO. The source switches and broadcast starts automatically. • You can operate iHeartRadio in the same way as iHeartRadio via USB input terminal. ( 13) Listen to Spotify Preparation: Select [ON] for [SPOTIFY SRC] in [SOURCE SELECT].
AUDIO SETTINGS BASS BOOST LEVEL1/LEVEL2/LEVEL3/LEVEL4/LEVEL5 or LV1/LV2/LV3/ LV4/LV5: Selects your preferred bass boost level. ; OFF: Cancels. LOUDNESS LEVEL1/LEVEL2 or LV1/LV2: Selects your preferred low and high frequencies boost to produce a well-balanced sound at a low volume level. ; OFF: Cancels. SUBWOOFER SET ON: Turns on the subwoofer output. ; OFF: Cancels. FADER R15 to F15 (0): Adjusts the rear and front speaker output balance.
AUDIO SETTINGS REAR HPF Digital Time Alignment settings R - HPF FRQ R - HPF SLOPE (Refer FRONT HPF settings on page 26.) R - HPF GAIN SUBWOOFER LPF SW LPF FRQ CAR SETTINGS DTA SETTINGS POSITION Selects your listening position (reference point).
AUDIO SETTINGS DISPLAY SETTINGS • Before making an adjustment for [DISTANCE] and [GAIN] of [DTA SETTINGS], select the speaker you want to adjust: FRONT LEFT/FRONT RIGHT/REAR LEFT/REAR RIGHT/SUBWOOFER: You can only select [REAR LEFT], [REAR RIGHT] and [SUBWOOFER] if a setting other than [NONE] is selected for [REAR] and [SUBWOOFER] of [SPEAKER SIZE]. ( 26) • [R-SP LOCATION] of [CAR SETTINGS] is selectable only if a setting other than [NONE] is selected for [REAR] of [SPEAKER SIZE].
TROUBLESHOOTING DISPLAY SETTINGS Default: XX Symptom Dim the illumination. ON: Dimmer is turned on. ; OFF: Cancels. DIMMER TIME: Set the dimmer on and off time. 1 Turn the volume knob to adjust the [ON] time, then press the knob. 2 Turn the volume knob to adjust the [OFF] time, then press the knob. (Default: [ON]: PM6:00 or 6:00PM; [OFF]: AM6:00 or 6:00AM) BRIGHTNESS 1 Select a zone. (See the illustration on page 28.) 2 0 to 31: Select your preferred brightness level for the selected zone.
TROUBLESHOOTING Symptom Remedy Symptom 30 Make sure the media contains supported audio files. ( 32) “NO DEVICE” Connect a USB device, and change the source to USB again. “COPY PRO” A copy-protected file is played. “UNSUPPORTED DEVICE” • Check whether the connected device is compatible with this unit and ensure the file systems are in supported formats. ( 32) • Reattach the device. “UNRESPONSIVE DEVICE” Make sure the device is not malfunction and reattach the device.
TROUBLESHOOTING SiriusXM® Radio Remedy Symptom Remedy Communication is unstable. “CHECK ANTENNA” “RATING ERROR” Registration of thumbs up/thumbs down has failed due to insufficient network connectivity. Check that the antenna and its connection are in good condition. “CHECK TUNER” Make sure the SiriusXM Vehicle Tuner is connected to the unit. “NO SIGNAL” Make sure the antenna is mounted outside the vehicle. “SUBSCRIPTION UPDATED – PRESS ENTER TO CONTINUE.” Your subscription is updated.
TROUBLESHOOTING Bluetooth® Symptom 32 Remedy Sound is being interrupted or skipped during playback of a Bluetooth audio player. • Reduce the distance between the unit and the Bluetooth audio player. • Turn off, then turn on the unit and try to connect again. • Other Bluetooth devices might be trying to connect to the unit. The connected Bluetooth audio player cannot be controlled. • Check whether the connected Bluetooth audio player supports Audio/Video Remote Control Profile (AVRCP).
REFERENCES About iPod/iPhone • Via USB: Made for – iPod touch (5th and 6th generation) – iPod nano (7th generation) – iPhone 4S, 5, 5S, 5C, 6, 6 Plus, 6S, 6S Plus, SE, 7, 7 Plus • Via Bluetooth: Made for – iPod touch (5th and 6th generation) – iPhone 4S, 5, 5S, 5C, 6, 6 Plus, 6S, 6S Plus, SE, 7, 7 Plus • You cannot operate iPod if “KENWOOD” or “ ” is displayed on iPod. • Depending on the version of the operating system of the iPod/iPhone, some functions may not operate on this unit.
REFERENCES Change the display information Each time you press DISP, the display information changes. • If the information is unavailable or not recorded, “NO TEXT”, “NO INFO”, or other information (eg. station name, playing time) appears.
INSTALLATION/CONNECTION REFERENCES Warning / Source name Display information STANDBY Source name RADIO Frequency Clock Clock (back to the beginning) (back to the beginning) (For FM Radio Broadcast Data System only) Station name Radio text Radio text+ Title/Artist Frequency Clock (back to the beginning) USB (For MP3/WMA/AAC/WAV/FLAC files) Song title/Artist Album title/Artist Folder name Playing time Clock (back to the beginning) File name iPod USB/iPod BT or ANDROID When [MODE OFF]/[BROWSE M
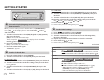
INSTALLATION/CONNECTION Part list for installation Installing the unit (in-dash mounting) Do the required wiring. ( 37) Hook on the top side (A) Faceplate (B) Trim plate Orientate the trim plate as illustrated before fitting. Dashboard of your car (C) Mounting sleeve Bend the appropriate tabs to hold the mounting sleeve firmly in place. When installing without the mounting sleeve 1 Remove the mounting sleeve and trim plate from the unit.
INSTALLATION/CONNECTION Wiring connection Antenna terminal (for Fuse (10 A) IMPORTANT : We recommend installing the unit with a commercially available custom wiring harness specific for your car and leave this job to professionals for your safety. Consult your car audio dealer. When connecting to an external amplifier, connect its ground wire to the car’s chassis to avoid damaging the unit.
INSTALLATION/CONNECTION Connecting external components USB cable (DC 5 V 1.5 A) (approx. 1.2 m/4 feet) MIC (Microphone input terminal) ( 18) (For ) To Kenwood Marine Remote Control unit, KCA-RC55MR (optional accessory) ( 5) MIC (Microphone input terminal) ( 18) Å Expansion port (12 V 500 mA) To the optional SiriusXM Vehicle Tuner (commercially available) ( 15) ı Output terminals / / / / ç 38 Microphone input jack ( 18) ENGLISH JS_KWD_KMM_BT522HD_KN_EN_9.
SPECIFICATIONS Frequency Range / / / / : 87.9 MHz — 107.9 MHz (200 kHz space) : 87.5 MHz — 108.0 MHz (50 kHz space) USB Standard USB 1.1, USB 2.0 Full Speed File System FAT12/16/32 Maximum Supply Current DC 5 V Frequency Response (±1 dB) 20 Hz — 20 kHz Signal-to-Noise Ratio (1 kHz) 105 dB Dynamic Range 90 dB 1.5 A 8.2 dBf (0.71 μV/75 Ω) Quieting Sensitivity 17.2 dBf (2.
Frequency Response (±3 dB) 20 Hz — 20 kHz Operating Voltage 14.4 V (10.
• Microsoft and Windows Media are either registered trademarks or trademarks of Microsoft Corporation in the United States and/or other countries. • HD Radio Technology manufactured under license from iBiquity Digital Corporation. U.S. and Foreign Patents. For patents see http://dts.com/patents. HD Radio™ and the HD, HD Radio, and “ARC” logos are registered trademarks or trademarks of iBiquity Digital Corporation in the United States and/or other countries.
MILITARY Units purchased through the U.S.A. military exchange serv1ce overseas may be serviced under warranty m the continental U.S.A, subject to the following conditions 1) The original warranty is in effect LIMITATION OF IMPLIED WARRANTIES 2) Proof ol purchase is provided to theservicer.
U S.A. JVCKENWOOD USA Corporation This warranty will be honored only 1n the U.S.A. WHO IS PROTECTED This warranty is enlorceable only by the original purchaser. KENWOOD LIMITED WARRANTY FOR CAR STEREO COMPONENTS WHAT WE WILL PAY FOR We will pay for all labor and material expenses lor covered items. Payment of shipping charges is discussed in the next section olthiswananly.