INSTRUCTION MANUAL KENWOOD CORPORATION Operations KRF-V7030D KRF-V6030D KRF-V5030D KRF-V4530D Preparations AUDIO VIDEO SURROUND RECEIVER This instruction manual is used to describe multiple models listed above. Model availability and features (functions) may differ depending on the country and sales area. About the supplied remote control (RC-R0610)... Remote Control Other Compared to standard remote controls, the remote control supplied with this receiver has several operation modes.
Before applying the power U nits are designed for operation as follow s. 2 U .K .and E urope ..........................................................A C 230 V only R ussia ...........................................................................A C 220 V only For the United Kingdom Factory fitted moulded mains plug Preparations 1.The mains plug contains a fuse. For replacement, use only a 13Amp ASTA-approved (BS1362) fuse. C aution : R ead this page carefully to ensure safe operation.
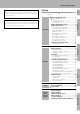
Before applying the power Maintenance of the unit When the front panel or case becomes dirty, wipe with a soft, dry cloth. Do not use thinner, benzine, alcohol, etc. for these agents may cause discoloration. Contents C aution : R ead the pages m arked operation. 3 carefully to ensure safe Before applying the power ................... 2 In regard to contact cleaner Do not use contact cleaners because it could cause a malfunction.
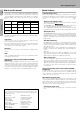
Before applying the power 4 How to use this manual Special features The manual covers the KRF-V7030D, KRF-V6030D, KRF-V5030D, and KRF-V4530D. Items such as functions, number of jacks, and remote control details differ somewhat between these models. To confirm the functions available on the model you have purchased, refer to the table below.
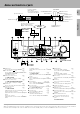
Names and functions of parts Frequency display, Input display, Preset channel display, Surround mode display AUTO SOUND indicator Band indicators Speaker indicators SP A B TI.VOL CLIP MUTE RDS L C LFE PTY LS DIGITAL indicator RS MUTE indicator MEMO. indicator ST.
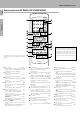
Names and functions of parts 6 Remote control unit (RC-R0610) (KRF-V7030D/V6030D) POWER 1 1 2 ! 3 POWER Preparations 4 5 6 7 8 9 0 +10 RETURN LSTN.M MENU SET UP OSD SOUND TV @ VCR/CDR 2 3 4 MULTI CONTROL TUNING CD ENTER B.BOOST RECEIVER A/B+100 DISC SKIP TITLE PHONO CD/DVD INPUT SEL. TUNER VIDEO1 VIDEO2 TV SEL. VIDEO3 9 Page references such as メR C 6モ indicate pages in the rem ote control operation m anual (Separate booklet). # P.CALL P.
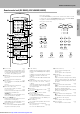
Names and functions of parts Remote control unit (RC-R0510) (KRF-V5030D/V4530D) D V D player operation Press the DVD POWER key on the remote control for more than 2 seconds to turn on the connected KENWOOD DVD player. Press the DVD POWER key again to activate the DVD player operation mode. POWER 1 1 2 3 4 5 6 7 0 7 8 0 ! P.CALL TUNING 9 MULTI CONTROL @ RECEIVER +10 ¡ (Search) 1 (Search) % fi @ # PTY 2 3 MENU SET UP OSD RETURN TITLE SOUND LISTEN MODE DISPLAY # $ P.CALL P.
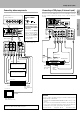
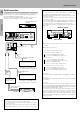
Setting up the system 8 M ake connections as show n below . W hen connecting the related system com ponents,be sure to also refer to the instruction m anuals supplied w ith the com ponents you are connecting. D o notconnectthe pow er cord to a w alloutletuntilallconnections are com pleted. Connecting audio components Shape of A C outlets U. K. DTS disclaimer clause Other countries Preparations DTS Digital Surround™ is a discrete 5.
Setting up the system Connecting video components S V ideo jacks (K R F-V 7030D only) PLAY IN REC OUT PLAY IN PLAY IN PLAY IN REC OUT DVD VIDEO 1 VIDEO 1 VIDEO 2 VIDEO 3 MONITOR S-VIDEO Connecting a DVD player (6-channel input) About the S VIDEO jacks 9 If you have connected a DVD player to the receiver with digital connection, be sure to read the “Input mode settings” section on the following page carefully.
Setting up the system 10 Digital connections Input mode settings The digital in jacks can accept DTS, Dolby Digital (AC-3), or PCM signals. Connect components capable of outputting DTS, Dolby Digital (AC-3), or standard PCM (CD) format digital signals. If you have connected any digital components to the receiver, be sure to read the “Input mode settings” section on this page carefully.
Setting up the system Connecting to the AUX IN jacks (KRF-V7030D Connecting the antennas 11 only) AM loop antenna The A U X IN jacks are convenient for connection of video components such as a camcorders and video games. The supplied loop antenna is for use indoors. Place it as far as possible from the receiver, TV set, speaker cords and power cord, and adjust the direction for best reception. AM antenna terminal connections 2 Insert cord. 3 R eturn lever. Preparations 1 Push lever.
Setting up the system 12 Connecting the system control C onnecting system control cords after connecting a K E N W O O D audio com ponent system lets you take advantage of convenient system control operations. T his unit is com patible only w ith the [SL -16] m ode. T he system control operation is notavailable if the unitis connected in the [X S8],[X S],or [X R ] connection m ode. Preparations If your component has the mode select switch, set the connected components to the [SL16] mode.
Setting up the system Connecting the speakers 2 L oosen. 3 Insert. 4 Secure. Front Speakers A Right Left FRONT SPEAKERS RED (8 – 16Ω) BLUE The KRF-V5030D/ V4530D are equipped with one-touch speaker terminals. C enter Speaker They are arranged in the same manner as the speaker terminals of the KRF-V7030D/V6030D. Refer to the instructions on making connections to the KRF-V7030D/ V6030D when making connections to the KRFV5030D/V4530D.
Setting up the system Preparing the remote control 14 Loading the batteries Speaker placement 1 R em ove the cover. 2 Insert the batteries. Center speaker Preparations Subwoofer Front speaker Surround speaker Listening position Frontspeakers : Place to the front left and right of the listening position. Front speakers are required for all surround modes. C enter speaker : Place front and center. This speaker stabilizes the sound image and helps recreate sound motion.
Preparing for surround sound 6 U se the M U L T I C O N T R O L to select the appropriate center speaker setting. To enable you to obtain optimum enjoyment from the receiver’s listening modes, make sure to complete the speaker settings (subwoofer, front, center, and surround speakers) as described below. MULTI CONTROL KRF-V6030D/ V5030D/ V4530D SET UP 1 C N T R Y E S: A center speaker is connected to the receiver. 2 C N T R N O : No center speaker is connected to the receiver.
Preparing for surround sound 16 Normal playback Preparing for playback 4 Input the distance to the speakers. 1 M easure the distance from the listening position to each of the speakers. Jot dow n the distance to each of the speakers. Distance to front speakers: ____ feet (meters) Distance to center speaker: ____ feet (meters) Distance to surround speakers: ____ feet (meters) Some preparatory steps are needed before starting playback.
Normal playback Listening to a source component VOLUME CONTROL INPUT SELECTOR Adjusting the sound 17 MULTI CONTROL SOURCE DIRECT SOUND KRF-V6030D/ V5030D/ V4530D SPEAKERS A/B PHONES INPUT SELECTOR INPUT SELECTOR VOLUME VOLUME RC-R0610 RC-R0510 VOLUME CONTROL SOUND MULTI CONTROL B.BOOST SOUND MULTI CONTROL BASS BOOST MUTE MUTE VOLUME 1 Use the INPUT SELECTOR to select the source you want to VOLUME RC-R0610 RC-R0510 listen to.
Normal playback 18 Recording Recording audio (analog sources) Muting the sound MONITOR The M U T E key lets you mute the sound of the speakers. Press the M U T E key. SP A B TI.VOL CLIP MUTE RDS EON PTY TP TA NEWS L C LFE LS R SW S RS Blinks INPUT SELECTOR To cancel Press the M U T E key again so that the メM U T E モ indicator goes off. • Muting can also be canceled by adjusting the volume.
Recording Recording video 1 U se the IN PU T SE L E C T O R to selectthe video source (other than メV ID E O 1 モ) you w ant to record. 19 Recording music in M-REC MODE DIMMER 2 Set the video deck connected to V ID E O 1 to record. • Select the REC MODE to record a digital input source. 3 Start playback,then start recording. • With certain video software, recording may not be normal due to the copy guard condition.
Listening to radio broadcasts 20 Tuning (non-RDS) radio stations Radio stations can be classified into RDS (Radio Data System) stations and other stations. To listen to or store RDS stations in the preset memory, see the section entitled, "Using RDS". MULTI CONTROL KRF-V6030D/ V5030D/ V4530D Using RDS (Radio Data System) RDS is a system that transmits useful information (in the form of digital data) for FM broadcasts along with the broadcast signal.
Listening to radio broadcasts Using the DISPLAY key Presetting RDS stations (RDS AUTO MEMORY) 21 This function automatically stores up to 40 RDS stations in the preset memory. In order to use the PTY function, the RDS stations must be stored in the preset memory using the RDS AUTO MEMORY function. DISPLAY DISPLAY BAND RC-R0510 AUTO MEMORY Pressing the DISPLAY key changes the contents of the display. 1 Use the INPUT SELECTOR to select the tuner.
Listening to radio broadcasts 22 Presetting radio stations manually The RDS auto memory function assigns preset numbers to RDS stations starting from preset number "1". Therefore, be sure to execute the RDS auto memory function before using the following operations to manually store AM stations and other FM stations, and RDS stations. “Presetting RDS stations (RDS AUTO MEMORY)”. ¡ MULTI CONTROL KRF-V6030D/ V5030D/ V4530D 2 Enter the number of the preset you want to receive (up to "40").
Listening to radio broadcasts Tuning by program type (PTY search) This function lets you set the tuner to automatically search for stations which are currently broadcasting the type of program (genre) you want to listen to. 23 3 Press the PTY key to start searching. E X A M PL E : Searching for a R ock M usic broadcast. U nder certain receiving conditions, it m ay take m ore than 1 m inute to com plete the search. Display while searching Blinks SP A B TI.
Ambience effects 24 T his receiver is equipped w ith listening m odes thatallow you to enjoy an enhanced sonic am bience w ith a variety of video sources. In order to obtain the optim um effectfrom the surround m odes,m ake sure to input the proper speaker settings beforehand. % Dolby Digital (AC-3) The Dolby Digital (AC-3) surround format lets you enjoy up to 5.1 channels of digital surround sound from Dolby Digital (AC-3) program ).
Ambience effects Surround Play Dolby 3 Stereo Dolby 3 Stereo is available for systems that do not have surround speakers. When in the Dolby 3 Stereo mode, the surround information is redirected to the front left and right speakers. This mode is designed for use with Dolby Surround program sources, but can also improve sound field unity for programs that are not Dolby Surround encoded.
Ambience effects When the DTS signal is input: (KRF-V7030D only) 26 (The DTS indicator lights up.) 1D T S: DTS surround 2ST E R E O : Normal stereo playback When the analog signal or the digital signal except for the DOLBY DIGITAL or DTS signal is input: 1P R O L O G IC : PRO LOGIC surround (The PRO LOGIC indicator lights up.) 23 ST E R E O : 3-STEREO surround (The 3 STEREO indicator lights up.
Ambience effects Convenient functions 2 U se the M U L T I C O N T R O L to select the on or off setting. 27 MULTI CONTROL KRF-V6030D/ V5030D/ V4530D SP A B TI.VOL CLIP MUTE RDS EON PTY TP TA NEWS DIMMER L C LFE LS R SW S RS AUTO FM AUTO SOUND DIGITAL AM PRO LOGIC S.DIRECT MEMO MHz 3 STEREO MONITOR ST. TUNED kHz DOWN MIX DSP • The adjustment item is displayed for approximately 8 seconds. • Some Dolby Digital (AC-3) software may not be compatible with the Midnight mode.
In case of difficulty 28 Resetting the Microcomputer W ith the pow er cord plugged in,turn the PO W E R key O FF.T hen, w hile holding dow n the O N /ST A N D B Y key,press PO W E R . If the m icrocom puter m ay m alfunction (unitcannotbe operated,or show s an erroneous display) if the pow er cord is unplugged w hile the pow er is O N ,or due to som e other external factor.
AUDIO section (KRF-V7030D/V6030D) R ated pow er output during ST E R E O operation D IN /IE C (D IN 1kH z,0.7% T .H .D .,at 4 Ω ..................... 100 W + 100 W E ffective pow er output during SU R R O U N D operation F R O N T (1kH z, 0.7% T .H .D . at 4 Ω, one channel driven) .........................................................................................100 W + 100 W C E N T E R (1kH z,0.7% T .H .D .at 4 Ω, one channel driven) ..................................................................
MEMO
MEMO
For your records Record the serial number, found on the back of the unit, in the spaces designated on the warranty card, and in the space provided below. Refer to the model and serial numbers whenever you call upon your dealer for information or service on this product.