
Instructions


4
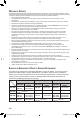
Charger Status Table
Indicator Color Meaning
Red
A battery pack
or a transceiver equipped with a battery pack
is in the
charging slot and
charging has started.
The LED will blink
red or will not light
The battery pack is defective or the battery
pack contacts are not
properly mated with
those of the charger.
Green and
Blinking Orange
The temperature of the battery pack has not satised the charging
start temperature. In this instance, remove the battery until its
temperature increases, then recharge it.
Green
Charging is completed; remove the battery pack or the transceiver
from the charging
slot.
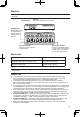
charging prOcedure
Do not use in explosive atmospheres (gases, dust, fumes, etc.).
ATTENTION:
Always switch OFF a transceiver equipped with a battery pack before inserting
the transceiver into the charger.
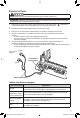
1
Ensure that the Power switch is in the off (
) position. Plug the AC cord into the AC inlet
located on the rear of the charger.
2
Plug the AC plug into an AC outlet.
3
Press the Power switch to turn the charger ON.
4
Slide a battery pack or a transceiver equipped with a battery pack into the charging slot.
• The indicator lights red and charging starts.
• Make sure the metal contacts of the battery pack mate securely with the charger
terminals.
5
When charging is completed, the indicator lights green. Remove the battery pack or the
transceiver from the charging slot and turn the power off.
• When the charger will not be used for a long time, unplug the AC cord from the AC outlet.
To
AC outlet
Power switch
AC cord
E type
T type