KTC-HR200 HD Radio™ TUNER UNIT INSTRUCTION MANUAL UNITE TUNER HD Radio™ MODE D'EMPLOI UNlOAD SINTONIZADORA HD Radio™ MANUAL DE INSTRUCCIONES Kenwood Corporation Take the time to read through this instruction manual. Familiarity with installation and operation procedures will help you obtain the best performance from your new HD Radio tuner unit. For your records Record the serial number, found on the back of the unit, in the spaces designated on the warranty card, and in the space provided below.
What is HD Radio Technology? Contents What is HD Radio Technology? En-2 ------------=----- Before use En-3 Operations -CD Receiver- En-4 -----------------~----------------- Tuning Tuning Mode Receive Mode Preset Memory Preset Tuning Auto Memory Entry Switching Display Text Scroll In HD Radio source Operations -DVD monitor 1- • Supplemental Program Audio (hereafter called Sub channel) En-8 En-11 Accessories/Installation Procedure En-14 En-16 Specifications En-17 I KTC-HR200 Analog AM Analo
Before use AWARNING To prevent injury or fire, take the following precautions: Control Units that can be Connected • To prevent a short circuit, never put or leave any metallic objects (such as coins or metal tools) inside the unit. Note that the following restrictions may occur depending on a control unit to be used. For the models to which this unit can be connected, consult your Kenwood dealer. • The HD Radio cannot be selected as a dual zone source.
Operations -CD Receiver- "Sub"/"Secondary"/"SEC: When it is switched to Sub Tuning channel Selecting the station. 1 Select HD Radio source Press the [SRC] button. Select the "HD Radio"j"HD RADIO" display. 2 Sets the tuning mode. Select the HD FM band Press the [FM] button. Each time the (FM] button is pressed it switches between the HF1, HF2, and HF3 bands. Select the HD AM band Press the [AM] button. 3 Tuning Mode Tune up or down program Press the [~] or [~] button.
Receive Mode Preset Memory Sets the receive mode. Putting the frequency and channel in the memory. 1 Select menu mode using the control unit. 1 Select the band Select the menu item. Select the "Receive Mode"/ "HDR mode" display. 2 3 Open Receive mode Press the setting button of the menu items in the control unit for at least 1 second. Press the [FM] or [AM] button. 2 Select the frequency to put in the memory Press the [~] or [~] button.
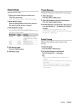
Operations -CD ReceiverAuto Memory Entry Switching Display Putting a station with good reception in the memory automatically. When you are listening to an HD Radio station, you can switch over the display information as follows. 1 Select the band for Auto Memory Entry Press the [FM] or [AM] button. 2 Open Auto Memory Entry Press the [AME] button for at least 2 seconds. Save six stations with the best reception in the memory and close Auto Memory Entry.
Text Scroll Scrolls the display title. For operations, see the CD features of in the instruction manual of your control unit. Function of remote In HD Radio source [FMj button Select the HD FM band. Each time the [FM] button is pressed, it switches between the HF 1, HF2, and HF3 bands. [AM] button Select the HD AM band. ['....]1 [~~] buttons Tune up or down program. [0] - [9] buttons Press buttons [1] - [6] to recall preset stations.
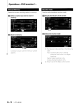
Operations -DVD monitor 1Functions While Displaying the Control Screen T Switches to the source control screen to use various functions. 11 Selects the channel on memory. , ~ .... '. . 0#' [HD Radio] button on the "Source Select" screen A ~ JJ rn [Ij [II []J [§] m []J []J JQ] lTIJ [J1) En-8 I Band display Preset number Frequency display Displays information concerning music being played.
I Seek Mode Auto Memory Sets a station selection mode. Stores stations with good reception in memory automatically. D Select a band you wish to store in memory D Select the Auto Memory mode D Start Auto Memory The mode is switched in following order each time you touch the button. Display "AUT01" "AUT02" "MANU" Save six stations with the best reception in the memory and close Auto Memory Entry.
Operations -DVD monitor 1Manual Memory Receive mode Stores the current receiving station in memory. Sets the radio broadcasts receive mode. II Select a station you wish to store in o Display the Receive mode screen D Select the receive mode memory II Store in memory LlJ The Receive mode switches in the following Continue to touch until the memory number appears. En-l0 I KTC-HR200 order. Auto: Automatically tunes to analog broadcast when there is no digital broadcast.
Operations -DVD monitor 2Functions While Displaying the Control Screen Switches to the source control screen to use various functions. ,--------------------------, I I !~~J~yG71 II I I I ~ II I I I '----------'\, ,/"---------' ... r.~r. ... t-/"'\ /1\.1+1""'\ fo..AI'"\I"V'\ ...... n ' ........ ICIC'1 LV ' I \ U l V JVIClllUIY/ 1... ....,,......1'"\ CY"\ 1 'l\ \tJa~C LII~JL) /"'\r V! (page En-13). ~ r~~L rr \ rJFl· ':--;: -;~.- c-~~ A. ""'.
Operations -DVD monitor 2Seek Mode Auto Memory Sets a station selection mode. Stores stations with good reception in memory automatically. II Select a band you wish to store in memory The mode is switched in following order each time you touch the button. Display "AUTO 1" B Select the Auto Memory mode "AUT02" "MANU" II Start Auto Memory Save six stations with the best reception in the memory and close Auto Memory Entry.
Manual Memory Receive mode Stores the current receiving station in memory. Sets the radio broadcasts receive mode. II Select a station you wish to store in II Display the Receive mode screen memory D Store in memory B Select the receive mode IT] The Receive mode switches in the following Continue to touch until the memory number appears. order. Auto: Automatically tunes to analog broadcast when there is no digital broadcast. Digital: Digital broadcasts only. Analog: Analog broadcasts only.
Accessories/Installation Procedure Installation Procedure Accessories CD ..........1 ] .......... 1 ..........2 I 1. To prevent short circuits, remove the key from the ignition and disconnect the 8 terminal of the battery. 2. Install the FM/ AM antenna and connect the antenna wire to the HD Radio tuner. 3. Connect the HD Radio tuner and the control unit using the proVided connection wire. 4. Make the proper input and output wire connections for each unit. 5. Install the unit in your car. 6.
InstaIlation Connecting Wires to Terminals ~. L~ Unit -----,I Control (5L connector) • Control Unit '-~t---~ (KAB connector) ~ ======~r"~ .- Accessorv(2) ~ ~ • The unit can only be connected to a control unit with either SL or KAB connector. O/'f\N3~ Antenna Cable (AccessoryG)) C~~P:CI I] To FM/AM antenna ' KTC-HR200 SELECT SWITCH IQ6rr SL Set "SELECT SWITCH" 1 depending on a connector type of a control unit to be used.
Troubleshooting Guide What might appear to be a malfunction in your unit may just be the result of slight misoperation or miswiring. Before calling service, first check the following table for possible problems. ottl' The HD Radio mode cannot be selected. The connection wire is not connected. 1& Use the connection wire to connect the control unit and the HD Radio tuner. -------------------------------- ottl' Nothing happens when the buttons are pressed.
Specifications Analog FM tuner section Frequency range (200 kHz space) : 87.5 MHz - 107.9 MHz Usable sensitivity (SIN: 30 dB) : 11.2 dBf (1.0 ~V175 0) Selectivity (HOO kHz) : 65 dB Quieting Sensitivity (SIN: 50 dB) : 16.3 dBf (18 ~V/75 0) Frequency response : 40 Hz - 15 kHz Stereo separation (1 kHz) : 40 dB Digital FM tuner section Frequency range (200 kHz space) : 87.5 MHz - 107.
KENWOOD
Warranty -Card Table of Contents Page U.S.A.
U.S.A. AUSTRALIA This warranty will be honored only in the U.S.A. The warranty will only be honoured in the country in which the unit was originally purchased. KENWOOD LIMITED WARRANTY FOR CAR STEREO COMPONENTS EXPRESS WARRANTY STATEMENT FOR CAR STEREO AND PERSONAL AUDIO COMPONENTS HOW LONG IS THE WARRANTY Kenwood U.S.A. Corporation ("Kenwood") warrants this product for a period of one (1) year from the date of original purchase.
CANADA GARANTIE KENWOOD KENWOOD WARRANTY KENWOOD ELECTRONICS CANADA INC. (ci-apres appelee "KENWOOD donne par ecrit la garanlie suivante a I'acheteuf original de chaque nouveau produit Kenwood distribue au Canada par KENWOOD et ache!€! a un concessionnaire autorise par KENWOOD. N ), KENWOOD garantit, sous reserve des lermes el des conditions enonces ci·dessous, que chaque nouveau produit Kenwood. dans des conditions d'emploi normales, est exempt de tous defauts.
.. KENWOOD ELECTRONICS BELGIUM N.V. CrerUIII~6ef'TOOIHISKernwoocI CcodII'ons 101M \'(IllS lemelClOns davolf dlOISI ce pn)ClUlI l(effl,ood ("le ~loole't'!d~JonlOfl!llJteet!f1\'l!fbloeI.'lGilfanlltOOd!:lre mefll,onres~sleMll'lUe1lO11'li1UPlOOUit f'Too.lI1') SlcelUl"", ll¥I5 de concl,l+01lS d'Ul,hSMIOII llOIlTIiIles ~delapl~C¥ledeGal"'.eeldes,nlolmatlOfl:5 ~IISil'O't
EUROPE KENWOOD ELECTRONICS EUROPE B.V. Ge,~llle I,letlrui~er van Kenwood produkten W'IGankenUvOOlnetk+€zenyaod,tKenwoodpro(MI(Ilet"P,odukt"1 Indlenhe:Projukt,bill'lllm,algebrU1k,gebrekenzOuvEllIOll€n.l.JlheI gra!'sworc.leiillerslelaoll'l;fvangefloveJeer'.oms!lol1ebepJhn oen ........ deleGor,r,l,ooart InClenhelproduklaanqekochtwer~rneeoHG li~sTaalen Ub'l helgebru,kervanproblemen ollderv>ndl.aeloevehet KENWOOD ELECTRONICS UK LTD. Pr~:isrndeGellrUil;SaaflWljlinogeleverdmethet 1"1 (el The!Ullnameanrlad\lres