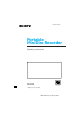
3-798-610-22 (1) Portable MiniDisc Recorder Operating instructions MZ-B3 1995 by Sony Corporation SONY MZ-B3 (E) 3-798-610-22(1)
WARNING To prevent fire or shock hazard, do not expose the unit to rain or moisture. To avoid electrical shock, do not open the cabinet. Refer servicing to qualified personnel only. •Consult the dealer or an experienced radio/TV technician for help. You are cautioned that any changes or modifications not expressly approved in this manual could void your authority to operate this equipment.
Welcome! Welcome to the world of the MiniDisc! Here are some of the capabilities and features you'll discover with the new MiniDisc (MD) Recorder. • Long-time recording in monaural sound – You can record for up to 148 minutes on a 74-minute MD by using monaural recording. You can record in stereo sound for up to 74 minutes. • A microphone and a speaker built in the recorder – You can record and play back an MD anywhere you go.
Table of contents Recording an MD right away! .................................6 Playing an MD right away! ......................................8 Various ways of recording .....................................10 Dictating (Digital VOR function) ......................................................... 10 Recording in stereo with an external microphone ............................ 11 Recording from other equipment......................................................... 12 Track marking while recording ....
Power sources .........................................................27 Using on house current ......................................................................... 27 Using on a lithium ion rechargeable battery ...................................... 27 Additional information ..........................................29 Precautions .............................................................................................. 29 Troubleshooting .........................................................
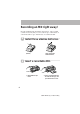
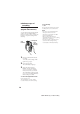
Recording an MD right away! Record an MD through the built-in microphone. The recorded sound is monaural, and you can record for up to 148 minutes on a 74-minute MD or up to 120 minutes on a 60-minute MD. 1 Install three alkaline batteries. (bottom) Three size AA (LR6) alkaline batteries 2 Insert a recordable MD. 1 Slide OPEN and open the lid. 2 Insert a recordable MD with the label side facing up, and press the lid down to close.
Sound source Microphone Press rREC. To stop recording, press p (stop). "REC" and "MONO" appear in the display, and recording starts from the beginning of the disc. The level of the recorded sound is adjusted automatically. "Toc Edit" flashes to store data of the recording (the track’s start and end points, etc.). Do not move or jog the recorder or disconnect the power source while the indication is flashing in the display. When the recorder completes storing the data, the r REC button will be released.
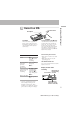
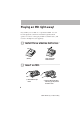
Playing an MD right away! Play an MD you recorded on or a premastered MD. You can hear the playback sound in monaural through the built-in speaker. For stereo sound, play an MD recorded in stereo, and use stereo headphones (not supplied). 1 Install three alkaline batteries. (bottom) Three size AA (LR6) alkaline batteries 2 Insert an MD. 1 Slide OPEN and open the lid. 2 Insert an MD with the label side facing up, and press the lid down to close.
3 Play an MD. Playing an MD right away! Speaker (monaural) 2 (headphones) VOL (volume) ( (play) 1 Press (. The recorder starts to play the first track. The recorder automatically switches to play in stereo or monaural according to the recorded sound. 2 Turn VOL to adjust the volume. To stop play, press p(stop). To Press To listen in stereo sound Pause P Press P again to resume play.
zVarious ways of recording Dictating (Digital VOR function) You can dictate easily using the digital VOR (Voice Operated Recording) function. You do not have to press any buttons to suspend recording while dictating. Microphone VOR indicator VOR ON/OFF To stop dictating Press p. The recorder will switch back to normal recording when you record next time. Notes • You cannot record with the built-in microphone while an external microphone is connected to the MIC PLUG IN POWER jack.
Recording in stereo with an external microphone Stereo microphone to MIC PLUG IN POWER Set MONO/STEREO to MONO. The recording time will be double the normal. To record with an external monaural microphone Use a monaural microphone ECM-T140, ECM-T110, etc. (not supplied), and set MONO/STEREO to MONO. Various ways of recording You can record in stereo sound using ECM-909A, ECM-727P, etc. (not supplied). You can record for up to 74 minutes on 74-minute MD or 60 minutes on 60minute MD.
Recording from other equipment Use a line cable (RK-G134 or RK-G128, not supplied) to connect the recorder to the source equipment. Portable CD player, portable MD player, etc. 1 2 3 to 2 or PHONES Stereo-mini plug 4 RK-G134 (not supplied) Connect the MIC PLUG IN POWER jack of the recorder to the source equipment with a line cable. Set MONO/STEREO to STEREO. Insert a recordable MD and start recording. To record, see "Recording an MD right away!" (page 6).
Track marking while recording Track marking to divide a recording Track number Elapsed time of the track being played Various ways of recording Track marking essentially adds tracks while recording and enables you to quickly find and play from the marked position. The track marking feature is useful particularly when recording a discussion, an interview, etc. You can add track marks with the recorder or the remote controller. To use the remote controller, connect it to the TRACK MARK (REC)/PAUSE jack.
Track marking important points Special track marks cannot be added after recording While you record a discussion or an interview, you can add not only regular track marks but special track marks. Special track marks can be found independently of the regular track marks during playback. You can add special track marks only with the remote controller while recording. 1 2 4 3 4 5 6 7 ¢ 4 ¢ 4 ¢ 8 Regular Special track marks track marks While recording, press TRACK MARK on the remote controller twice.
Tips on recording To monitor the sound being recorded To record-protect an MD, slide open the tab at the side of the MD. In this position, the MD cannot be recorded. To record again, slide the tab back so the tab is visible. Rear of an MD Various ways of recording Connect headphones (not supplied) to the 2 jack and adjust the volume by turning VOL. Sound levels are copied onto the MD automatically and independently of the volume for monitoring.
To know the remaining time, etc. Display window • While in stop mode Press DISPLAY while the recorder is in stop mode. Each time you press the button, the display changes as follows. Track number Elapsed time of the track being recorded . DISPLAY • While recording Press DISPLAY while recording. Each time you press the button, the display changes as follows. Track number REC MONO Elapsed time of the track being recorded .
Setting the clock to stamp the recorded time 4 Press (. The year is set and the digit of the month flashes. DATE AM 5 Repeat steps 3 and 4 to enter the current month, date, hour, and minute. When you press ( to set the minute, the clock starts operating. Various ways of recording To stamp the date and time on the MD when you record, you first need to set the clock.
Charging the built-in battery for the clock After setting the clock, leave the recorder with the dry batteries installed for about 2 hours to charge the built-in battery for the clock. You can use the recorder while charging. Once charged, the built-in battery should last about a month without connecting to any of the power sources. The recorder will automatically charge the built-in battery while connected to dry batteries, AC power, or a rechargeable battery.
zVarious ways of playback Listening at a fast speed You can reduce the listening time by using the fast playback function. The playback speed can be set to 1.6 or 2.2 times as fast as the normal playback. Playing tracks repeatedly You can play tracks repeatedly in three ways – all repeat, single repeat, and shuffle repeat. PLAY MODE Press FAST PLAY. "FAST" appears in the display, and fast playback starts at a speed of 1.6 times normal. To change the speed to 2.2 times, press FAST PLAY again.
Play mode indication Track number or track name* To know the time and track name MONO SHUF * Appears only with MDs that have been electronically labeled. ”(none)” (normal play) Tips on playback You can see in the display window the name, number, remaining time, and recorded time of the track being played. Display window Z A whole disc (all the tracks) is played once. . ”f” (all repeat) A whole disc (all the tracks) is played repeatedly. . ”f1” (single repeat) A single track is played repeatedly.
Track number or name* To lock the controls (Hold function) To prevent the buttons from being accidentally operated while carrying the recorder, use this function. MONO . Elapsed time of the track being played Track number or name* Various ways of playback MONO REMAIN Remaining time of the current track . Remaining number of tracks MONO HOLD Slide HOLD in the direction of the c. The controls on the recorder are locked. REMAIN Remaining time of the recording .
Listening with other equipment Connect the 2 jack of the recorder to a tape player or an amplifier with a line cable (RK-G134, or RK-G129, not supplied). You can listen to an MD with your stereo system or record on a cassette tape, etc. Stereo tape recorder, portable MD recorder, etc. Stereo system, cassette-corder, etc. to LINE IN 2 phono plugs R (red) RK-G129 (not supplied) L (white) to 2 (headphones) to MIC Stereomini plug RK-G134 (not supplied) Adjust the volume around "6".
zEditing recorded tracks You can edit your recordings by adding or erasing track marks, or erasing tracks. Premastered MDs cannot be edited. While the recorder is playing an MD, press TRACK MARK on the recorder at the point you want to mark. A track mark is added and the track number will increase by one.
Erasing a track mark You can erase a track mark to combine the tracks before and after the track mark. You can erase regular track marks and special track marks in the same way. The track numbers will change as follows. 1 2 . 3 3 Press TRACK MARK on the recorder to erase the mark. The track mark is erased and the two tracks are combined. MONO MONO 4 4 Erase a track mark To erase other track marks 1 2 3 Track numbers decrease TRACK MARK Repeat steps 2 and 3.
Erasing a track Note that once a recording has been erased, you cannot retrieve it. Check the track number before erasing. ERASE To erase a part of a track Add track marks at the beginning and the end of the part you want to erase, then erase the part. Notes Editing recorded tracks • When you press p after erasing a track, "Toc Edit" flashes and the recorder starts writing the new data to the MD. Do not move or jog the recorder while "Toc Edit" is flashing in the display.
Erasing a whole disc You can quickly erase all the tracks and data of the MD at a time. Note that once a recording has been erased, you cannot retrieve it. ERASE rREC p(stop) 1 2 3 4 Play the MD you want to erase. Check the contents of the disc. Press p to stop. While pressing ERASE, press rREC. "AllErase?" and "PushErase" appear in the display alternately. To cancel erasing, press p. Press ERASE again. "Toc Edit" flashes in the display. When erasing finishes, "BLANKDISC" appears.
zPower sources You can use the recorder on dry batteries, house current, or a lithium ion rechargeable battery. Using on house current It is preferable to use the recorder on house current when recording for a long time. Connect the DC IN 4.5V jack of the recorder to a wall outlet with the ACE45HG AC power adaptor (not supplied).
When to charge or replace the batteries You can check the battery condition with the battery indication displayed while using the recorder. ∫ Used batteries v b Weak batteries. Charge the rechargeable battery, or replace all the dry batteries. v n The batteries have gone out. "LOW BATT" flashes in the display, and the power goes off. Battery lifea) Batteries RecordPlaybackc) ingb) Size AA (LR6) Approx. Approx. alkaline 3 hours 6 hours batteries Lithium ion rechargeable battery (LIP-12) Approx.
zAdditional information Do not put any foreign objects in the DC IN 4.5 V jack. While carrying the recorder Keep personal credit cards using magnetic coding or spring-wound watches, etc., away from the recorder to prevent possible damage from the magnet used for the speaker. On power sources On the headphones • Use three size AA (LR6) batteries, the house current, or a lithium ion rechargeable battery. • For use in your house: Use the ACE45HG AC power adaptor (not supplied).
• Dust on the lens may prevent the unit from operating properly. Be sure to close the disc compartment lid after inserting and ejecting an MD. Note on mechanical noise The recorder gives out mechanical noise while operating, which is caused by the power-saving system of the recorder and it is not a trouble. Notes on recording Mechanical shock or vibration Do not subject the recorder to strong mechanical shock or continuous vibration while recording. The sound may be skipped or recording may stop.
Do not remove the black sheet unless you are disposing of this product, or it may not work properly. If you have any questions or problems concerning your recorder, please consult your nearest Sony dealer.
Troubleshooting Should any problem persist after you have made these checks, consult your nearest Sony dealer. Symptom Cause/Solution The recorder does not work or works poorly. • Moisture has condensed inside the recorder. b Take the MD out and leave the recorder in a warm place for several hours until the moisture evaporates. • The dry batteries or rechargeble battery are weak (b "LOW BATT" flashes). b Replace the dry batteries or recharge the battery (page 6 or 27).
Symptom Cause/Solution Sound has a lot of static. • Strong magnetism from a television or such device is interfering with operation. b Move away from the source of strong magnetism. The REC button stays pressed down. • You pressed the REC button while the recorder was not connected to the power source. b Install dry batteries or a rechargeable battery. Or connect to house current with the AC power adaptor (page 6 or 27). Cannot erase the track marks.
System limitations The recording system in your MiniDisc recorder is radically different from those used in cassette and DAT decks and is characterized by the limitations described below. Note, however, that these limitations are due to the inherent nature of the MD recording system itself and not to mechanical causes. Symptom Cause "TR FULL" appears even before the disc has reached the maximum recording time (120 or 148 minutes in monaural, 60 or 74 minutes in stereo).
Error messages If the following error messages flash in the display window, check the chart below. Meaning/Remedy BLANKDISC •An MD with no recording on it is inserted. b Insert a recorded MD. BUSY •You tried to operate the recorder while it was accessing the recorded data. b Wait until the message goes out (in rare cases, it may take 2–3 minutes). CANNOT •You tried to erase a track mark while playing the MD or at the beginning of the first track.
Error message Meaning/Remedy TEMP OVER • Heat has built up in the recorder. b Leave the recorder to cool down. TR FULL • There is no more space for new data when you are editing the MD. b Erase unneccessary track numbers or tracks (page 24 or 25). TRprotect • You tried to record or edit on a track that is protected from erasing. b Record or edit on other tracks.
Specifications System Audio playing system MiniDisc digital audio system Laser diode properties Material: GaAlAs Wavelength: l = 780 nm Emission duration: continuous Laser output: less than 44.6 µW (This output is the value measured at a distance of 200 mm from the lens surface on the optical pick-up block.
Optional accessories AC-E45HG AC power adaptor LIP-12 Lithium ion rechargeable battery ACP-MZ60A* AC Power adaptor/ Battery charger ECM-909A, ECM-727P, ECM-717 Stereo microphones ECM-T140, ECM-T110 Monaural microphones MDR-E747, MDR-E535 Stereo dynamic earphones MDR-D55, MDR-D33 Stereo headphones RK-G134, RK-G128 Line cables MDW-74/74A, MDW-74L/74R/74Y, MDW-60/60A Recordable MDs CK-MD4 MiniDisc carrying case CK-MD10 MiniDisc filing box * ACP-MZ60A can only be used as a battery charger.
How the MiniDisc got so small Shock-Resistant Memory The 2.5-inch MiniDisc, encased in a plastic cartridge that looks like a 3.5inch diskette, uses a new digital audio compression technology called ATRAC (Adaptive TRansform Acoustic Coding). To store more sound in less space, ATRAC extracts and encodes only those frequency components actually audible to the human ear. One major drawback of optical read systems is that they can skip or mute when subjected to vibration.
Looking at the controls See pages in ( ) for more details. The recorder 1 END SEARCH button (7) 2 DISPLAY button (16, 20) 3 TRACK MARK (REC)/PAUSE (for the remote controller) jack (13) 4 Display window (7, 9, 16, 21) 5 DC IN 4.
The display window REC STEREO MONO 1 SHUF FAST !¡ Time display (16, 17, 21) Shows the recorded time, current time, elapsed time of the track or MD being recorded or played. !™ Position indicator (7, 9) Shows the current location on the MD. The point under recording or playing flashes. The recorded portion lights up. Additional information 1 STEREO indication (11, 12) 2 REC indication (7) Lights up while recording. When flashing, the recorder is in record standby mode.
Remote controller 1 TRACK MARK button (13, 14) Used to add track marks while recording. Adds a regular track mark when pressed once. Adds a special track mark when pressed twice.
Additional information 43 SONY MZ-B3 (E) 3-798-610-22(1)
Sony Corporation Printed in Japan SONY MZ-B3 (E) 3-798-610-22(1)