LCD Remote Control wit h Poi ntL es s™ R F Te chnology
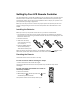
Setting Up Your LCD Remote Controller Your new LCD Remote is a powerful controller that you can easily set up to remotely control a Kenwood receiver as well as all of the IR-controllable audio and video components in your entertainment system. The remote’s macro capabilities make it easy for you to perform complex operations by touching a single button. Before you can use your remote to control any of your system’s components you first must program it.
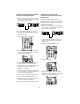
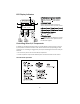
Changing the RF Transmission Frequency The RF remote function may be affected by radio interference, etc. If this happens, you can change the RF transmission frequency. To change the RF remote transmission frequency: 1. Open the battery cover on the rear. 2. Change the RF switch setting. RF 1 RF 2 2 1 After changing remote control’s RF frequency, you also must change the receiver’s RF reception frequency. 3. To change the receiver’s RF reception frequency.
3. Do not install the receiver where direct sunlight or high-frequency fluorescent lighting can shine directly into the infrared remote sensor. This can limit the remote’s operating range. 4. Make sure that the remote’s range is not being affected by other radio frequency transmissions. 5. Do not block the IR transmitter on the remote or on the receiver’s front panel .
Changing a Setup Code If you replace an existing component with a new one you will need to perform steps 1 10 to program the remote to control the new component. Deleting a Setup Code 7. Use the and buttons to select the component’s brand, then press ‘Enter’. If you disconnect a component from the system and do not replace it, you can remove its control code from the remote. • If the manufacturer of your component is not listed, select ‘Nothing’ and press ‘Enter.
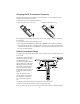
To Control a Component that Couldn’t be Successfully Programmed To Extend the Functions of a Component that was Successfully Programmed 1. Place the LCD Remote and the remote you want to learn the commands from head-tohead, about 4 inches apart: By using the LCD remote’s “Extend 1 - 5” functions you can program up to 5 extended functions for each component you have set the remote up to control. 1.
5. Press the button on the LCD remote into which you want to program the new function. 6. Press and hold the button with the function that you want the LCD remote to learn. Do not move either remote until the LCD remote’s display changes from “Waiting” to “Complete”. • To reset a button to its original factory-programmed function, press the ‘Clr’ button in step 3 of the above procedure. 7.
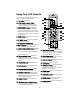
Using Your LCD Remote Note: Pressing the F.SHIFT button (#25) activates a button’s secondary function 1. LCD display: see page 9 2/3. LCD function buttons 1 and 2: Selects the function shown directly above the button on the LCD display 4. CONFIRM/SHIFT button: CONFIRM:reestablishes interrupted communication with the receiver; SHIFT: lets you use the Input Selector buttons (see #17) to select a component and control it without making it the active input 5.
LCD Display Indicators 1. Playback/recording mode indicators: Play indicator/ Pause indicator/ Record indicator/ Stop indicator 2. Character display: Shows various information such as the source component name and track number. 3. Current function of LCD function button 1 4. Current function of LCD function button 2 5. Communication indicators: Sending / Receiving. 6. Battery indicator: appears when the batteries are nearly exhausted. When it does, replace all of the four batteries together.
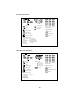
CD Player Operation: AV POWER TITLE/GUIDE TUNING BAND REPEAT RANDOM INPUT SEL. TV SELECT DISPLAY SELECT AUDIO THEME FAVORITE INFO. EXIT LAST CHANNEL STATUS MULTI ZONE ZONE A/B ENTER AUTO/MONO : Scan Backward : Play/Pause : Scan Forward : Pause TITLE/GUIDE Numeric Entry : Track/Title : Stop With F.
MD Player Operation: AV POWER TITLE/GUIDE TUNING BAND REPEAT RANDOM INPUT SEL. TV SELECT DISPLAY SELECT AUDIO THEME FAVORITE INFO. EXIT LAST CHANNEL STATUS MULTI ZONE ZONE A/B ENTER AUTO/MONO : Scan Backward : Play : Scan Forward : Pause Numeric Entry TITLE/GUIDE : Track/Title : Stop With F.
VCR Operation: AV POWER TITLE/GUIDE TUNING MENU BAND REPEAT RANDOM INPUT SEL. TV SELECT DISPLAY SELECT AUDIO THEME FAVORITE INFO. EXIT LAST CHANNEL STATUS MULTI ZONE ZONE A/B ENTER OSD /PAGE RETURN /PAGE AUTO/MONO ENTER : Enter : Cursor Up : Cursor Down : Cursor Left : Cursor Right : Play : Pause : Stop : Rewind MENU Numeric Entry With F.SHIFT button: INPUT SEL.
TV Operation: AV POWER TUNING BAND REPEAT RANDOM INPUT SEL. TV SELECT DISPLAY SELECT AUDIO THEME FAVORITE INFO. EXIT LAST CHANNEL STATUS MULTI ZONE ZONE A/B ENTER AUTO/MONO : Mute : Volume Down : Volume Up ENTER : Enter : Cursor Up : Cursor Down : Cursor Left : Cursor Right Numeric Entry With F.SHIFT button: : Channel Up INPUT SEL.
Satellite Receiver Operation: AV POWER TITLE/GUIDE TUNING MENU BAND REPEAT RANDOM INPUT SEL. TV SELECT DISPLAY SELECT AUDIO THEME FAVORITE INFO. EXIT LAST CHANNEL STATUS MULTI ZONE ZONE A/B ENTER OSD /PAGE RETURN /PAGE AUTO/MONO : Channel Up : Channel Down ENTER : Enter : Cursor Up : Cursor Down : Cursor Left : Cursor Right Numeric Entry With F.SHIFT button: INPUT SEL.
Performing Several Actions at Once (Macros) Your LCD Remote allows you to perform up to 20 different actions by pressing a single button. For example, you can create a macro that turns the TV on, turns the VCR on, selects the correct TV channel or input, and starts the VCR playing. The remote can store 3 different macros. Creating a Macro 1. Think about the sequence of events you want to set up.
Internet www.kenwoodusa.com e-m mail: inquiry@kenwoodusa.com 1-800-KENWOOD Main Office: P.O. Box 22745 Long Beach, CA 90801-5745 Canada Office: 6070 Kestrel Rd. Mississauga, Ontario L5T 1S8 ©2002 Kenwood USA Corporation.