AUDIO VIDEO SURROUND RECEIVER VR-707 KRF-V6070D INSTRUCTION MANUAL KENWOOD CORPORATION This instruction manual is for some models. Model availability and features (functions) may differ depending on the country and sales area. About the supplied remote control Compared to standard remote controls, the remote control supplied with this receiver has several operation modes. These modes enable the remote control to control other audio/video components.
Before applying the power Caution : Read this page carefully to ensure safe operation. Units are designed for operation as follows. How to use this manual U.S.A. and Canada ........................................... AC 120 V only Australia ........................................................... AC 240 V only Europe and U.K. ............................................... AC 230 V only China and Russia ............................................. AC 220 V only Other countries ..........
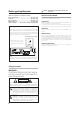
Before applying the power Contents Unpacking Caution : Read the pages marked safe operation. carefully to ensure Unpack the unit carefully and make sure that all accessories are present. FM indoor antenna (1) AM loop antenna (1) Before applying the power .............................. 2 Safety precautions ............................................. 2 How to use this manual ..................................... 2 Unpacking ..........................................................
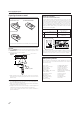
Before applying the power Preparing the remote control Channel space switching (Except for the U.S.A., Canada and Australia) Loading the batteries 1 Remove the cover. 2 Insert the batteries. The space between radio channels has been set to the one that prevails in the area to which the system is shipped.
Before applying the power Special features For the U.S.A. FCC WARNING This equipment may generate or use radio frequency energy. Changes or modifications to this equipment may cause harmful interference unless the modifications are expressly approved in the instruction manual. The user could lose the authority to operate this equipment if an unauthorized change or modification is made.
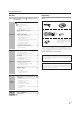
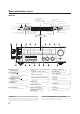
Names and functions of parts Main Unit Frequency display, Input display, Preset channel display, Surround mode display Speaker indicator MUTE indicator CLIP indicator AUTO DETECT indicator DTS indicator Band indicators 6CH INPUT indicator DIGITAL indicator AUTO indicator A B MEMO. indicator ST.
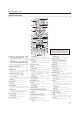
Names and functions of parts Remote control unit This remote control unit can be use not only for Kenwood products but also for non-Kenwood products by setting the appropriate manufacturer’s setup codes. º ^ 1 DVD 6CH TUNER CD DVD VID1 MD TAPE VID2 POWER RCVR T 4 o VP w er C Po 5 3 P. Call 2 & * ( 6 Multi P. Call 3 TV r we 2 SR AUX Enter 7 Multi 1 0 + 10 9 4 8 ) + 100 ¡ TV Mute Page Return OSD Last / A/B Exit 5 Guide Disc Skip Menu Mute Disc Sel.
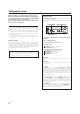
Setting up the system Make connections as shown in the following pages. When connecting the related system components, be sure to refer to the instruction manuals supplied with the components you are connecting. Do not connect the power cord to a wall outlet until all connections are completed. Input mode settings CD/DVD, VIDEO2 and DVD/6CH inputs each include jacks for digital audio input and analog audio input. After completing connections and turning on the receiver, follow the steps below.
Setting up the system Connecting audio components Shape of AC outlets U.S.A.
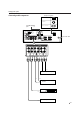
Setting up the system Connecting video components About the S-VIDEO jacks S-VIDEO jacks S-VIDEO S-VIDEO VIDEO 2 IN DVD IN MONITOR OUT Use the S-VIDEO jacks to make connections to video components with S-VIDEO IN/OUT jacks. • If you use the S-VIDEO jacks to connect your video playback components, be sure to use the S-VIDEO jacks when connecting your monitor and video recording components.
Setting up the system Digital connections The digital in jacks can accept DTS, Dolby Digital, or PCM signals. Connect components capable of outputting DTS, Dolby Digital, or standard PCM (CD) format digital signals. If you have connected any digital components to the receiver, be sure to read the “Input mode settings” section carefully.
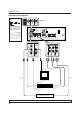
Setting up the system Connecting a DVD player (6-channel input) If you have connected a DVD player to the receiver with digital connection, be sure to read the “Input mode settings” section carefully.
Setting up the system Connecting the speakers Front Speakers Right Left Center Speaker FRONT CENTER + R L C RED WHITE GREEN SPEAKERS (8-16Ω) SURROUND + + - - SURROUND BACK SUB WOOFER + PRE OUT R L SB GRAY BLUE PURPLE SPEAKERS (8-16Ω) Powered sub woofer Right Left Surround Speakers (Be sure to connect both surround speakers) Surround Back 13 EN
Setting up the system Connecting the terminals Connecting the antennas AM loop antenna 1 Strip coating. 2 Push the lever. The supplied loop antenna is for use indoors. Place it as far as possible from the receiver, TV set, speaker cords and power cord, and adjust the direction for best reception. AM antenna terminal connections 3 Insert the cord. 4 Return the lever. • Never short circuit the + and – speaker cords.
Setting up the system Connecting the system control Connecting system control cords after connecting a KENWOOD audio component system lets you take advantage of convenient system control operations. This unit is compatible only with the [SL-16] mode. The system control operation is not available if the unit is connected in the [XS8], [XS], or [XR] connection mode. If your component has the mode select switch, set the connected components to the [SL16] mode.
Preparing for surround sound Speaker settings To enable you to obtain optimum enjoyment from the receiver’s listening modes, make sure to complete the speaker settings (subwoofer, front, center, and surround speakers) as described below. POWER ON/STANDBY ON/STANDBY (KRF-V6070D) (VR-707) MULTI CONTROL 2 Use the MULTI CONTROL knob or Multi %/fi keys to select the speaker system setting. 1 2WAY 2SPKR : For selected Kenwood speaker – for example, KS-307HT.
Preparing for surround sound 0 Use the MULTI CONTROL knob or Multi %/fi keys to select the appropriate surround speaker setting. If you have selected “LRG” as the center speaker setting, 1 SURR NML (normal) : Average size surround speakers are connected to the receiver. 2 SURR LRG (large) : Large surround speakers are connected to the receiver. 3 SURR OFF : Surround speaker setting mode to the receiver is OFF.
Preparing for surround sound Normal playback Preparing for playback 5 Repeat steps 3 and 4 to input the distance for each of the speakers. 6 Setup is complete when the EXIT indication appears. Some preparatory steps are needed before starting playback. POWER ON/STANDBY SPEAKERS ON/STANDBY (KRF-V6070D) ON/OFF (VR-707) • The speakers you have selected should appear on the display. Confirm that all the speakers have been correctly selected. 7 Press the SETUP key to exit the SETUP mode.
Normal playback Listening to a source component VOLUME CONTROL INPUT SELECTOR Adjusting the sound SPEAKERS ON/OFF ACTIVE EQ PHONES VOLUME CONTROL MULTI CONTROL MUTE Input Selector Multi % / fi ¢ + + 4 VOL Tone ¢ + + 4 – – – + + Active EQ 1 Use the INPUT SELECTOR knob or keys to select the source you want to listen to.
Normal playback Recording Recording audio (analog sources) Adjusting the Loudness mode (remote control only) You can adjust the Loudness function which controls the low volume settings to maintain the music’s richness. The adjustment can be made when the receiver is in the PCM stereo and analog stereo mode. Press the Loudness key to turn the Loudness setting ON. To cancel Press the Loudness key again so that the “Loudness” indicator goes off.
Recording 3 Press and hold the DIMMER key for more than 2 seconds to select the A-REC or M-REC mode during digital input. Listening to radio broadcasts The receiver can store up to 40 stations in the memory and recall them by one-touch operation. Tuning radio stations 1 Rec mode off : The digital input record mode is switched off. 2 A-REC mode : The digital input signals (DTS, Dolby Digital, or PCM) are identified automatically and converted into stereo signals that are ready for recording.
Listening to radio broadcasts Presetting radio stations manually MEMORY Receiving preset stations in order (P.Call) TUNER P.Call @/# ¢ + + 4 MULTI CONTROL + 1 Tune to the station you want to store. 2 Press the MEMORY key while receiving the station. Blinks for 5 seconds Lights for 5 seconds 1 Press the TUNER key to select tuner as the source. 2 Use the P.Call @¥# keys to select the desired station. • Each time you press the key, another preset station is received in order.
Ambience effects This receiver is equipped with listening modes that allow you to enjoy an enhanced sonic ambience with a variety of video sources. In order to obtain the optimum effect from the surround modes, make sure to input the proper speaker settings beforehand. ^ Surround modes The below speaker placements are for 5.1 channel surround sound system which are; • Dolby Digital • Dolby Pro Logic II • DTS • DSP • DVD 6-channel The below speaker placements are for 6.
Ambience effects Dolby Digital DTS mode The Dolby Digital surround format lets you enjoy up to 5.1 channels of digital surround sound from Dolby Digital program sources (such The DTS multi-channel audio format is available on CD, LD and DVD software. DTS is a strictly digital format and cannot be decoded inside most CD, LD or DVD players.
Ambience effects Surround play The DTS compatible models can reproduce a CD, DVD, or LD carrying the DTS mark. DOLBY DIGITAL can be used when playing DVD or LD software bearing mark and DOLBY DIGITAL format digital broadcasts (etc.). the DOLBY PRO LOGIC can be used when playing video, DVD, or LD mark. software bearing the LISTEN MODE INPUT MODE INPUT SELECTOR When the DOLBY DIGITAL or DOLBY DIGITAL EX signal is input: (The DOLBY DIGITAL or PRO LOGIC indicator lights up.
Ambience effects DVD 6-channel playback Convenient functions Using a DVD player or the like equipped with six (5.1) output channels and the receiver, you can enjoy surround sound playback. Connecting a DVD player which can decode the surround signal itself is also acceptable.
Ambience effects 2 Use the MULTI CONTROL knob or Multi %/fi keys to select the ON or OFF setting. Center Width mode (Pro Logic II Music mode only) Center Width adjustment allows you to enjoy an enhanced sound when listening to music through center image from only center speaker, or left and right speakers or various combinations adjustments. • Some Dolby Digital software may not be compatible with the Midnight mode.
Basic remote control operations for other components The remote control supplied with this receiver is also capable of controlling components from a variety of manufacturers once you register the appropriate setup codes into the remote control unit. Low battery warning Replace all two batteries with new ones when you notice a shortening of the distance from which the remote control will operate. The remote control is designed to retain setup codes in memory while you change batteries.
Basic remote control operations for other components Re-assigning device keys Operating other components The remote control can be set up to control a second TV or VCR, or any combination of eight home entertainment components. For example, to control the operation of two different VCR using the remote control, the user need to re-assign the unused VID2 key to operate the second VCR (VID1) as follows: This operation lets you operate the registered components.
Basic remote control operations for other components Setup code chart TV Setup codes Manufacturer Setup Codes Manufacturer Setup Codes AOC 0019, 0030 GE Admiral 0093, 0463 0021, 0047, 0051, 0178, 0251, 0451, 0747, 0804, 0807, 0809, 0811, 1147, 1347 Gibralter 0017, 0019, 0030 Adventura 0800 Aiko 0092 Aiwa 0701, 0800, 0802 Akai 0030 Alaron 0179 America Action 0180 Ampro 0751 Anam 0180 Apex Digital 0748, 0765, 0767 Asha 0804 Audiovox 0092, 0180, 0451, 0623, 0802 Baysonic 018
Basic remote control operations for other components Setup code chart Manufacturer Setup Codes Manufacturer Orion 0179, 0236, 0463, 0817 Techwood 0051, 0056 Panasonic 0051, 0250, 0809, 0812, 0815, 0907, 0908 Teknika 0016, 0019, 0054, 0056, 0060, 0092, 0150, 0179, 0180, 0800, 0802 Penney 0019, 0021, 0030, 0047, 0051, 0060, 0156, 0178, 0747, 0802, 0804, 0809, 0814, 1347 Telefunken 0056 Philco 0019, 0030, 0054, 0145, 0463 Philips 0054, 0904, 1454 Pilot 0019, 0030, 0802 Pioneer 0166, 0679
Basic remote control operations for other components Setup code chart DVD player Setup codes VCR Setup codes Manufacturer Setup Codes Manufacturer Setup Codes Aiwa 0641 Admiral 0048, 0209 Apex Digital 0672, 0717, 0755, 0794, 0795, 0796, 0797, 0830 American High 0035 Bell & Howell 0104 Blue Parade 0571 Broksonic 0121, 0184, 0209 DVD2000 0521 Canon 0035 Daewoo 0784 Carver 0081 Denon 0490, 0634 Craig 0047 Emerson 0591 Curtis Mathes 0035, 0060, 0162, 0760 Enterprise 0591 D
Basic remote control operations for other components Setup code chart Manufacturer Setup Codes Setup codes for Kenwood components with System Control connection Sanyo 0047, 0104 Component Setup Codes Scott 0043, 0045, 0121, 0184 CD 1338 Sears 0035, 0042, 0047, 0104 MD 1339 Semp 0045 Cassette deck 1340 Sharp 0048 Sonic Blue 0614, 0616 Sony 0032, 0033, 0035, 0636, 1032 Sylvania 0035, 0043, 0081 Technics 0035, 0162 Teknika 0035 Tivo 0618, 0636 Toshiba 0043, 0045 Vector 0045
Basic remote control operations for other components CASSETTE deck, CD player & MD recorder operations You can perform these basic operations using the keys described below when connected to KENWOOD cassette deck, CD player or MD recorder equipped with system control operations.
Basic remote control operations for other components Other components’ operations Refer to the following for the type of remote control operations available for each component. 1 Select the input source. 2 Press the keys corresponding to the operations you desire. Refer to the following sections for details. • When pressing keys in succession, press each key firmly and be sure to wait at least 1 second before pressing the next key.
Basic remote control operations for other components DVD player operation keys Cable operation keys DVD 6CH 6 Enter 7 Enter % (Cursor up) fi (Cursor down) @ (Cursor left) # (Cursor right) T 4 3 Numeric keys 2 Enter 0 9 + 100 Page Return Return OSD Last / A/B Exit Guide Disc Skip +100 (Select tracks) OSD (On screen display) Menu Disc Skip Input Sel.
In case of difficulty For the U.S.A. and Canada Resetting the Microcomputer Unplug the power cord from the wall outlet, then plug it back in while holding down the POWER ON/STANDBY key. The microcomputer may malfunction (unit cannot be operated, or shows an erroneous display) if the power cord is unplugged while the power is ON, or due to some other external factor. If this happens, execute the following procedure to reset the microcomputer and return the unit to its normal operating condition.
In case of difficulty Remote control unit Symptom Cause Certain inputs cannot be selected using the remote control. • No setup codes registered at the respective input(s). • Register a setup code at input(s). Remote control operation is not possible. • The remote control is set to a different operation mode. • Press the any of the Input Selector keys to select the appropriate operation mode. • Replace with new batteries. • Operate the remote control unit within the controllable range.
Specifications For the U.S.A and Canada AUDIO section Rated power output during STEREO operation 100 watts per channel minimum RMS, both channels driven, at 8Ω from 40 Hz to 20 kHz with no more than 0.7% total harmonic distortion. (FTC) Effective power output during SURROUND operation FRONT (40 ~ 20 kHz, 0.7% T.H.D. at 8Ω one channel driven) ............................................................................... 100 W + 100 W CENTER (40 ~ 20 kHz, 0.7% T.H.D. at 8Ω one channel driven) ...............
For your records Record the serial number, found on the back of the unit, in the spaces designated on the warranty card, and in the space provided below. Refer to the model and serial numbers whenever you call upon your dealer for information or service on this product.