DVD COMPACT HIFI SYSTEM XD-DV90 XD-DV80 XD-DV70 XD-DV60 XD-DV50 XD-A850DV INSTRUCTION MANUAL KENWOOD CORPORATION This instruction manual is used to describe multiple models listed above. Model availability and features (functions) may differ depending on the country and sales area.
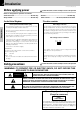
Introduction XD-DV series (EN/K,M,T,X,Y) Before applying power Caution : Read this section carefully to ensure safe operation. Units are designed for operation as follows. U.S.A. and Canada ...................................................... AC 120 V only Europe and U.K. ........................................................... AC 230 V only Preparations For the United Kingdom Australia ....................................................................... AC 240 V only *Other countries .....
XD-DV series (EN/K,M,T,X,Y) Unpacking Unpack the unit carefully and make sure that all accessories are put aside so they will not be lost. Examine the unit for any possibility of shipping damage. If your unit is damaged or fails to operate, notify your dealer immediately. If your unit was shipped to you directly, notify the shipping company without delay. Only the consignee (the person or company receiving the unit) can file a claim against the carrier for shipping damage.
Introduction XD-DV series (EN/K,M,T,X,Y) In regard to demonstration When this unit is switched on for the first time or after the power cable has been disconnected for a long time, it will enter automatically into demonstration mode (only display). During the demonstration, the display changes in sequence but the audio does not change. The demonstration can be canceled with the following procedure. Cancellation of Demonstration mode 1 Set the POWER key to ON. 2 Press the DISPLAY/DEMO key.
IMPORTANT SAFEGUARDS Caution : Read this page carefully to ensure safe operation. 5 XD-DV series (EN/K,M,T,X,Y) Please read all of the safety and operating instructions before operating this appliance. Adhere to all warnings on the appliance and in the instruction manual. Follow all the safety and operating instructions. These safety and operating instructions should be retained for future reference. 1.
XD-DV series (EN/K,M,T,X,Y) 13.Lightning – For added protection for this appliance during a lightning storm, or when it is left unattended and unused for long periods of time, unplug it from the wall outlet and disconnect the antenna or cable system. This will prevent damage to the appliance due to lightning and power-line surges. Preparations 14.Abnormal smell – If an abnormal smell or smoke is detected, immediately turn the power OFF and unplug the appliance from the wall outlet.
Contents 7 XD-DV series (EN/K,M,T,X,Y) Program play (Using the On-screen display)(DVD/CD/VCD) .......... 28 Preparation section Using the On-screen banner display .................................................. 30 Selecting a Title ..................................................................................... 31 Selecting a Chapter or Track ............................................................... 31 Before applying power .................................................................
Region codes XD-DV series (EN/K,M,T,X,Y) Every player of this model has a certain region code assigned to it based on the country where the player is used. When the player is used to play back DVD discs, it can only play the DVD discs carrying the region codes matching the region code of the player. The region code for this player is described on the rear panel of the player.
Video formats 9 XD-DV series (EN/K,M,T,X,Y) TV formats of major countries The video signals used to display TV pictures and video disc pictures are mainly based on two types of signal formats (PAL, SECAM and NTSC), which are assigned to each country or area as shown on the right. As a result, it is required to select discs according to the video format used with your TV monitor (in your country or area). TV Format NTSC PAL SECAM Major Countries & Areas Japan, Taiwan, Korea, U.S.A.
Discs information XD-DV series (EN/K,M,T,X,Y) Recording systems and types of playable discs The system using this unit does not only play music from CD but can also play the discs listed below to offer you high-quality entertainment of video of movies and live concerts. DVD Playable Disc CD VCD COMPACT COMPACT COMPACT Logo mark on disc DIGITAL DIGITAL VIDEO VIDEO Preparations DIGITAL AUDIO Disc size 8cm Played sides Contents Video + Audio 8cm 12cm One or both One or both Approx.
Handling of discs and tapes 11 XD-DV series (EN/K,M,T,X,Y) Disc handling precautions Handling Hold the discs so that you do not touch the playing surface. Never play a cracked or warped disc During playback, the disc rotates at high speed in the player. Therefore, to avoid danger, never use a cracked or deformed disc or a disc repaired with tape or adhesive agent. Please do not use discs which are not round because they may cause a malfunction.
Caution : Read this page carefully to ensure safe operation. System Connections XD-DV series (EN/K,M,T,X,Y) Make connections as shown below. When connecting the related system components, refer also to the instruction manuals of the related components. Caution: Preparations Do not plug in the power lead until all connections are completed. Caution Malfunction of microcomputer Be sure to adhere followings. Or proper ventilation will be blocked causing damage or fire hazard.
System Connections 13 XD-DV series (EN/K,M,T,X,Y) Connection of the front speakers Do not plug the power cord into the power outlet until all of the required connections have been made.
XD-DV series (EN/K,M,T,X,Y) Connection of the surround speaker system For XD-DV90/XD-DV80 + SPEAKERS - SURROUND (8Ω) + CENTER (6Ω) L - R – - + + + - + - + + - + - R + L IN VIDEO/AUX OUT ANTENNA COMPONENT VIDEO OUTPUT Cr AM FM 75Ω GND DIGITAL OUT OPTICAL AC 110120V AC 220240V Y SPEAKERS FRONT SPEAKERS (6Ω) VIDEO OUTPUT Cb SUB WOOFER PRE OUT S-VIDEO SURROUND (8Ω) L L R – R CENTER (6Ω) + – + Center speaker Example of the XD-DV90 Surround speaker (right) Surround s
System Connections 15 XD-DV series (EN/K,M,T,X,Y) Connection of the TV monitor (optional) and VCR (optional) This product is compatible with the MacroVision type copy protection. Some discs contain the recording of copy inhibit signals, and the video may be disturbed when the video of such discs is recorded onto a VCR and played back.
Controls and indicators XD-DV series (EN/K,M,T,X,Y) Main unit (1) ( * & ^% $ # @! DISC SELECTOR DISC 1 0OPEN/CLOSE DISC SKIP DISC 2 DISC 3 0 1 STANDBY /TIMER DISPLAY/DEMO LISTEN MODE DVD EQ MODE /EX.BASS REVERSE MODE VCD POWER 2 TUNING MODE VIDEO/AUX 8 CD ON/STANDBY VOLUME CONTROL 3 4 TUNER BAND TAPE A TAPE B STOP 23 23 7 PHONES MIC L /P.CAL ROL NT CO DVD/CD SMART MENU TI UL M Preparations 9 DOLBY DIGITAL ¢ PRO LOGIC SELEC T MIC LEVEL EN TE R 4 EX.
Controls and indicators 17 XD-DV series (EN/K,M,T,X,Y) Main unit (2) ¶ REVERSE MODE POWER §∞¢ VIDEO/AUX EQ MODE /EX.BASS VCD TUNING MODE CD ON/STANDBY 4 TUNER BAND TAPE A TAPE B STOP 23 23 7 PHONES MIC L /P.CAL ROL NT CO DVD/CD SMART MENU TI UL M VOLUME CONTROL DOLBY DIGITAL ¢ PRO LOGIC SELEC T MIC LEVEL EN TE R EX.BASS PUSH OPEN TAPE A PUSH OPEN PLAY PLAY/REC TAPE ) Cassette holder (TAPE A) · Press the area marked “PUSH OPEN” to load or eject a tape.
Operation of remote control unit XD-DV series (EN/K,M,T,X,Y) The keys on the remote control unit with the same names as on the main unit have the same function as the keys on the main unit. POWER DISC 1 DISC 2 DISC 3 1 2 3 KEY CONTROL 1 4 5 ECHO – + 7 DVD/CD HIT MASTER TUNER 9 TUNING 2 P.CALL Preparations 3 BAND TAPE A ¡ 4 9 6 6 8 1 / ¢ 0 23 STOP TAPE B 7 23 2 8 2 ∞ CLEAR 4 5 RETURN SELECT ENTER PTY RDS S.
SMART MENU operation/Clock adjustment 19 XD-DV series (EN/K,M,T,X,Y) SMART MENU operation 4, ¢/P.CALL When one of the MULTI CONTROL keys (4 keys) is pressed after the SMART MENU key (S.MENU key) has been pressed, various operations can be performed while watching the display. SELECT key ENTER key RETURN key →Selects an item. → Confirms the selected contents. →Returns to the previous operation. ENTER SELECT RETURN 23 23 7 MULTI CONTROL SELECT ENTER Adjust the clock before setting the timer.
Clock adjustment XD-DV series (EN/K,M,T,X,Y) “TIME 24H” or “TIME 12H”, 5 Select then press the SELECT key. To decrease TI UL M ¢ SELEC T L /P.CAL ROL NT CO 4 Preparations To increase ÷ When operating on the remote control unit, Press the 4, ¢ keys to select “TIME 24H” or “TIME 12H”, then press the SELECT key. the figure of hour, then press the 6 Enter SELECT key. TI UL M 11:00 Example of the 24 hour display. Example of the 12 hour display. ÷ The time display starts to blink.
Let's put out some sound 21 XD-DV series (EN/K,M,T,X,Y) In regard to input switching between VIDEO and AUX When the VIDEO/AUX key is pressed, the input is switched to the AUX terminal at the rear of the unit. Each time the VIDEO/AUX key is pressed for more than 2 seconds, the display is switched between VIDEO and AUX.
Let's put out some sound XD-DV series (EN/K,M,T,X,Y) Changing the Tone This unit is equipped with various preset equalizers and three custom equalizers, which can be preset freely, so that various sounds can be enjoyed. In addition, it has an EX-BASS function for one-touch bass correction. Extra Bass When the EX. BASS function is switched on, richer bass tones can be reproduced. Press and hold the EX. BASS key for mor than 2 seconds. MAIN UNIT REMOTE EQ MODE /EX.
Let's put out some sound 23 XD-DV series (EN/K,M,T,X,Y) To set the CUSTOM EQ. 1 Press the SMART MENU key. MAIN UNIT REMOTE SMART MENU S.MENU 2 Select “AUDIO OPTION”, then press the SELECT key. MAIN UNIT “RECORDING OPTION” “TAPE DUBBING” “AUDIO OPTION” “CLOCK OPTION” REMOTE P.CALL TI UL M ¢ L /P.CAL ROL NT CO 4 4 ¢ The following items can be selected by pressing the MULTI CONTROL keys. SELECT SELEC T 3 Select “CUSTOM EQ 1”, then press the SELECT key. REMOTE TI UL M ¢ L /P.
Playback of discs XD-DV series (EN/K,M,T,X,Y) Sequential playback from the first track or chapter 1 Open the tray and place a disc ÷ The tray opens when the key is pressed and closes when the key is pressed again. The label must be on top. 0OPEN/CLOSE Disc number 2Close the tray 1 2 ÷ Depending on the disc, playback may start automatically.
Playback of discs 25 XD-DV series (EN/K,M,T,X,Y) Playback from the desired track or chapter DVD CD VCD Skipping tracks or chapters MAIN UNIT REMOTE ¢ L /P.CAL ROL NT CO 4 TI UL M To skip backward P.CALL To skip backward 4 ¢ To skip forward ÷ The chapter (or track) in the direction of the key pressed is skipped, and the selected chapter (or track) will be played from the beginning.
Playback of discs XD-DV series (EN/K,M,T,X,Y) DVD CD VCD Repeat play DVD CD VCD Desired tracks or all discs can be played back repeatedly. ÷ ÷ ÷ ÷ ÷ All Disc – Repeat all discs. 1 Disc– Repeat the disc that is playing. Title – Repeat the title that is playing. Chapter – Repeat the chapter that is playing. Track – Repeat the track that is playing. / The A-B repeat function lets you mark a segment to repeat between the beginning “A” and the end “B” of the segment you want to replay.
Playback of discs 27 XD-DV series (EN/K,M,T,X,Y) CD VCD Random play The tracks of the disc are played in random order. 1 During playback or stop mode, press RANDOM on the remote. / ANGLE RANDOM ÷ When the RANDOM key is pressed during playback, the tracks of the disc being played will be selected in random order for playback. ÷ After all tracks of a disc have been played in random order, playback will stop. (Random mode will be cancelled.
Program play (Using the On-screen display)(DVD/CD/VCD) XD-DV series (EN/K,M,T,X,Y) Program Edit / 1 During stop mode, press the SHIFT key on the remote, then press the DVD PGM key on the remote. Program edit display appears. DVD PGM EQ SHIFT / 2 Select desired disc number, title, chapter or track by Press Cursor up/down (5/∞) keys or numeric keys.
Program play (Using the On-screen display)(DVD/CD/VCD) 29 XD-DV series (EN/K,M,T,X,Y) Insert chapter or track / 1 Press the SHIFT key on the remote, then press the DVD PGM key on the remote. DVD PGM Program edit display appears. EQ SHIFT / 2 Select specific title/chapter or track to insert by Press Cursor up/down (5/∞) keys or numeric keys.
Using the On-screen banner display XD-DV series (EN/K,M,T,X,Y) The on-screen Banner Display contains many playback features. To see the Banner Display, press OSD key on the remote while a disc is playing. Use the Cursor (Up/Down/Left/Right) keys on the remote to move through the different features in the Banner Display. Each feature is illustrated with an icon. 1 During playback, press the OSD key on the remote.
Using the On-screen banner display 31 XD-DV series (EN/K,M,T,X,Y) DVD Selecting a Title Selecting a Chapter or Track DVD CD Some discs contain more than one title. For example, there might be four movies on one disc (each movie might be considered a title). Because DVD discs use digital technology, a title can be divided into individual chapters (similar to tracks on a CD). You can skip a specific chapter by using the Chapter section in the Banner Display.
Using the On-screen banner display XD-DV series (EN/K,M,T,X,Y) DVD Changing the Audio Language If the disc was created with different language tracks, you can use the Banner Display to temporarily change the DVD player’s Audio setting. Using the on-screen banner display DVD You can change the Subtitle language while you’re watching a disc (but only if the disc was created with subtitles). Using the on-screen banner display 1 During playback, press the OSD key on the remote.
Using the On-screen banner display 33 XD-DV series (EN/K,M,T,X,Y) DVD Changing the Camera angle CD VCD Using IntroScan function Some disc contains multiple angles particular scene or sequence. If the disc only has one angle, this feature won’t work. IntroScan plays the first few seconds of each track on the CD. Using the on-screen banner display Using the on-screen banner display 1 During playback, press the OSD key on the remote. / 1 During playback, press the OSD key on the remote.
Using the On-screen banner display XD-DV series (EN/K,M,T,X,Y) DVD CD VCD Using Bookmarks The bookmark feature lets you mark a point on the disc that you can go to quickly. You can store up to 9 bookmarks. Create the bookmark Recalling a bookmarked scene 1 During playback, press the OSD key on the remote. / 1 During playback, press the OSD key on the remote. / OSD OSD 2 Press the Cursor left/right (2/3) keys until the BOOKMARK icon is highlighted.
Receiving broadcast station 35 XD-DV series (EN/T,M,X) It is also possible to receive them by one-touch operations by storing up to 45 stations in the preset memory. (see page 36) TUNING / TUNER/ BAND TUNING MODE STOP TUNER/ BAND P.CALL MULTI CONTROL 23 23 7 ENTER ENTER 1 Select the TUNER input MAIN UNIT When the BAND key is pressed, this unit will be switched on automatically.
Receiving broadcast station XD-DV series (EN/T,M,X) You can store up to 45 stations in the memory and recall with a single touch of the key. / MULTI CONTROL P.CALL ENTER 23 23 7 ENTER Storing the broadcast stations (one-by-one presetting) a station (auto tuning or manual 1 Select tuning) fi 2 Press the ENTER key 1 2 3 1 2 3 1 2 3 Blinks REMOTE Operations ENTER 3 Select the desired preset number REMOTE P.
Receiving broadcast station 37 XD-DV series (EN/T,M,X) RDS is a system which transmits useful information (digital data) for FM broadcasts together with the broadcast signal. Tuners and receivers designed for RDS reception can extract the information from the broadcast signal for use with various functions such as automatic display of the station name. / TUNER/BAND P.CALL TUNING PTY RDS Using RDS function ( for Europe and U.K.
Receiving broadcast station XD-DV series (EN/T,M,X) PTY function The PTY information is composed of an identification symbol, which helps the FM radio to recognize the program type of each FM station. TUNING The 29 PTY modes are shown in the display by pressing the PTY key. PTY / TUNER/BAND Using the PTY search function 1 Select the FM band fi TUNER BAND 2 Press the PTY key PTY RDS Program types TOP MENU Operations ÷ The PTY MODE (POP M, ROCK M etc.) appears on the display. Press the P.
Playback of tapes 39 XD-DV series (EN/T,M,X) This unit can only use tape for the normal position (Type I). / REVERSE MODE 1, ¡ TAPE A / TAPE B STOP 23 23 4, ¢ 7 STOP Notes Longer tape than 90 minutes cassette tape: Since longer tape than 90 minutes cassette tape is very thin, the tape could adhere to the pinch roller or be easily cut. It is recommended that these tapes not be used with this unit to prevent possible damage. It is possible to reset the tape counter by one of the following methods.
Normal Recording (TAPE B only) This unit can only use tape for the normal position (Type I). To record a DOLBY SURROUND disc, please switch the listening mode to STEREO. Preparation 1 Open the door. Press the area marked PUSH OPEN to load or eject a tape 2 Insert a tape. 3 close the door. A / REVERSE MODE 23 23 7 4, ¢ TAPE B TAPE B STOP 23 23 7 STOP ÷ Remove tape slack before loading. ÷ Close the door securely.
CD Direct Recording (TAPE B only) 41 XD-DV series (EN/T,M,X) This unit can only use tape for the normal position (Type I). CD Direct recording is not possible for a DOLBY SURROUND disc. Please switch the listening mode to STEREO and perform normal recording. (See page 53) With CD Direct recording, an entire CD is recorded and CD and TAPE stop automatically. Preparation See “Preparation” on page 40. 1 Select reverse mode · MAIN UNIT Select “CD DIRECT RECORDING”, then 5 press the SELECT key.
CD Program Recording (TAPE B only) XD-DV series (EN/T,M,X) This unit can only use tape for the normal position (Type I). CD Program recording is not possible for VCD, DVD discs. Preparation See “Preparation” on page 40. 1 · Select reverse mode Each press switches the modes as follows 1“ MAIN UNIT REVERSE MODE tape transport direction, then 2 Select press the STOP ( 7 ) key.
TAPE DUBBING 43 XD-DV series (EN/T,M,X) This unit can only use tape for the normal position (Type I). Tapes can be copied easily using the tape dubbing function. Preparation Load the tape to be played in TAPE A and the tape to be recorded in TAPE B. 1 Select reverse mode · MAIN UNIT Select tape transport direction of 4 TAPE A, then press the SELECT key. MAIN UNIT REVERSE MODE TI UL M ¢ 2 P.CALL 4 SELECT ¢ SELEC T Press the SMART MENU (S. MENU) key. MAIN UNIT L /P.
Menu playback XD-DV series (EN/T,M,X) Hierarchical structure of VCD menus (P.B.C.) When an item is selected on the menu screen during playback of a P.B.C.-compatible VCD, another menu with more details items may be displayed. When a number of menus are connected in multiple layers in this way, it is said that the menus have a hierarchical structure. In this structure, the desired scene can be reached by repeating item selections on the menu screens.
Enjoying karaoke singing (only for some areas) 45 XD-DV series (EN/T,M,X) KARAOKE mode icon Software with which this function is available: DVD VCD Echo icon CD HIT MASTER icon KEY CONTROL icon Start playback 1 Load a disc and Connect a microphone MIC MIC LEVEL 0OPEN/CLOSE 1 2 Note 2 Karaoke mode operation is possible only when a microphone is connected. Start playback MIC LEVEL DVD/CD ÷ Press 6 key to start playback ÷ Adjust volume level of the microphone.
Set Up functions XD-DV series (EN/T,M,X) Set up menu The initial setup of the player, which has been made at the factory, can be changed to the desired setup. 1 During stop mode, press MENU key on the remote. (Example of the XD-DV90) / RDS MENU Current setup menu display appears on the screen.
Set Up functions 47 XD-DV series (EN/T,M,X) DVD Select Audio Language DVD Select Subtitle Language 1 Press Cursor up/down (5/∞) keys on the remote to select Audio on the set up menu display, then press the ENTER key. / / ∞ 2 1 Press Cursor up/down (5/∞) keys on the remote to select Subtitle on the set up menu display, then press the ENTER key. ∞ 2 2 ENTER 2 ∞ (Audio menu appears.) (Subtitle menu appears.
Set Up functions XD-DV series (EN/T,M,X) DVD Select Menu Language DVD 1 Press Cursor up/down (5/∞) keys on the remote to select Menus on the set up menu display, then press the ENTER key. / Select Rating (Parental Lock) This part of DVD rating lets you determine how your player will react discs that contain movies that are rated (in the U.S.A. the Motion Pictures Association of America rates movies as G, PG, PG-13, etc.).
Set Up functions 49 XD-DV series (EN/T,M,X) DVD Password Input password / 1 Press Cursor up/down (5/∞) keys on the remote to select Password on the set up menu display, then press the ENTER key. 4 Press ENTER key to finish password input (Confirm Password display appears below Enter Password display). ∞ 2 2 ENTER ∞ (Password menu appears.) ∞ 2 After select “Set Password”, press the ENTER key. 2 2 ENTER ∞ / ∞ 2 2 ENTER ∞ 6 Select OK and press the ENTER key.
Set Up functions XD-DV series (EN/T,M,X) DVD Password (continued) Change password / 1 Press Cursor up/down (5/∞) keys on the remote to select Password on the set up menu display, then press the ENTER key. / ∞ ∞ 2 4 Press Cursor up/down (5/∞) keys or numeric keys on the remote to enter password. 2 2 2 ENTER ∞ ENTER ∞ 5 Press ENTER key to finish password input (Confirm Password display appears below Enter Password display). Operations (Enter Password menu appears.
Set Up functions 51 XD-DV series (EN/T,M,X) DVD Password (continued) DVD TV aspect Clear password / 1 Press Cursor up/down (5/∞) keys on the remote to select Password on the set up menu display, then press the ENTER key. 1 Press Cursor up/down (5/∞) keys on the remote to select TV Aspect on the set up menu display, then press the ENTER key. / ∞ ∞ 2 2 2 2 ENTER ∞ ENTER ∞ (TV Aspect menu appears.) 2 Press Cursor up/down (5/∞) keys or numeric keys on the remote to enter password.
Set Up functions XD-DV series (EN/T,M,X) DVD Dynamic Range DVD 1 Press Cursor up/down (5/∞) keys on the remote to select Dynamic Range on the set up menu display, then press the ENTER key. / Digital Audio Out 1 Press Cursor up/down (5/∞) keys on the remote to select Digital Audio Out on the set up menu display, then press the ENTER key. / ∞ 2 ∞ 2 2 ENTER Operations ∞ / 2 ENTER ∞ (Dynamic Range menu appears.) (Digital Audio Out menu appears.
Setting up surround mode 53 XD-DV series (EN/T,M,X) What are surround modes? You can experience true home-theater sound with your new system. This system incorporates several listen modes to let you enjoy surround sound with a wide variety of program sources. Each produces multiple channels of surround-sound, but each does it differently. ● Dolby Digital : Dolby Digital uses an encode/decode process based on its theatrical digital surround sound technology.
SPEAKER SETUP XD-DV series (EN/T,M,X) Positioning the speakers To achieve the optimum effects obtainable with this SURROUND SOUND system, it is important to position the speakers properly. Refer to the following illustration to find the best location in your room. Center speaker Preparation 1 Play a disc marked ”Dolby Digital”. DVD/CD ¢ C L SL R SW SR Front speaker Sub woofer (optional) Front speaker 2 Stop the playback.
SPEAKER SETUP 55 XD-DV series (EN/T,M,X) / 4 Press the cursor up/down (5/∞) key to select Large or small, then press the ENTER key When only the accessory speakers are to be used, the most suitable setting already has been made. Please do not make any change, but continue to "Delay time setting".
XD-DV series (EN/T,M,X) Delay time setting The ideal listening position for 6-channel surround playback is the point at equal distance from all speakers. By setting the delay time for the center and surround speakers, this item realizes the ideal listening position virtually. (The center and surround speakers can be set as if they are laid out on the dotted line circle shown below.) Ideal center speaker position SW R C R Dc S L Distance A Setting 0 cm 0 ms Approx. 40 cm 1 ms Approx.
SPEAKER SETUP 57 XD-DV series (EN/T,M,X) Speaker level setting 1 Press up/down (5/∞) keys or cursor left/right (2/3) keys to select “TEST” on the Speaker Setup menu, then press the ENTER key. / ∞ 2 2 ENTER ∞ When TEST (test tone) has been selected, test noise is put out sequentially from the speakers, starting with the left front speaker. Check that the test noise can be heard from all speakers and that the same volume is heard from all speakers.
Timer function Adjust the clock before setting the timer XD-DV series (EN/T,M,X) Sleep timer (SLEEP) : The unit is turned OFF automatically after the specified period has elapsed. Timer playback: At the set ON time, the power is switched on and playback of the source set in advance starts. The power is switched off at the set OFF time. Timer recording: At the set ON time, the power is switched on and recording of the source (tuner or external input) set in advance starts.
Timer function 59 XD-DV series (EN/T,M,X) Timer Play 1 Switching the power ON. POWER ON/STANDBY 2 Press the SMART MENU key. SMART MENU 3 Select “CLOCK OPTION”, then press the SELECT key. TI UL M ¢ L /P.CAL ROL NT CO 4 SELEC T 4 Select “TIMER PLAY”, then press the SELECT key. TI UL M SELEC T 5 Select desired timer mode, then press the SELECT key. TI UL M ¢ L /P.CAL ROL NT CO 4 SELEC T TI UL M L /P.CAL ROL NT CO ¢ SELEC T 7 Select OFF time. TI UL M ¢ L /P.
Timer function XD-DV series (EN/T,M,X) 9 Select the preset station (only when tuner is selected above), then press the SELECT key TI UL M ¢ SELEC T L /P.CAL ROL NT CO 4 "SET CLOCK" will be displayed when the present time has not been set. In that case, please set the present time. (See page 19) 0 As the timer setting contents will be displayed , press the ENTER key.
Timer function 61 XD-DV series (EN/T,M,X) 6 Select ON time. TI UL M ¢ SELEC T L /P.CAL ROL NT CO 4 7 Select OFF time. TI UL M ¢ L /P.CAL ROL NT CO 4 SELEC T 8 Select the input source. TI UL M ¢ SELEC T L /P.CAL ROL NT CO 4 TI UL M The following items can be selected by pressing the MULTI CONTROL keys. 1 2 3 SELEC T L /P.CAL ROL NT CO ¢ ÷ Enter the figure of hour, then press the SELECT key and enter the figure of minute. ÷ Press the SELECT key.
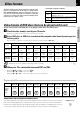
Knowledge XD-DV series (EN/T,M,X) DVD menu language code list Knowledge Cord No.
Important items 63 XD-DV series (EN/T,M,X) Maintenance Cleaning the head section Cleaning the heads and peripheral components For maintaining the best condition of the deck and for longer service life, always keep the heads (recording / playback / erase), capstan and pinch roller clean. To clean them, perform the following: 1. Open the cassette holder. 2. Using a cotton swab dipped in alcohol, clean the head (recording / playback / erase), capstan and pinch roller carefully.
In case of difficulty XD-DV series (EN/T,M,X) What seems to be a malfunction is not always so. Before calling for service, check the following table according to the symptom of your trouble. Operation to reset The microcomputer may fall into malfunction (impossibility to operate, erroneous display, etc.) when the power cord is unplugged while power is ON or due to an external factor. In this case, execute the following procedure to reset the microcomputer and return it to normal condition.
In case of difficulty 65 XD-DV series (EN/T,M,X) Remote control unit Symptom Cause Remote control operation is not possible. ÷ Batteries are exhausted. ÷ The remote control is too far away from the system, the controlling angle is deviated or there is an obstacle in between. ÷ There is no tape or CD set in the component to be played. Remedy ÷ Replace with new batteries. ÷ Operate the unit inside the remote controllable range. * * ÷ Set a tape or CD in the component to be ¢· played.
In case of difficulty XD-DV series (EN/T,M,X) DVD / CD player unit Symptom Cause Playback does not start when the play (6) key is pressed. ÷ There is no disc in the player. ÷ There are no signals recorded on the side of the disc being played. ÷ Load a disc and press the play (6) key. ÷ Turn the disc over and properly place it on the disc tray. Playback starts but no image/sound is seen/heard. ÷ The TV is not turned on. ÷ The connection cords are not properly connected. ÷ Turn on the TV.
In case of difficulty 67 XD-DV series (EN/T,M,X) DVD / CD player unit Symptom Cause Remedy Playback will not start even after a title is selected. ÷ A viewing restriction (Parental level) has been set for the disc. ÷ Check the viewing restriction level (Parental level) setting. The viewing restriction level (RATING) cannot be changed. ÷ You have forgotten the viewing restriction (Parental) password. ÷ Set the initial setup to the factory setup with the following procedure.
Specifications Main unit [ Amplifier section ] XD-DV90 [for Europe and U.K.] Rated output power during STEREO operation (DIN) 1 kHz, 0.7 % T.H.D. at 6 Ω ............................... 105 W + 105 W Effective output power during SURROUND operation Front (1 kHz, 10 % T.H.D. at 6 Ω) ............................ 124 W + 124 W Center (1 kHz, 10 % T.H.D. at 6 Ω) ............................................. 62 W Surround (1 kHz, 10 % T.H.D. at 8 Ω) ..........................
[ DVD/CD/VIDEO CD player section ] Front Speakers (LS-N70V)) Laser .................................................................... Semiconductor laser Wow & Flutter ................................... Less than unmeasurable Limit Video output format (for U.S.A. and Canada) .......................... NTSC Video output format (for other countries) ........................ NTSC/PAL VIDEO OUTPUT Composit video output level/impedance ...............
For your records Record the serial number, found on the back of the unit, in the spaces designated on the warranty card, and in the space provided below. Refer to the model and serial numbers whenever you call upon your dealer for information or service on this product.