
Use and Care Manual


Allow a 2” minimum clearance between the bottom of the metal pan of the cooktop and any combustible surface located
below, ie: the upper edge of a drawer installed below the cooktop (see Fig. B on previous page). Failure to provide proper
clearancesandventilationmayresultinarehazard.
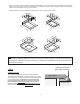
Cooktop dimensions and countertop cutout dimensions for each model are shown below:
Note:
When making countertop, radius the corner of the cutout (1/4” radius is typical). This will prevent cracking of
the countertop. Follow the countertop manufacturer’s instructions regarding the minimum corner radius and
reinforcement of corners.
12
"
12 1/2"
10 3/4"
11 1/2"
2 5/8"
Models: MED1, CAR1, ALP1, CORT1
3 1/4"
23 1/4"
14 1/4"
21 3/4" 12 3/4"
Models: MED2, ALP2LG
3 1/4"
2 5/8"
12
"
21"
10 3/4"
20"
Models: MED2TL, CAR2, ALP2SM, CORT2
3 1/4"
2 5/8"
4
19 1/2"
16"
17"21"
2 3/4"
Models: ARCTIC2, ANTARCTIC2 & GLACIER2
2 3/4"
3 1/4"
STEP #4
Installing the Cooktop
The cooktop is supplied with two metal mounting brackets.
Thesebracketsaredesignedtoholdthecooktoprmlyinplace.
The cooktop does not have a metal frame and should be sealed
to the countertop. Use a soft bedding compound that will
prevent damage if later removal for service is necessary.
We recommend a nonadhesive type of sealant, such as
plumber’s putty, maximum compressed thickness of 1/16”.
Silicone may be used to seal the glass edge only, if desired.
silicone to seal the
glass edge if desired
counter top
glass panel
putty strip