www.CookWithKenyon.
Contents IMPORTANT SAFETY INSTRUCTIONS 3 Product Specifications 5 Before Using the Grill Quick Start Tips Stuffed French Toast 9 10 Operation Indicator Lights Turning On Safety Lock Feature Cooking Mode Options Heat Level Cooking Mode Temperature Cooking Mode Changing Temperature Units Timer Options Automatic Shut-Off Time Temperature Guide Error Code Readout Power Cord Grill Parts Lid Removal 12 12 12 12 13 13 13 14 15 15 16 17 18 19 Please read & save these instructions Thank you for choosing Keny
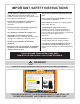
IMPORTANT SAFETY INSTRUCTIONS Read this section BEFORE operating the grill. The following information applies to all KENYON Grills. THIS GRILL, LIKE ALL APPLIANCES, HAS THE POTENTIAL TO CREATE SAFETY PROBLEMS THROUGH CARELESS AND IMPROPER USE. PLEASE OBSERVE ALL OF THE FOLLOWING SAFETY PRECAUTIONS. When used as a portable grill, store indoors when not in use, out of the reach of children. Suitable shelter must be provided to prevent direct exposure to rain. Covers available.
IMPORTANT SAFETY INSTRUCTIONS Do not replace or attempt to repair any part of the grill, unless otherwise noted in this manual. All other service is to be performed by a factory authorized technician. Do not store flammable materials near the grill. Fuel, such as charcoal briquettes, are not to be used with this appliance. Ensure grill is installed per instructions and properly grounded by a qualified electrician. Do not wear loose fitting or hanging apparel when using the grill.
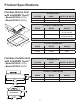
Product Specifications Frontier Built-in Grill with IntelliKEN Touch™ - Model B70550 (120V) - Model B70551 (240V) BURNER DATA VOLTAGE 120V AC 240V AC 7 5/16" 185mm AMPS 11 6 OUTPUT IN WATTS 1300 1300 PRODUCT DIMENSIONS WIDTH 21” HEIGHT 4 15/16” (8 5/16” with lid) 533mm 305mm 125mm (211mm with lid) Height includes 1” drain fitting not visible in drawing 3 15/16" 100mm 21" 533mm 12" 305mm 19 3/4" 502mm 11 5/8" 295mm DEPTH 12” CUTOUT DIMENSIONS WIDTH 19 3/4” 502mm Frontier Portable Grill with Inte
Product Specifications Floridian Built-in Grill with IntelliKEN Touch™ - Model B70580 (120V) - Model B70581 (240V) BURNER DATA VOLTAGE 120V AC 240V AC AMPS 11 6 OUTPUT IN WATTS 1300 1300 PRODUCT DIMENSIONS 7 5/8" 194mm 3 15/16" 100mm 12" 305mm 21" 533mm WIDTH 21” HEIGHT 4 15/16” (8 5/8” with lid) 533mm 305mm 125mm (219mm with lid) Height includes 1” drain fitting not visible in drawing CUTOUT DIMENSIONS 19 3/4" 502mm 11 5/8" 295mm DEPTH 12” WIDTH 19 3/4” 502mm Floridian Portable Grill with In
Product Specifications Rio Built-in Grill with IntelliKEN Touch™ - Model B70585 (120V) - Model B70586 (240V) BURNER DATA VOLTAGE 120V AC 240V AC AMPS 11 6 OUTPUT IN WATTS 1300 1300 PRODUCT DIMENSIONS 7 5/8" 194mm 3 15/16" 100mm 15 5/8" 397mm 11 5/8" 295mm 23 1/16" 586mm WIDTH 23 1/16” HEIGHT 4 15/16” (8 5/8” with lid) 586mm 397mm 125mm (219mm with lid) Height includes 1” drain fitting not visible in drawing 19 3/4" 502mm CUTOUT DIMENSIONS WIDTH 19 3/4” 502mm No Lid Built-In Grill with IntelliKE
Product Specifications SilKEN® Built-in Grill with IntelliKEN Touch™ BURNER DATA VOLTAGE 120V AC 240V AC - Model B70570 (120V) - Model B70571 (240V) AMPS 11 6 PRODUCT DIMENSIONS 8" 203mm WIDTH 21” HEIGHT 4 15/16” (9” with lid) 533mm 305mm 125mm (229mm with lid) Height includes 1” drain fitting not visible in drawing 3 15/16" 100mm 12" 305mm 21" 533mm DEPTH 12” CUTOUT DIMENSIONS 19 3/4" 502mm 11 5/8" 295mm WIDTH 19 3/4” 502mm 8 8 OUTPUT IN WATTS 1300 1300 SilKEN® Portable Grill with Intelli
Before Using the Grill 6 1 Remove the cooking grate and drip tray from the grill. Wash the grill with warm soapy water using a non-abrasive cloth. USE ONLY HIGH TEMP PLASTIC UTENSILS WHEN GRILLING. Visit our website to purchase a set of high quality stainless steel/high temp plastic grill utensils, www.cookwithkenyon.com. Preheat grill for 5 to 9 minutes on heat setting for type of food.
Before Using the Grill 15 13 Wipe the stainless steel surfaces with a damp cloth to remove any residue from previous grilling sessions. The touch control area is ceramic glass which is sealed from the effects of rain, snow and ice. To clean the glass, use a glass cleaner and soft towel. If stains appear, use a ceramic glass cleaner which can be found in your local grocery store. 14 Your Kenyon grill came with a sample bottle of stainless steel cleaner.
Operation DO NOT USE WATER ON GREASE FIRES Smother fire or flame or use dry chemical or foamtype extinguisher. CLEAN GRILL AFTER EACH USE This appliance is equipped with removable, disposable drip tray. The drip tray MUST be removed and cleaned after each and EVERY use. Do not allow grease to accumulate between cooking. The drip tray and baffle tray MUST be used when cooking on the grill. Excessive grease may spill over into the interior of the grill, voiding your warranty and posing a fire hazard.
Operation Indicator Lights Safety Lock Feature There are a series of lights that provide indications of element operation and hot surfaces. The lock feature can be activated as a safety measure at any time whether the grill is ON or OFF. These lights are located adjacent to the control panels. When the control is ON, a LED light array will illuminate indicating that the element is on. When the Grill is ON: Locking the grill when it is ON will deactivate the power settings from adjusting up or down.
Operation Heat Level Cooking Mode Temperature Cooking Mode With the main power on and the element powered on, swipe your finger along the temperature control arc and release at the desired setting. The settings range from LOW-MED-HIGH in 16 increments, as indicated by the LED light array that illuminates along the control sweep. Also, the arc + and – signs can be toggled to select the desired heat level. The LED light array will indicate the selected setting.
Operation Timer Options Cooking Timer The cooking timer can be activated to shut the heating element off at the end of the set time. Kitchen Timer The kitchen timer is a general timer that has many uses around the kitchen, independent of cooking activity on the grill. At any time during cooking, set the desired time duration by first touching the clock graphic then touching the + and – buttons, holding the button to increase or decrease the setting.
Operation Automatic Shut-Off Time Temperature Guide The table below displays the automatic shut-off time corresponding to each heat setting. The following is meant to be a guideline. Factors such as wind, and outside temperatures, food temperature when placed on grill can affect cooking times. The grill is designed and engineered for optimal cooking performance with the lid down or closed.
Operation SINGLE ZONE GRILL WITH INTELLIKEN TOUCH™ MAINTENANCE The Kenyon Single Zone Grill with IntelliKEN Touch™ is a sealed unit that does not require regular maintenance. Please follow our operating instructions as mentioned above. If your grill requires service, this must be preformed by Authorized Personnel only. Please call Kenyon Customer Care at 860-664-4906. Error Code Readout De-power and re-start the unit to clear the display. Allow the unit to cool as necessary.
Operation Power Cord GROUNDED 3-PRONG PLUG THIS PERTAINS TO 120V MODELS ONLY Ground Fault Circuit Interrupter (GFCI) The GFCI is a safety device designed to protect the user from any electrical shock hazard. Indicator Light The indicator light will stay illuminated when electrical power is applied and indicates that the GFCI is working properly. Test/Emergency Off Button Pressing this button will test the GFCI. The indicator light will go out and electrical power will not be supplied to the grill.
Operation Grill Parts GRATE Heating Element The heating element is designed to pivot as shown to remove/replace the baffle tray and drip tray. It will stay in the up position. To put down apply slight downward pressure. Baffle Tray The baffle tray supports the drip tray, heating element and grate and must always be used when operating the grill. DRIP TRAY Drip Tray The disposable drip tray collects all the fat and juices created during the cooking process. The drip tray must be emptied after each use.
Operation THIS PERTAINS TO SilKEN® PORTABLE & BUILT-IN GRILLS With the quick release pin removed, grasp the lid, lifting on the left side to clear the hinge and slide it to the left until clear of the hinge pin on the right. Once the lid is removed, it can be washed in warm, soapy water. The SilKEN® Grill incorporates a high temperature silicone lid. Through the use of silicone, the lid can collapse accordion-style to a height of two inches.
Installation Unpacking the Grill 1 PARTS INCLUDED Carefully unpack the grill from its shipping container. Verify and identify the package contents. The following items should be included in the carton. If any components are missing or damaged, call KENYON immediately.
Installation Countertop Preparation D - 30 inches minimum clearance between the top of the cooking surface and the bottom of an unprotected wood or metal cabinet or 24 inch minimum clearance when the bottom of the wood or metal cabinet is protected by not less than 1/4-inch-thick flame retardant millboard covered with not less than No. 28 MSG sheet steel, 0.015-inch-think stainless steel, 0.024-inch-thick aluminum or 0.020-inch-thickcopper.
Installation The putty is hidden under the flange, lip, or edge of the grill and is not visible when the grill is installed. If caulk were used instead of putty, it would be difficult to access these areas to cut through the caulk to remove the part. WARNING! To eliminate the risk of burns by reaching over heated surface units, cabinet storage space located above surface units should be avoided.
Installation Outlet Location Final Preparations Prior to Use Be sure the electrical outlet intended for the grill is in an easily accessible location. This allows the user to easily plug and unplug the grill. This is necessary to ensure safe cleaning and storage of the grill. 5 Remove the protective plastic film from the lid, trim flange and glass panel. Clean the grill before you use it for the first time.
Statement of Warranty KENYON Kenyon International, Inc (the “Company”) warrants its products in normal usage to be free of defects in materials and workmanship subject to the conditions and limitations below. Any part, which proves to be defective in normal usage during the warranty period will be repaired or replaced by the Company. In order for product to be covered under this warranty it must be returned to the Company for evaluation. Please contact kenyonservice@cookwithkenyon.