www.CookWithKenyon.
Contents Items Required and Hardware Kits Parts Lists Base Kit Enclosure Kit Shelf Kit Instructions Assembling Base Texan Stand Assembling the Enclosure Kit Assembling the Shelf Kit 3 4 5 5 Please read & save these instructions Thank you for choosing Kenyon, the world’s leading manufacturer 7 9 10 of specialty cooking appliances. By following the instructions in this assembly manual, your grill stand will provide you with many years of reliable service.
PLEASE READ THESE INSTRUCTIONS IN THEIR ENTIRETY BEFORE USE. SAVE THESE INSTRUCTIONS FOR FUTURE REFERENCE.
Part Lists Base Kit BACK FRAME (1X) LEG (4X) FRONT FRAME (1X) LOWER SHELF (1X) UPPER SHELF (1X) 4
Part Lists Enclosure Kit SIDES (2X) BACK (1X) DOORS (2X) Shelf Kit SHELF (2X) 5
Instructions 1 • • • 2 • • • • • • • • • • • Attain all materials and hardware needed to put together stand.
Instructions There will be 4 included hooks in this package. These use Very High Bond tape so first adhesion is very important. Please thoroughly clean the stainless steel where you want the hooks to be. On the back of the hook there is the double-sided tape. Peel the protective layer off and then stick the hook on firmly. Allow this to set for at least 2 hours before putting any load on the hook. Assembling Base Texan Stand 1 Assemble stand on a carpet or soft surface to avoid any dents or scratches.
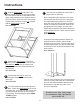
Instructions Align the Upper Shelf with hole 5. The shelf should have the vinyl facing towards the Front Frame and the 2 large holes in the upper shelf should be on the opposite side of the Front Frame, as shown in the next image. Tighten lightly 2 screws to each Leg. Repeat with the Lower Shelf in hole 6. Use: Screw S1 3 7 Take this time to tighten all screws (don’t forget under the shelves!). Now, if assembling the enclosure kit or shelf kits skip this step and move to the next page.
Instructions Assembling the Enclosure Kit Now, take the Screw S1, Nylon Nut N1, White Nylon Washers W1, included to assemble the Doors. There are 2 square holes in the front frame and 2 square holes on the Upper Shelf. The Nylon Nuts will snap inside these holes. Place one White Washer (W1) on Screw S1. Do this with all 4 pivot points on the door set. Tighten until you feel an increase in resistance, overtightening will strip the nut.
Instructions Take this time to tighten all screws (don’t forget under the shelves!). 2 Now, if assembling the Shelf Kit skip this step and go to the next page. If not assembling the shelf kit, place the Texan grill into the stand, please be careful, 2 people recommended. Hold by the strongest part of the flange as close to the Texan body as possible. Be aware, flange will bend if held too far out. Fasten Texan to stand using Screw S2.
Instructions If using the mounting brackets to fasten the stand to the deck, find the install location to set the Texan. There are two types of mounting brackets, they are mirrors of each other. Use screw S3 to fasten to your deck. Use: Screw S3 Take all of the remaining vinyl off and use this time to clean and polish to put a beautiful shine on the grill and stand’s stainless steel. Remember to wipe with the grain, never across or diagonally.