
Assembly Instructions


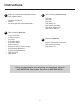


Instructions
8
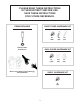
5
Put the nal two Legs on now. The
orientation should be the same as the
other legs.
Use: Screw S1
6
Turn the stand over so the open frame is
down. Fasten the Back Frame to the rest of
the stand now, vinyl side out. The 3 holes with
nuts should be on the top, the same as the
Front Frame. This will bring the entire BASE
STAND together.
Use: Screw S1
7
Take this time to tighten all screws (don’t
forget under the shelves!).
Now, if assembling the enclosure kit or shelf
kits skip this step and move to the next page.
If not assembling the enclosure or shelf kit,
place the Texan grill into the stand, please be
careful, 2 people recommended. Hold by the
strongest part of the ange, as close to the
Texan body as possible. Be aware, ange will
bend if held too far out. Fasten Texan to stand
using Screw S2.
Use: Screw S2
If using the mounting brackets to fasten the
stand to the deck or patio, nd the install
location to set the Texan. There are two types
of mounting brackets, they are mirrored parts
of each other. Use lag bolt S3 to fasten to the
deck or patio.
Use: Screw S3
Take all of the remaining vinyl off now and use
this time to clean and polish to put a beautiful
shine on the grill and stand’s stainless steel.
Remember to wipe with the grain, never
across or diagonally.
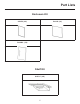
3
Align the Upper Shelf with hole 5. The
shelf should have the vinyl facing towards
the Front Frame and the 2 large holes in the
upper shelf should be on the opposite side of
the Front Frame, as shown in the next image.
Tighten lightly 2 screws to each Leg. Repeat
with the Lower Shelf in hole 6.
Use: Screw S1
4
Connect the Side Frames to the top 2
holes in the Legs. If you have one (or two)
Side Shelves, attach one (or neither) side
frame but leave the side shelf assembly off
until the end.
Use: Screw S1
Continue to the next page
to assemble the enclosure
and shelf kit.