
Assembly Instructions


Instructions
9
Assembling the Enclosure
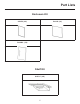
Kit
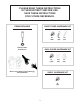
1
Lift the stand to the standing position and
open the Enclosure Kit hardware package.
Next, fasten the handles to the doors. Take
one S1 screw, put it through the hole on the
inside face of the door. Take the handle
assembly and screw S1 into one of the small
handle legs. Fasten the other screw into the
handle. Repeat with the other door.
Use: Screw S1
Hardware kit and accessories can be found
inside the rectangular packaging.
Peel vinyl at least 2 inches from each side.
This is required for the sides, back and doors
to sit ush with the shelf.
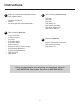
2
Now, take the Screw S1, Nylon Nut N1,
White Nylon Washers W1, included to
assemble the Doors. There are 2 square holes
in the front frame and 2 square holes on the
Upper Shelf. The Nylon Nuts will snap inside
these holes. Place one White Washer (W1) on
Screw S1. Do this with all 4 pivot points on the
door set. Tighten until you feel an increase in
resistance, overtightening will strip the nut.
Use: Screw S1, Nut N1, Washer W1
3
Using Screw S1, fasten the Back and both
Sides on the stand. The Back goes on the
side closest to the 2 holes on the upper shelf.
These should have a ush mount against the
Legs, Upper Shelf, and Top Frames.
Use: Screw S1