Kerio Connect Step-by-Step Kerio Technologies
Kerio Technologies s.r.o. All rights reserved. This guide provides detailed description on Kerio Connect, version 7.0. All additional modifications and updates reserved. For current versions of the product and related manuals, check http://www.kerio.com/mailserver/. Information regarding registered trademarks and trademarks are provided in appendix A.
Contents 1 Introduction . . . . . . . . . . . . . . . . . . . . . . . . . . . . . . . . . . . . . . . . . . . . . . . . . . . . . . . . . . . . . . . . . . . 4 1.1 Before you start . . . . . . . . . . . . . . . . . . . . . . . . . . . . . . . . . . . . . . . . . . . . . . . . . . . . . . . . . . 5 2 Installation . . . . . . . . . . . . . . . . . . . . . . . . . . . . . . . . . . . . . . . . . . . . . . . . . . . . . . . . . . . . . . . . . . . . . 2.1 Windows . . . . . . . . . . . . . . . . . . . . . .
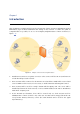
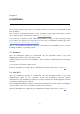
Chapter 1 Introduction This document is a simple guide focused on description of Kerio Connect configuration applied immediately upon its first installation and startup in the network. To make the guide as comprehensible as possible, let us see an exemplary implementation of Kerio Connect (see figure 1.1): Figure 1.1 Example of Kerio Connect implementation 1. Install Kerio Connect on a separate server (no other services will be run on it) and run it in a local firewall-protected network. 2.
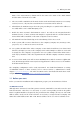
1.1 Before you start Name of the Active Directory domain will be the same as the name of the email domain and the name of the Kerberos realm. 5. The server will be available both from the local network and from the Internet. For security reasons, however, only SSL/TLS-secured Internet connections will be allowed. 6. All undelivered email (messages where the part preceding the @ symbol in the address is not valid) will be sent to admin@company.com. 7. Enable the Kerio Connect’s dual antivirus control.
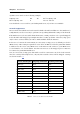
Chapter 1 Introduction A public server can be as the following example: company.com mail.company.com MX A 10 mail.company.com 215.75.128.33 You should also set a record for your backup mail server, if you have one available. Firewall configuration Kerio Connect is installed in a local network behind a firewall. In addition to the mailserver’s configuration, it is also necessary to perform corresponding additional settings of the firewall.
Chapter 2 Installation Kerio Connect supports three types of operating systems. You can choose from Windows, Mac OS X and Linux. List of versions (or distribution packs) of the operating systems supported by Kerio Connect can be found at Kerio Technologies website (Kerio Technologies). It is necessary to install a special additional installation package on any operating system (as for Linux, two packages are in question). For any type of installation package file, check http://www.kerio.
Chapter 2 Installation 2.3 Linux Kerio Connect is distributed in two RPM or DEB packages which include the server and the administration console. The installation must be performed by a user with root rights. Kerio Connect Engine is installed to /opt/kerio/mailserver and the Kerio Administration Console to /opt/kerio/admin. To install RPM packages, use this command: # rpm -i In case of the recent versions of the distributions, problems with package dependencies might occur.
2.4 Configuration Wizard 3. The next dialog of the wizard allows setting of location of the data store. In this directory, all user accounts and server logs will be stored. 4. In the last dialog, a summary of the parameters just set is provided. When this dialog is closed, a notice of the successful completion of the installation is displayed.
Chapter 3 Server configuration 3.1 Running Kerio Connect On Windows and Mac OS X, Kerio Connect is automatically started upon a successful installation, while on Linux, the server must be run by hand. Starting and stopping of the server depends on the operating system where Kerio Connect is installed, as follows: Windows To run Kerio Connect, use the icon which appeared in the notification area of the system toolbar. To open a pop-up context menu, right-click on the icon.
3.3 Setting domain and user accounts Upon the first authentication, a product registration dialog is displayed. It is possible to register either the full product version or the trial version — charge-free technical supported is available for any registered version. This support is available during the whole period of the product’s validity, either of the full or of the trial version. Note: For connection to the interface, it is also possible to use Kerio Administration Console, the desktop application.
Chapter 3 Server configuration Setting an alias for undeliverable email Aliases can be defined in the Accounts → Aliases section. 1. Click on Add. 2. This opens a dialog where a new alias can be added. In the Alias entry, enter the * symbol. In the E-mail address textfield specify the address of the mailbox where any undeliverable email will be sent (in our case it is admin@company.com). 3. Once the alias is saved, you can test it by the Check address button available in the Aliases section.
3.5 Antispam control of the SMTP server 3. Set Max. number of unknown recipients to 10. 4. In Do not apply these limits to IP address group, set Local clients. This will exclude Kerio Connect users from these rules. If you use private IP addresses in your internal network, you can simply choose Local Clients group where all private IP addresses ranges are defined. Details on security of the SMTP server can be found in chapter SMTP server of the Kerio Connect 7, Administrator’s Guide. 3.
Chapter 3 Server configuration Antivirus Kerio Connect allows to set various configuration options of antivirus control. Kerio Connect can be purchased in versions either with or without the integrated McAfee antivirus. In addition to that, Kerio Connect supports a respectful number of external antiviruses (for the list of supported antivirus applications, see the Kerio Technologies website).
3.8 How to create and manage resources Backup of the data store and configuration files Backup can be set on the Backup tab: 1. The backup can be enabled by checking the Enable message store and configuration recovery backup option. 2. In the Backup scheduling table, set one full backup for Sunday midnight so that the backup does not burden the server within working hours. 3. In the Backup directory entry, specify the path to the directory where backups will be stored.
Chapter 3 Server configuration Resource reservation is focused Kerio Connect 7, User’s Guide in Kerio Connect 7, Administrator’s Guide and 3.9 How to set public folders Kerio Connect supports public folders. This feature can be used to create a public company calendar called Events and a public folder labelled Customers with contact information of the company’s customers but with view/edit rights assigned to your sales department only.
3.9 How to set public folders 3. In the folder tree, right-click on Public Folders. 4. In the pop-up context menu just opened, click on New subfolder and enter Customers as the calendar name and Contacts as the type of the new public folder. 5. Right-click the new folder and choose Access rights from the pop-up menu. 6. By default, all users of the domain have read rights for the folder. Cancel this setting and click on Add. 7.
Chapter 4 Settings of client applications and connection to Kerio WebMail Users will connect to the server via the Kerio WebMail interface or use a supported MS Outlook (on Windows) or MS Entourage (on Mac OS X) clients. The following sections include instructions on how to connect to Kerio WebMail and how to set email clients optimally. 4.
4.3 MS Entourage settings 4. Click on the Click here to auto-configure Kerio Outlook Connector link. 5. Depending on your browser and its settings, the tool gets downloaded and launched automatically or it only gets downloaded and you can run it by double-clicking on the tool’s icon. 6. The script now runs MS Outlook, creates a new profile and preconfigures your Kerio account. 7. For security reasons, enter only your user mailbox password.
Chapter 4 Settings of client applications and connection to Kerio WebMail Note: For updated list of the Kerio Technologies website. supported versions of MS Entourage, refer to 2. Login to Kerio WebMail (see section 4.1) and select Integration with MAC OS X in the Settings menu. 3. Click on Auto-configure Entourage. 4. The tool gets downloaded and starts automatically. 5. The installation requires username and password for an account with administration rights for the computer. 6.
Appendix A Legal Notices Microsoft , Windows , Windows NT , Windows Vista , Internet Explorer , Active Directory , Outlook , ActiveSync and Windows Mobile are registered trademarks of Microsoft Corporation. Apple , Mac OS , Tiger, Panther , Leopard and Snow Leopard are registered trademarks or trademarks of Apple Computer, Inc. Linux is registered trademark of Linus Torvalds. Kerberos is trademark of Massachusetts Institute of Technology (MIT).