KERN & Sohn GmbH Ziegelei 1 D-72336 Balingen E-Mail: info@kern-sohn.com Tel: +49-[0]7433- 9933-0 Fax: +49-[0]7433-9933-149 Internet: www.kern-sohn.com Operating instruction Counting scales KERN CXB/CXP Version 1.
GB KERN CXB/CXP Version 1.6 11/2010 Operating instruction Counting scales Table of Contents 1 Technical data ................................................................................................ 4 2 Declaration of conformity ............................................................................. 7 3 Appliance overview ....................................................................................... 8 3.1 3.1.1 3.1.2 3.1.3 3.1.4 3.2 Overview of display.........................
9.3 9.4 9.4.1 9.4.2 9.5 9.5.1 9.5.2 Automatic reference optimization ........................................................................................ 27 Store/call reference weight ................................................................................................... 28 Save.......................................................................................................................................... 28 Call-up .................................................................
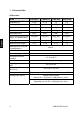
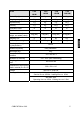
1 Technical data CXB models: KERN CXB 3K0.2 CXB 6K0.5 CXB 15K1 CXB 30 K2 Readability (d) 0.2 g 0.5 g 1g 2g Weighing range (max) 3 kg 6 kg 15 kg 30 kg Reproducibility 0.2 g 0.5 g 1g 2g Linearity ± 0.4 g ± 1.0 g ±2g ±4g Stabilization time 2 sec. 2 sec. 2 sec. 2 sec. 3 kg (M1) 5 kg (M1) 15 kg (M1) 30 kg (M1) g g g g 0.1 g 0.2 g 0.
KERN CXB 3K1M CXB 6K2M CXB 15K5M CXB 30K10M Readability (d) 1g 2g 5g 10 g Weighing range (Max) 3 kg 6 kg 15 kg 30 kg Reproducibility 1g 2g 5g 10 g Linearity 1g 4g 10 g 20 g Verification class III III III III Stabilization time 2 sec. 2 sec. 2 sec. 2 sec.
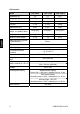
CXP models: KERN CXP 30K2 CXP 75K5 CXP 150K10 2g 5g 10 g 30 kg 75 kg 150 kg 2g 5g 10 g Linearity ±4g ± 10 g ± 20 g Stabilization time 2 sec. 2 sec. 2 sec. 20 kg (M1) 50 kg (M1) 100 kg (M1) g g g 0.5 g 1g 2.5 g Readability (d) Weighing range (max) Reproducibility Recommended adjustment weight, not added (class) Weighing unit Minimum piece weight Warming up time (operating temperature) Reference quantity Net weight (kg) Permissible ambient condition 30 min freely selectable 8.
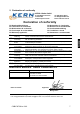
2 Declaration of conformity KERN & Sohn GmbH D-72322 Balingen-Frommern Postfach 4052 E-Mail: info@kern-sohn.de Tel: 0049-[0]7433- 9933-0 Fax: 0049-[0]7433-9933-149 Internet: www.kern-sohn.
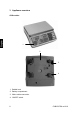
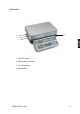
3 Appliance overview CXB models: 1 2 3 4 1. Bubble level 2. Battery compartment 3. Mains cable connection 4.
CXP models: 4 3 2 1 1. ON/OFF switch 2. Mains cable connection 3. RS 232 interface 4.
3.
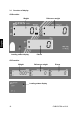
3.1.1 Display weight Here, the weight of your goods is displayed. Overlay W indicates: a Zeroing display PRETARE Tare in memory Battery very low 3.1.2 Display reference weight The reference weight of a sample is shown here. This value is either entered by user of calculated by balance. Overlay W indicates: Placed number of pieces insufficient for reference calculation Placed reference weight insufficient for reference calculation 3.1.
3.
Choice - Function • Number keys • Delete key • Call counting with tolerance control • • Store reference weights in memory Call stored reference weights • • Addition in total memory Call up total memory • Delete summation memory • • • Enter reference weight through weighing Display reference weight stored last Enter target number of pieces • • • Numeric entry reference weight Display reference weight stored last Enter target weight • • Zeroing key Back to weighing mode • • Taring key Ent
4 Basic Information (General) 4.1 Proper use The balance you purchased is intended to determine the weighing value of material to be weighed. It is intended to be used as a “non-automatic“ balance, i.e. the material to be weighed is manually and carefully placed in the centre of the weighing plate. As soon as a stable weighing value is reached the weighing value can be read. 4.2 Improper Use Do not use balance for dynamic weighings.
4.4 Monitoring of Test Resources In the framework of quality assurance the measuring-related properties of the balance and, if applicable, the testing weight, must be checked regularly. The responsible user must define a suitable interval as well as type and scope of this test. Information is available on KERN’s home page (www.kern-sohn.com with regard to the monitoring of balance test substances and the test weights required for this.
7 Unpacking, Setup and Commissioning 7.1 Installation Site, Location of Use The balances are designed in a way that reliable weighing results are achieved in common conditions of use. You will work accurately and fast, if you select the right location for your balance.
7.2.1 Setup Level balance with foot screws until the air bubble of the water balance is in the prescribed circle. Models CXP: 1 2 3 4 5 Weighing plate Cantilever Screws (x 2) Spring Substructure 6 7 8 9 10 Platform Display part Support Screws (x 4) Allen keys A) Insert screw (3) in eye of spring (4) and screw it down. Screw down second screw (3) as well. B) Push the holder (8) into the guide rail of the display part (7). Attach the display part (7) to the weighing balance, using the four screws (9).
7.2.2 Scope of delivery Serial accessories: CXB models Balance Weighing plate Mains power supply Protective cover Internal battery Operating Manual CXP models Platform Terminal Mains power supply Protective cover Internal battery Operating Manual 7.3 Mains connection Power is supplied via the external mains adapter. The stated voltage value must be the same as the local voltage. Only use original KERN mains adapters. Using other makes requires consent by KERN. 7.
7.5.1 Start-up Turn on scales with ON/OFF switch (left). The balance will carry out a self-test As soon as the weight display shows "0" in all the three display windows your balance is ready to weigh. On CXP models (with RS 232) an internal number appears before the balance counts down to zero. 0 0 a W PRETARE 0 M+ W 7.5.2 Turn off – CXB models • Turn off balance by operating the ON/OFF switch (left) 7.5.
7.6 Adjustment with external weight As the acceleration value due to gravity is not the same at every location on earth, each balance must be coordinated - in compliance with the underlying physical weighing principle - to the existing acceleration due to gravity at its place of location (only if the balance has not already been adjusted to the location in the factory).
7.6.2 Adjustment of models CXB Operation Ensure that there are no objects on the weighing plate.
12345 (Example) Press , then : 12345 (Example) The value of the used adjustment weight appears flashing Place the adjustment weight Press : „EC01“ is displayed, cipher „1“ flashes Take away weight and press Press anew, herewith the adjustment process is finished.
7.6.3 Adjustment of models CXB_M Operation Ensure that there are no objects on the weighing plate. Ö Press + 1 + 5 keys Ö Press key The display shows: 0.000 Ö Press M+ 0 12345 0 12345 key The display shows: 15.000 M+ (Example) Weight value of adjustment weight is flashing on display. Ö Carefully place adjusting weight in the centre of the weighing plate. Ö Press key Adjustment will be carried out automatically after dead stop control. Ö Remove adjustment weight during count down to zero.
8 Verification General introduction: According to EU directive 90/384/EEC balances must be verified if they are used as follows (legally controlled area): a) For commercial transactions if the price of goods is determined by weighing. b) For the production of medicines in pharmacies as well as for analyses in the medical and pharmaceutical laboratory. c) For official purposes. d) For manufacturing final packages. In cases of doubt, please contact your local trade in standard.
8.1 Adjustment key and seals When verification of a scale is finished, the positions indicated on the scale are sealed. Verification of a scale without a seal is invalid.
9 Parts counting With parts counting you can either count parts into a container or remove parts from a container. To count a greater number of parts the average weight per part has to be determined with a small quantity (reference quantity). The larger the reference quantity, the higher the counting exactness. High reference must be selected for small parts or parts with considerably different sizes. 9.1 Determination of the reference weight by weighing Set balance to zero and tare, as required.
9.2 Numeric entering of the reference weight If you know the reference weight/piece you can enter this via number keys. Enter reference weight via number keys a W PRETARE Confirm with a W PRETARE 0 1.833 M+ 0 1.833 M+ W 0 W 0 key Reference weight Now you can place the parts to be counted onto the weighing plate. All quantity parameters of your goods to be weighed are displayed: 9.
9.4 Store/call reference weight There are 10 memory locations at your disposal (occupied via number keys 0 -9). 9.4.1 Save Enter the reference weight to be stored a W 0.0 PRETARE Press a W PRETARE Press a W PRETARE 100 M+ W 0 button PlSET M+ W button PlSET SET M+ W Enter the storage location for the reference weight via the number keys (0 - 9) a PRETARE 28 W 0.
9.4.2 Call-up When the reference weight is required at a later point in time it can be called by pressing the key and entering the relevant storage location number. Press a W PRETARE button PlSET M+ W Enter memory location (0 - 9) via number keys and the stored reference weight will appear. a W 0.0 PRETARE 100 0 M+ W 9.5 Count with tolerance control - Fill to target This function can be used to program a target number of pieces or target weight.
Press ----- a PRETARE Press a button 100 M+ W 100 button W 0 0.0 PRETARE 0 M+ W 9.5.2 Set tolerance value for target weight Reaching the target value will be indicated by an audio signal and [-efPST-] will be flashing in the reference window Press button ----- a PRETARE 0 M+ W 300 Last value stored Use number keys to enter target value ----- a PRETARE Press PRETARE Press a PRETARE Entered target value.
10 Taring The dead weight of any weighing container may be tared away by pressing a button, so that the following weighings show the net weight of the goods to be weighed. 10.1 Determination of the tare weight by weighing Ö Place empty tare container on the weighing plate. The total weight of the container is displayed. 6.8 a W PRETARE Ö Press PRETARE 0 - key ----- a 0 M+ TAlE M+ ----- After dead stop control was carried out, the display is reset to "0".
10.2 Numerical input of tare (PRE-TARE) Pre-setting PRE-TARE mode (not models CXB-M) key, [CEnTR] appears on the weight display.
PRE-TARE setting „1“: Objects present on weighing plate. 177.5 a PRETARE 1.7752 M+ W 100 Ö Enter your tara weight via number keys. 177.5 a PRETARE Ö Press the a PRETARE W 1.0 M+ 177 key. The net weight of the goods to be weighed is displayed 176.5 1.7752 M+ 99 Information: To delete the stored tare, unload the weighing plate and then press the TARE key; the [W ] display next to "PRE-TARE" disappears.
PRE-TARE setting „0“: Ö Remove all objects from weighing plate. 0 0 M+ 0.0 PlETA M+ ----- PlETA M+ ----- a W PRETARE Ö Press a W PRETARE W 0 key Ö Enter tare via number keys. a W PRETARE Ö Press a W PRETARE 6.8 - key, tare weight is indicated as negative value -6.8 0 M+ ----- Ö Put on tare container + goods to be weighed.
10.3 Numerical input of tare (PRE-TARE) Modelle CXB-M: PRE-TARE setting „1“: Objects present on weighing plate. 177.5 a PRETARE 1.7752 M+ W 100 Ö Enter your tara weight via number keys. 177.5 a PRETARE 1.0 M+ 177 The net weight of the goods to be weighed is displayed a PRETARE W 176.5 1.7752 M+ 99 Information: To delete the stored tare, unload the weighing plate and then press the TARE key; the [W ] display next to "PRE-TARE" disappears.
PRE-TARE setting „0“: Remove all objects from weighing plate. 0 0 M+ 0.0 PlETA M+ ----- M+ ----- a W PRETARE Ö Press a W PRETARE W 0 - key Ö Enter your tara weight via number keys. a W PRETARE Ö Press a W PRETARE 6.8 PlETA - key, tare weight is indicated as negative value -6.8 0 M+ ----- Ö Put on tare container + goods to be weighed.
11 Add up The balance is equipped with a summation memory used for adding up of identical counted parts to total quantity and total weight. 11.1 Add up “number parts" Select reference weight and place number of parts for first weighing. a PRETARE 118.3 1.1833 100 M+ W The display value is added to the summation memory by pressing the a PRETARE ----- ADD M+ key. ----- The [W ] display next to "M+" indicates the stored value.
11.2 Add up “weight" Place weight on weighing plate. a PRETARE 0 118.3 0 M+ W The display value is added to the summation memory by pressing the a PRETARE ----- ADD M+ key. ----- The [W ] display next to "M+" indicates the stored value. After dead stop control was carried out the balance will return automatically to counting mode. a PRETARE a PRETARE 118.3 1 0 118.3 M+ W W W M+ W 100 0 Place goods to be weighed for second weighing and add to memory.
11.3 Delete stored values Unload balance and press the key. Stored values, total weight, total number of pieces and number of weighings will be set to zero. The [W ] display next to "M+" disappears. 12 Application menu To adjust the balance to individual requirements, use the application menu to change settings for the balance 12.1 Navigation in the menu Press key, [CEnTR] appears on the weight display. During this display press the key, on the weight display appears [USER].
12.2 Menu overview [USER] Function Choice Key Display Parameter selection Description of function Key Weighing data pop up for 3 sec. after key was pressed Display weighing data in summation memory (Kap.10) PRE-TARE mode (Chpt. 9.2) PRE-TARE mode (Chpt. 8.5) nnPLU Weighing data remain popped up after key was pressed until key is operated Weighing data will not pop up after key was pressed, only an audio signal is sounded Input of tare only possible when weighing plate is unloaded.
13 Configurations menu 13.1.1 Display background illumination (not models CXB-M) The back light for the display can be adjusted as follows: Auto backlight Adjustment Function Press This display will appear backlit for weight value > 10 d or after key was pressed. key, [CEnTR] appears on the weight display Press the key during this display. When the display moves towards zero, or when the weight value is < 10d, the display will be extinguished 5 seconds later.
13.1.2 Setting the display speed (not models CXB-M) You may set values ranging from 01 to 15 as a display speed: 01 = slow and sensitive 15 = fast and insensitive Adjustment Press key, [CEnTR] appears on the weight display. Press the display. a PRETARE 20 5PEED PRESET key during this XX Display speed Use the key, to increase and the key to decrease the number value Store setting by using the mode. 42 key.
14 Data output (CXP models only) The balance is typically equipped with a RS 232C interface. 14.1 RS 232C interface The RS 232C interface allows a bi-directional data exchange from the balance to external devices. This data exchange is asynchronous using ASCII - Code. Pin allocation of balance output plug: RxD 2 TxD 3 4 5 SG 7 Technical specifications of interface: Baud rate Start bit Stop bit Parity DATA FLOW 9600; 4800; 2400;1200 0 2, 1 nOnE, odd, even 8,7 nOnE Default settings in bold print.
14.2 Description of interface The selection of a certain operating mode allows you to set the output format, the output control, the transmission speed and the parity bit. Navigation in the menu: key, [CEnTR] appears on the reference weight display. Press During this display press the key, on the weight display appears [FVnCT].
STl XX X - Number of output values X: 0 – F (0-15) Confirm setting X by pressing the key, then enter settings according to table 2.
Table 1: Code 00 0E 01 Significance Output after pressing M+ Printout header line Printout last line Table 2: Code 46 Description Pre -character End -character code code 00 Gross 02 03 01 Tare 04 05 02 Net 06 07 03 Reference weight 08 09 04 Weighing unit 2A 2B 05 Memory # 0C 0D 06 Pieces 0A 0B 07 Stability display 08 None 09 User defined input in ASCII Cod#1 11 12 0A User defined input in ASCII Cod#2 14 15 0B Decimal point weight 16 17 0C Decimal point refe
Delineation 1: Number of positions (max. 15) Code (Tab. 1) 0 : 1.- 4. Position 1 : 5. - 8. Position 2 : 9.- 12. Position 3 :13.-15. Position Net (Tab. 2) Gross Piece number Reference weight ( For codes see table 2) Output of this setting: c Net d Reference weight e Number pcs.
14.2.1 Example: Setting an output format Call up function Weight Piece number Reference weight STl XX Use number keys , , , to select desired code (XX, see table 1). Example 00 = Output after pressing M+ STl 00 Confirm setting by pressing the key, reference display is flashing. Set number of output values (e. g. 7) with number keys [0 - F (0-15) ], max. 15 values available , , , 7 STl 00 Confirm setting by pressing the key, first output value in reference weight window is flashing.
15 Service, maintenance, disposal 15.1 Cleaning Before cleaning, please disconnect the appliance from the operating voltage. Please do not use aggressive cleaning agents (solvents or similar agents), but a cloth dampened with mild soap suds. Ensure that no liquid penetrates into the device and wipe with a dry soft cloth. Loose residue sample/powder can be removed carefully with a brush or manual vacuum cleaner. Spilled weighing goods must be removed immediately. 15.
16 Instant help In case of an error in the program process, briefly turn off the balance and disconnect from power supply. The weighing process must then be restarted from the beginning. Fault Possible cause The displayed weight does not glow. • The balance is not switched on. • The mains supply connection has been interrupted (mains cable not plugged in/faulty). • Power supply interrupted. • Batteries are inserted incorrectly or empty • No batteries inserted.
17 Appendix ASCII CODE table DEC 0 1 2 3 4 5 6 7 8 9 10 11 12 13 14 15 16 17 18 19 20 21 22 23 24 25 26 27 28 29 30 31 32 33 34 35 36 37 HEX 00 01 02 03 04 05 06 07 08 09 0A 0B 0C 0D 0E 0F 10 11 12 13 14 15 16 17 18 19 1A 1B 1C 1D 1E 1F 20 21 22 23 24 25 symbol (ZERO) _ CXB/CXP-BA-e-1016 key Ctrl 2 Ctrl A Ctrl B Ctrl C Ctrl D Ctrl E Ctrl F Ctrl G Backspace ¶ § Tab Ctrl J Ctrl K Ctrl L Enter Ctrl N Ctrl O Ctrl P Ctrl Q Ctrl R Ctrl S Ctrl T Ctrl U Ctrl V Ctrl W Ctrl X Ctrl Y Ctrl Z Esc Ctrl \ Ctrl ] Ctr
DEC 76 77 78 79 80 81 82 83 84 85 86 87 88 89 90 91 92 93 94 95 96 97 98 99 100 101 102 103 104 105 106 107 108 109 110 111 112 113 114 115 52 HEX 4C 4D 4E 4F 50 51 52 53 54 55 56 57 58 59 5A 5B 5C 5D 5E 5F 60 61 62 63 64 65 66 67 68 69 6A 6B 6C 6D 6E 6F 70 71 72 73 symbol L M N O P Q R S T U V W X Y Z [ \ ] ^ _ ` a b c d e f g h i j k l m n o p q r s key L M N O P Q R S T U V W X Y Z [ \ ] ^ _ ` a b c d e f g h i j k l m n o p q r s DEC 116 117 118 119 120 121 122 123 124 125 126 127 128 129 130 131 13
DEC 156 157 158 159 160 161 162 163 164 165 166 167 168 169 170 171 172 173 174 175 176 177 178 179 180 181 182 183 184 185 186 187 188 189 190 191 192 193 194 195 HEX 9C 9D 9E 9F A0 A1 A2 A3 A4 A5 A6 A7 A8 A9 AA AB AC AD AE AF B0 B1 B2 B3 B4 B5 B6 B7 B8 B9 BA BB BC BD BE BF C0 C1 C2 C3 symbol £ ¥ P ƒ á í ó ú ñ Ñ ª º ¿ ¬ ¬ ½ ¼ ¡ « » ¦ ¦ ¦ │ ┤ ╡ ╢ ╖ ╕ ╣ ║ ╗ ╝ ╜ ╛ ┐ └ ┴ ┬ ├ CXB/CXP-BA-e-1016 key Alt 156 Alt 157 Alt 158 Alt 159 Alt 160 Alt 161 Alt 162 Alt 163 Alt 164 Alt 165 Alt 166 Alt 167 Alt 168 Alt 169
DEC HEX symbol key DEC HEX symbol key 236 EC 8 Alt 236 246 F6 ÷ Alt 246 237 ED f Alt 237 247 F7 ˜ Alt 247 238 EE e Alt 238 248 F8 º Alt 248 239 EF n Alt 239 249 F9 • Alt 249 240 F0 = Alt 240 250 FA · Alt 250 241 F1 ± Alt 241 251 FB v Alt 251 242 F2 = Alt 242 252 FC n Alt 252 243 F3 = Alt 243 253 FD ² Alt 253 244 F4 ( Alt 244 254 FE ¦ Alt 254 245 F5 ) Alt 245 255 FF (blank) Alt 255 CXB/CXP-BA-e-1016