KERN & Sohn GmbH Ziegelei 1 D-72336 Balingen E-Mail: info@kern-sohn.com Tel: +49-[0]7433- 9933-0 Fax: +49-[0]7433-9933-149 Internet: www.kern-sohn.com Operating instruction Platform scale KERN DE Version 5.
GB KERN DE Version 5.5 04/2012 Operating instruction Platform scale Table of Contents 1 Technical data ............................................................................................ 4 2 Basic Information (General) .................................................................... 11 2.1 2.2 2.3 2.4 Proper use........................................................................................................................... 11 Improper Use .......................................
7 Settings ..................................................................................................... 25 7.1 7.2 7.3 7.4 7.5 7.5.1 7.5.2 7.6 7.7 Call-up menu structure ...................................................................................................... 25 Leave menu structure ........................................................................................................ 26 Dosing and Zero-tracking ......................................................................
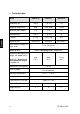
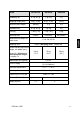
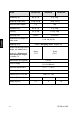
1 Technical data KERN DE6K0.5A DE6K1D DE12K1A Readability (d) 0.5 g 1g/2g 1g Weighing range (max) 6 kg 3 kg / 6 kg 12 kg Minimum piece weight 1g 2g 2g 0,5 g 1g/2g 1g ± 1.5 g ±2g/4g 3g 30 minutes 10 minutes 30 minutes Reproducibility Linearity Warm-up time Reference unit weights at piece count Weighing Units 5, 10, 20, 25, 50 Details „Weighing units“ chapter 6.9 Recommended adjustment weight, not added (class) Details for „Selection of the Adjustment weight“ in chapter 7.
KERN DE15K0.2D DE15K2D DE24K2A Readability (d) 0.2 g / 0,5 g 2g/5g 2g Weighing range (max) 6 kg / 15 kg 6 kg / 15 kg 24 kg Minimum piece weight 400 mg 4g 4g Reproducibility 0.2 g / 0,5 g 2 g / 5g 2g Linearity ± 0.8 g / 2g ± 4 g / 10 g ±6g 2 hours 10 minutes 30 minutes Warm-up time Reference unit weights at piece count Weighing Units 5, 10, 20, 25, 50 Details „Weighing units“ chapter 6.
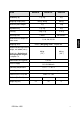
KERN Readability (d) DE35K0.5D DE35K5D DE35K5DL 0.5 g / 1 g 5 g / 10 g Weighing range (max) 15 kg / 35 kg 15 kg / 35 kg Minimum piece weight 1g 10 g Reproducibility 0,5 g / 1g 5 g / 10 g Linearity ±2g/4g ± 10 g / 20 g 2 hours 10 minutes Warm-up time Reference unit weights at piece count Weighing Units 5, 10, 20, 25, 50 Details „Weighing units“ chapter 6.9 Recommended adjustment weight, not added (class) Details for „Selection of the Adjustment weight“ in chapter 7.
KERN DE60K1D Readability (d) DE60K1DL DE60K5A 1g/2g 5g Weighing range (max) 30 kg / 60 kg 60 kg Minimum piece weight 2g 10 g 1g/2g 5g ±4g/8g ± 15 g 2 hours 30 minutes Reproducibility Linearity Warm-up time Reference unit weights at piece count Weighing Units 5, 10, 20, 25, 50 Details „Weighing units“ chapter 6.9 Recommended adjustment weight, not added (class) Details for „Selection of the Adjustment weight“ in chapter 7.4 Stabilization time (typical) ( M1 ) + 5° C ....
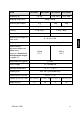
KERN DE60K10D Readability (d) DE60K10DL DE120K10A 10 g / 20g 10 g Weighing range (max) 30 kg / 60 kg 120 kg Minimum piece weight 20 g 20 g 10 g / 20 g 10 g ± 20 g / 40 g ± 30 g 10 minutes 30 minutes Reproducibility Linearity Warm-up time Reference unit weights at piece count Weighing Units 5, 10, 20, 25, 50 Details „Weighing units“ chapter 6.9 Recommended adjustment weight, not added (class) Details for „Selection of the Adjustment weight“ in chapter 7.
KERN DE150K2D Readability (d) DE150K2DL 2 g / 5g Weighing range (max) Linearity Warm-up time 20 g / 50 g 40 g 40 g 2g/5g 20 g / 50 g ± 8 g / 20 g ± 40 g / 100 g 2 hours 10 minutes Reference unit weights at piece count 5, 10, 20, 25, 50 Details „Weighing units“ chapter 6.9 Weighing Units Recommended adjustment weight, not added (class) Details for „Selection of the Adjustment weight“ in chapter 7.4 150 kg 150 kg ( F2 ) ( M1 ) Stabilization time (typical) 2,5 sec.
KERN Readability (d) DE150K20DXL DE300K5DL 20 g / 50 g 5 g / 10 g Weighing range (max) 60 kg / 150 kg Minimum piece weight 40 g 10 g 20 g / 50 g 5 g / 10 g Reproducibility Linearity Warm-up time 10 minutes 150 kg / 300 kg 10 minutes 150 kg 300 kg 300 kg ( M1 ) ( F2 ) ( M1 ) 2,5 sec. DC 15V/600 mA Operating temperature + 5° C .... + 35° C Humidity of air max. 80 % (not condensing) Terminal (B x D x H) mm 10 ± 100 g / 200 g Details „Weighing units“ chapter 6.
2 Basic Information (General) 2.1 Proper use The balance you purchased is intended to determine the weighing value of material to be weighed. It is intended to be used as a “non-automatic“ balance, i.e. the material to be weighed is manually and carefully placed in the centre of the weighing plate. As soon as a stable weighing value is reached the weighing value can be read. 2.2 Improper Use Do not use balance for dynamic weighings.
2.4 Monitoring of Test Resources In the framework of quality assurance the measuring-related properties of the balance and, if applicable, the testing weight, must be checked regularly. The responsible user must define a suitable interval as well as type and scope of this test. Information is available on KERN’s home page (www.kern-sohn.com) with regard to the monitoring of balance test substances and the test weights required for this.
5 Unpacking, Setup and Commissioning 5.1 Installation Site, Location of Use The balances are designed in a way that reliable weighing results are achieved in common conditions of use. You will work accurately and fast, if you select the right location for your balance.
5.2.3 Basic structure Place the balance on a horizontal and solid base (refer also to „5.2.1 Installation“) Pull off the protection foil from the weighing plate if existing. 5.3 Mains connection Power is supplied via the external mains adapter. The stated voltage value must be the same as the local voltage. Only use original KERN mains adapters. Using other makes requires consent by KERN. 5.4 Operation using a (rechargeable) battery (optional) Lift-off the battery cover on the lower side of the balance.
5.5 Connection of peripheral devices Before connecting or disconnecting of additional devices (printer, PC) to the data interface, always disconnect the balance from the power supply. With your balance, only use accessories and peripheral devices by KERN, as they are ideally tuned to your balance. 5.6 Initial Commissioning In order to obtain exact results with the electronic balances, your balance must have reached the operating temperature (see warming up time chap. 1).
Procedure when adjusting: Observe stable environmental conditions. A warming up time (see chapter 1) is required for stabilization. Switch on the balance using the key Press key and keep it pressed, after the acoustic signal appears in the display for short time „CAL“. After that the exact size appears flashing in the display (chapter.7.4) of the adjustment weight. Now set the adjusting weight in the centre of the weighing plate. Now press the key.
6 Operation 6.1 Overview of display 6.2 Weighing Switch on the balance using the key The balance shows for approx. 3 seconds „88888“ in the display and then goes to „0“. Now it is ready for operation. Important: Should the display flash or not be on „0“, press the key. Only now (!) place goods onto weighing plate. Take care that the weighed material does not touch the balance housing or the base mat. Now the weight is displayed, after the standstill control appears the weighing unit (e.g.
6.3 Taring Switch-on the balance using the key and wait for the „0“ display. Put the tare vessel on the weighing plate and press the key. The balance display goes to „0“. The weight of the container is now internally saved. If after finishing the weighing process the anew in the display. key, is pressed again, „0“ appears The taring process can be repeated any number of times, e.g. when adding several components for a mixture (adding). The limit is reached when the whole weighing range is exhausted.
6.6 Parts counting Switch-on the balance using the key and wait for the „0“ display. Press key shortly. Appears the reference unit number 5. By pressing the key several times, more reference quantities 10, 20, 25 and 50 can be called up. Place as many pieces to count on the weighing plate as the set reference quantity requires. Confirm with key.
6.8 Percent weighings Display symbol: % Percent weighing allows to display weight in percent, in relation to a reference weight. Switch-on the balance using the key and wait for the „0“ display. Press the key several times shortly. The reference quantities of the counting function are passed through, after that „100%“ is displayed. Place the reference item on the weighing pan. Press key, the weight of the item is taken over as reference (100%).
6.9 Weighing units (Unit) key and wait for the „0“ display. Switch-on the balance using the Press the Press Use the key and keep it pressed until „UNIT“ appears on the display. shortly, the selected unit appears in the display. key to select between the different units (see table). By pressing the key the selected weighing unit is taken over.
The different weighing models have integrated different foreign weighing units. Details can be seen in this table: DE 6K1D DE 12K1A DE 15K0.2D DE 15K2D DE 24K2A DE 35K0.
6.10 Display background illumination In the menu the functions of the background illumination can be switched on or off. Proceed as follows: Switch-on the balance using the key and wait for the „0“ display. Press the key and keep it pressed until „UNIT“ appears on the display. Press the key seven times, in the display appears „bl“.
6.11 Animal weighing function The balance has an integrated animal weighing function (mean value calculation). With this function it is possible to weigh domestic or small animals exactly, although they do not stand quiet on the weighing plate. Note: If they move too much, an exact weighing will not be possible. In the menu the animal weighing function can be switched on or off.
7 Settings 7.1 Call-up menu structure Switch-on the balance using the key and wait for the „0“ display. To enter into the menu structure keep the appears. By pressing the key pressed approx. 3 sec. until „UNIT“ key the different menu items are called up. Use the select a menu item. Within this menu item use the key to key to make your choice. If the key is repeatedly actuated, the setting will be saved. Press the PRINT key 3 seconds -> Chapter 7.5.
7.2 Leave menu structure Everywhere in the menu it is possible to leave the menu structure and thereby save or reject the changes made. After pressing the key „Exit“ is displayed. A: Use the (YES) key, to confirm. After that „store“ is displayed. If it shall be saved, press the key repeatedly. If the menu shall be left without saving, press the ( NO ) key. B: The (NOT EXIT) key must be pressed, if the next menu item shall be reached. After having set all the individual adjustments, it can be saved. 7.
7.4 Selection of the adjustment weight In the model series KERN DE, the adjustment weight can be selected from three preset nominal values (approx.1/3; 2/3; max) (refer also to table 1 below, factory setting with grey background). In order to achieve high-quality weighing results in the sense of the measuring technology, it is recommended to select the nominal value as high as possible. DE6K0.5A DE6K1D DE12K1A DE15K0.
7.5 Interface RS232C Data output via interface RS 232 C General Information The previous condition for the data transfer between balance and a peripheral device (e.g. printer, PC ...) is that the appliances are set to the same interface parameters (e.g. baud rate, transfer mode ...). 7.5.1 Data transfer mode In weighing mode keep the PRINT key pressed until [Unit] appears. Press the MODE button several times until „Pr“ is displayed. Acknowledge using SET key, the current setting is displayed.
7.5.2 Baud rate The baud rate defines the transfer speed vie the interface, 1 Baud = 1 Bit/second. In weighing mode keep the PRINT key pressed until [Unit] appears. Press the MODE key several times until „bAUd“ is displayed. Acknowledge using SET key, the current setting is displayed. Use MODE key select the desired settings 9600 4800 2400 1200 19200 Use the SET key to confirm selection. The balance returns to weighing mode.
7.6 Selection printed edition printout Using this function data are selected which are to be sent via the RS232C (not valid for data transfer mode BAPr ). In weighing mode keep the PRINT key pressed until [Unit] appears. Press the MODE key several times until „LAPr“ is displayed. Acknowledge using SET key, the current setting is displayed.
7.7 Reset to factory setting This function resets all balance settings to factory setting. In weighing mode keep the PRINT key pressed until [Unit] appears. Press the MODE button several times until „rSt“ is displayed. Acknowledge using SET key, the current setting is displayed. Select the desired settings by pressing the MODE key rSt rSt yes no Balance will be reset to factory setting. The balance keeps its individual setting Use the SET key to confirm selection.
8 Data output RS 232 C 8.1 Technical data 8-bit ASCII Code 1 start bit, 8 data bits, 1 stop bit, no parity bit Baud rate selectable at 1200, 2400, 4800, 9600 and 19200 Baud Miniature plug-in necessary (9 pole D-Sub) For operation with interface faultless operation is only ensured with the correct KERN – interface cable (max. 2m) 8.2 Pin allocation of the balance output socket (front view) 5 1 Pin 2: Pin 3: Pin 5: 9 Transmit data Receive data Signal ground 6 8.
8.3.2 AU Pr As soon as the weighing value is stable, the format is automatically transferred from LAPR. c. Format for stable values for weight/quantity/percentage 1 2 3 4 5 6 7 8 9 10 11 12 13 M S N1 N2 N3 N4 N5 N6 N7 N8 N9 N10 B 14 U1 15 U2 16 U3 17 18 CR LF d. Format in case of fault 1 2 3 4 5 6 B B B B B B 14 r 15 o 16 r 17 18 CR LF 7 B 8 B 9 B 10 B 11 B 12 E 13 r 8.3.3 AU PC The weighing values are sent automatically and continuously, no matter if the value is stable or unstable. e.
8.3.4 rE Cr The remote control commands s/w/t are sent from the remote control unit to the balance as ASCII code. After the balance having received the s/w/t commands, it will send the following data. Take into account that the following remote control commands must be sent without a subsequent CR LF.
8.4 Output on bar code printer The data transfer mode has to be set on „BA Pr“ (chapter 8.5.1). As bar code printer a Zebra printer model LP2824 is provided. Take into account that the output format of the balance is fixedly defined and cannot be changed. The printer format is stored in the printer, i.e. in case of a failure the printer cannot be changed with a new one from factory, previously it is necessary that KERN installs the respective software.
9 Service, maintenance, disposal 9.1 Cleaning Before cleaning, please disconnect the appliance from the operating voltage. Please do not use aggressive cleaning agents (solvents or similar agents), but a cloth dampened with mild soap suds. Ensure that no liquid penetrates into the device and wipe with a dry soft cloth. Loose residue sample/powder can be removed carefully with a brush or manual vacuum cleaner. Spilled weighing goods must be removed immediately. 9.
10 Instant help In case of an error in the program process, briefly turn off the balance and disconnect from power supply. The weighing process must then be restarted from the beginning. Help: Fault The displayed weight does not glow. Possible cause The balance is not switched on. The mains supply connection has been interrupted (mains cable not plugged in/faulty). Power supply interrupted.