KERN & Sohn GmbH Ziegelei 1 D-72336 Balingen E-Mail: info@kern-sohn.com Phone +49-[0]7433- 9933-0 Fax +49-[0]7433-9933-149 Internet: www.kern-sohn.com Instruction Manual Counting balance KERN CPB-N / CPB-DM Version 2.
GB KERN CPB-N / CPB-DM Version 2.3 01/2013 Instruction Manual Counting balance Contents 1 Technical data ................................................................................................ 5 2 Appliance overview ....................................................................................... 7 2.1 Overview of display .................................................................................................... 8 2.1.1 2.1.2 2.1.3 Display weight ............................
7 Operation Mode ........................................................................................... 27 7.1 7.2 7.3 7.4 Switch on/off and set zero ........................................................................................27 Simple weighing........................................................................................................27 Weighing with taring .................................................................................................
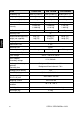
1 Technical data KERN CPB 6K0.1N CPB 15K0.2N CPB 30K0.5N 0.0001 kg 0.0002 kg 0.0005 kg 6 kg 15 kg 30 kg 0.0001 kg 0.0002 kg 0.0005 kg Linearity ± 0.0002 kg ± 0.0004 kg ± 0.002 kg Recommended adjusting weight (not supplied) 5 kg (F2) + 10 kg (F2) + 20 kg (F2) + 1 kg (F2) 5 kg (F2) 10 kg (F2) Readability (d) Weighing range (max) Reproducibility Weighing Units kg, lb Stabilization time 2 sec.
KERN CPB 6K1DM CPB 15K2DM CPB 30K5DM 0.001 kg; 0.002 kg 0.002 kg;0.005 kg; 0.005 kg;0.01 kg; Weighing range (max) 3 kg; 6 kg 6 kg; 15 kg 15 kg; 30 kg Minimum weight (min) 20 g 40 g 100 g 0.001 kg; 0.002 kg 0.002 kg; 0.005 kg 0.005 kg; 0.01 kg ± 0.002 kg; ± 0.004 kg; ± 0.01 kg; ± 0.004 kg ± 0.01 kg ± 0.
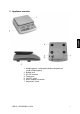
2 Appliance overview 1. Weighing plate / rechargeable battery compartment (under weighing plate) 2. Bubble level 3. RS 232 interface 4. Footscrews 5. ON/OFF switch 6. Mains adapter connection 7.
2.1 Overview of display Weight Reference weight Quantity Battery charge status display 2.1.1 Display weight Here the weight of the load is displayed in [kg]. The arrows above the symbols show: Battery very low NET Net weight Stability display Zeroing display 2.1.2 Display reference weight Here, the reference weight of a sample is displayed in [g]. This value is either entered by user of calculated by balance.
2.
3 Basic Information (General) 3.1 Proper use The balance you purchased is intended to determine the weighing value of material to be weighed. It is intended to be used as a “non-automatic balance”, i.e. the material to be weighed is manually and carefully placed in the centre of the weighing plate.. As soon as a stable weighing value is reached the weighing value can be read. 3.2 Improper Use Do not use balance for dynamic weighing.
3.4 Monitoring of Test Resources In the framework of quality assurance the measuring-related properties of the balance and, if applicable, the testing weight, must be checked regularly. The responsible user must define a suitable interval as well as type and scope of this test. Information is available on KERN’s home page (www.kern-sohn.com with regard to the monitoring of balance test substances and the test weights required for this.
6 Unpacking, Setup and Commissioning 6.1 Installation Site, Location of Use The balances are designed in a way that reliable weighing results are achieved in common conditions of use. You will work accurately and fast, if you select the right location for your balance.
Ensure that transport guard has been removed (only existing in 6 kg models) 1 To loosen the transport guard screw out transport screw [1] anticlockwise. For transportation carefully screw-in transport screw clockwise till to the stopper and then fix it using locknut.
6.2.2 Scope of delivery Serial accessories: Balance Weighing plate Power cable Protective cover Instruction Manual 6.3 Mains connection Power is supplied via the external mains adapter. The stated voltage value must be the same as the local voltage. Only use original KERN mains adapters. Using other makes requires consent by KERN. 6.4 Rechargeable battery operation (optional) The internal battery is charged with the supplied mains cable.
6.7 Adjustment As the acceleration value due to gravity is not the same at every location on earth, each balance must be coordinated - in compliance with the underlying physical weighing principle - to the existing acceleration due to gravity at its place of location (only if the balance has not already been adjusted to the location in the factory).
Press the TARE button, the acceleration value due to gravity is displayed. Press the TARE key anew. „UnLoAd“, followed by „LoAd“ is displayed Put the adjustment weight (see chap. 1) carefully in the center of the weighing plate, „PASS“ will be displayed. While the balance carries out a self test, remove the adjustment weight. After successful adjustment the balance automatically returns to weighing mode.
6.7.2 Models CPB-DM (verified models) The adjustment is locked for verified balances. Carrying out adjustment requires that the seal is destroyed and the adjusting switch is pressed when turning on the scale. For position of adjusting switch, see chap. 6.9.1. Attention: After destruction of the seal the balance must be re-verified by an authorised agency and a new verification wire/seal mark fitted before it can be reused for applications subject to verification.
TARE button, „UnLoAD“ appears Press the TARE key anew „LoAd“ as well as the currently set adjustment weight appear flashing either Confirm with TARE In order to change, enter the desired weight value of the adjustment weight by the numeric keyboard and confirm on the TARE button. or In order to achieve high-quality weighing results in the sense of the measuring technology, it is recommended to select the nominal value as high as possible. We recommend 80 % max.
6.8 Linearization (non-verified models only) Linearity shows the greatest deviation of a weight display on the scale to the value of the respective test weight according to plus and minus over the entire weighing range. If linearity deviation is discovered during a testing instrument control, you can improve this by means of linearization. Carrying out linearization is restricted to specialist staff possessing well acquainted with the workings of weighing scales.
Press TARE button, the acceleration value due to gravity is displayed. Press the TARE key anew (Example) „LoAd 0“ appears, after a short time a signal will sound and „LoAd 1“ appears First adjustment weight (s. tab. 1) after a short time a signal will sound and „LoAd 2“ appears Second adjustment weight after a short time again a signal will sound and „LoAd 3“ appears. Third adjustment weight after a short time again a signal will sound and „LoAd 4“ appears.
Second adjustment weight after a short time a signal will sound and „LoAd 0“ appears. First adjustment weight After successful linearization the balance automatically returns to weighing mode. In case of an adjustment error or incorrect adjusting weight the display will show an error message; repeat linearization process.
6.9 Verification General introduction: According to EU directive 90/384/EEC balances must be verified if they are used as follows (legally controlled area): a) For commercial transactions if the price of goods is determined by weighing. b) For the production of medicines in pharmacies as well as for analyses in the medical and pharmaceutical laboratory. c) For official purpose. d) For manufacturing final packages. In cases of doubt, please contact your local trade in standard.
6.9.1 Adjustment switch and seals Possible seals: enforced, and 1. 2. 3. 4. or Seal mark 1 Cover Verification switch Verification wire 6.10 Checking the balance verification settings For the adjustment, the balance must be switched over to service mode. In the service mode the parameters of the balance can be modified. The service parameters may not be modified, as this could damage the balance settings. In calibrated scales the service mode is locked individually for each switch.
6.11 Service mode (verified models) This overview of the service parameters is merely for checking the parameters set by the appropriate Bureau of Standards. No changes may be made. Access to menu: Switch-on balance and during the selftest press the TARE button Use the number keys to enter password: either Default password "0000" Personal password, enter under or function see chap.12 Confirm with TARE button Select function: Press one.
Overview for service parameter: * = Factory settings = The menu item is blocked; to modify press the justification button.
F9 Grv not documented Gravity ok* Low nG HiGH Signal sound, when the load is within the set range Signal sound, when the load is below the lower limit value Signal sound, when the load is beyond the set range Signal sound, when the load is above the upper limit value F11 t n P-tArE o-tArE Always use this setting F12 rSt Reset to default setting F10 bEP Audio signal 26 CPB-N / CPB-DM-BA-e-1323
7 Operation Mode 7.1 Switch on/off and set zero Operation indikation 1. Switch on balance As soon as the weight display shows "0" in all the three display windows your balance is ready to weigh. Press ON/OFF switch and hold briefly (at the bottom right side of the balance) The balance will carry out a self-test 2. Set on zero The zero display and the arrow above the „0“ symbol are displayed. 7.
7.3 Weighing with taring The dead weight of any weighing container may be tared away by pressing a button, so that the following weighings show the net weight of the goods to be weighed. Operation indikation Place empty tare container on the weighing plate. The total weight of the container is displayed. (Example) Reset display to "0": The weight of the container is now internally saved. The zero display and the arrows above the symbols will appear.
Reset display to "0": The total weight of the container is tared away. Add more components into the weighing Now read off the weight of the added item to be weighed on the container (adding). display. Delete tare value: Unload the weighing platform and press CPB-N / CPB-DM-BA-e-1323 .
7.4 Display background illumination The balance has the following possibilities of setting for the display background illumination: Keep pressed in weighing mode. The last selected setting will be shown. Press to select the following settings: Display background illumination off Display background illumination on Display background automatically off Select desired setting by illumination . The setting is taken over and the balance changes into weighing mode.
8 Piece counting With pieces counting you can either count parts into a container or remove parts from a container. To count a greater number of parts the average weight per part has to be determined with a small quantity (reference quantity). The larger the reference quantity, the higher the counting exactness. High reference must be selected for small parts or parts with considerably different sizes. 8.
Count the items: Tare if necessary, place weighing good and read off the number of items. Weight placed on balance: Reference weight: Quantity placed on balance: The display value can be printed out by connecting an optional printer and pressing . Printout example KERN YKB-01N: Item counter Weight placed on balance Reference weight Quantity placed on balance NO. GS U.W. PCS 0 0.300 kg 100.
8.2 Numeric entering of the reference weight If you know the reference weight/piece you can enter this via numeric keys. Set reference: Enter reference weight via number keys Confirm within 5 sec: Count the items: Tare if necessary, place weighing good and read off the number of items.
9 Totalization This function allows you to execute several weighing procedure. After that, the total items number, the total weight and the number of weighing procedures will be displayed. 9.1 Manual totalizing Menu setting: [ ], see chap. 12.2.1 Determine the average piece weight (see chap. 8.1) or enter manually (see chap. 8. 2). Place weighing goods A. Currently placed weight Wait for stability display, then press .
Printout example KERN YKB-01N: Number weighing processes Weight placed on balance Reference weight Quantity placed on balance NO. 1 GS 2.000 kg U.W. PCS 100 g 20 pcs Remove the weighed good. More weighed goods can only be added when the display ≤ zero. Place goods to be weighed B. Wait for stability display, then press . The displayed values are added into the summation memory and edited, when an optional printer is connected.
Add more weighed goods as described before. Please note that the weighing system must be unloaded between the individual weighing procedures. You can repeat this process until the capacity of the weighing system is exhausted. Display sum total: Press , total weight, number of weighing procedures and total number of items will be displayed shortly. Press output.
9.2 Automatic adding-up With this function the individual weighing values are automatically added into the summation memory when the balance is unloaded without pressing when an optional printer is connected. Menu settings: [ and edited, ] Add up: Place weighing goods A. After the standstill control sounds a signal tone. Unload the weighing good, the weighing value is added into the summation memory (ACC1) and printed out. Place goods to be weighed B.
10 Weighing to target quantity or target weight and tolerance check An acoustic signal is sounded as soon as the number of items placed or a certain weight value reaches or exceeds/drops below a pre-set limit (depending on the settings in menu F10) Options: OK Signal sound, when the load is within the set range Low Signal sound, when the load is below the lower limit value NG Signal sound, when the load is beyond the set range High Signal sound, when the load is above the upper limit value 10.
Set limit values: Determine upper limit value for target item number: Press , „Hi Cnt“ will appear: Enter the upper limit value via the numeric keyboard, e.g.: 70 Pcs Press „Lo Cnt“ appears: Determine lower limit value for target item number: Enter the lower limit value via the numeric keyboard, e.g.
Start tolerance check Determine the average piece weight (see chap. 8.1) or enter manually (see chap. 8. 2). Place the load, wait until the acoustic signal sounds, depending on the settings in the menu „F10“ (see chap. 11.2, only for non-verified models). Delete limit values: For all limit values enter „0“ and confirm using the TARE button. 10.
Select target weight mode: By keeping pressed the desired tolerance weighing mode can be selected: Check off – Tolerance check switched off Check psc - Tolerance check for target item number Check net -: Tolerance check for target weight Set limit values: Determine upper limit value for target weight: Press repeatedly and confirm via the TARE button until „Hi nEt“ appears: Enter the upper limit value via the numeric keyboard, e.g.
Determine lower limit value for target weight: Enter the lower limit value via the numeric keyboard, e.g.: 90 g Confirm within 5 sec: Press repeatedly until the balance is in weighing mode Start tolerance check Place the load, wait until the acoustic signal sounds, depending on the settings in the menu „F10“ (see chap. 11.2, only for non-verified models). Delete limit values: For all limit values enter „0“ and confirm using the TARE button.
12 Menu (non verifiable models) Access to menu: Switch-on balance and during the selftest press the TARE button. Use the number keys to enter password: either Default password "0000" Personal password, enter under or function see chap.12 Confirm with TARE button Select function: Press by one. to select the individual menu items showing the current settings one Change / save settings: Confirm selected function by pressing and confirm by pressing .
12.
F9 Gru not documented Gravity F10 bEP Audio signal F11 rSt ok* Low nG HiGH Signal sound, when the load is within the set range Signal sound, when the load is below the lower limit value Signal sound, when the load is beyond the set range Signal sound, when the load is above the upper limit value Reset to default setting * default setting CPB-N / CPB-DM-BA-e-1323 45
13 Data output RS 232 C The balance is typically equipped with a RS 232C interface. Weighing data can be edited according to menu setting or automatically or by pressing via the interface. This data exchange is asynchronous using ASCII - Code. The following conditions must be met to provide successful communication between the weighing balance and the printer. Use a suitable cable to connect the weighing balance to the interface of the printer.
14 Service, maintenance, disposal 14.1 Cleaning Before cleaning, please disconnect the appliance from the operating voltage. Please do not use aggressive cleaning agents (solvents or similar agents), but a cloth dampened with mild soap suds. Ensure that no liquid penetrates into the device and wipe with a dry soft cloth. Loose residue sample/powder can be removed carefully with a brush or manual vacuum cleaner. Spilled weighing goods must be removed immediately. 14.
15 Instant help In case of an error in the program process, briefly turn off the balance and disconnect from power supply. The weighing process must then be restarted from the beginning. Fault Possible cause The displayed weight does not glow. The balance is not switched on. The mains supply connection has been interrupted (mains cable not plugged in/faulty). Power supply interrupted. Batteries are inserted incorrectly or empty No batteries inserted.
16 Declaration of conformity KERN & Sohn GmbH D-72322 Balingen-Frommern Postfach 4052 E-Mail: info@kern-sohn.de Tel: 0049-[0]7433- 9933-0 Fax: 0049-[0]7433-9933-149 Internet: www.kern-sohn.
KERN & Sohn GmbH D-72322 Balingen-Frommern Postfach 4052 E-Mail: info@kern-sohn.de Tel: 0049-[0]7433- 9933-0 Fax: 0049-[0]7433-9933-149 Internet: www.kern-sohn.