
Manual

3
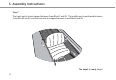
3. Assembly Instructions
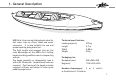
All NERIS folding kayaks are run
through presale test assembly.
However, the first kayak assembly
may seem to be more challenging
then following one. The skin is
being stretched with each
assembly and it will be easier to
put the skin on a frame.
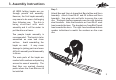
Two people kayak assembly is
recommended. The kayak is to be
assembled on even and clean
surface. Avoid assembling the
kayak on sand. It may cause
damage to joining parts and more
difficult assembly and disassembly
in future.
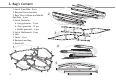
The main parts of the kayak are
marked with numbers and pointing
arrows for ease of assembly. The
Keel Bars are marked showing
points where the Cross Ribs are to
be installed.
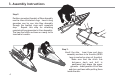
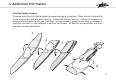
Step 1.
Attach Bow and Stern A-shape Keel Bars to Bow and Stern
Assembly. Attach Cross Rib #1 and # to Bow and Stern
Assembly. Use wing nuts and bolts to secure the cross
ribs. The kayak features seamed cross ribs with stainless
steel brackets. Note that brackets on Cross Rib #1 must
lean towards the bow. The brackets on Cross Rib #5 must
lean towards the stern. The right-hand washboards have
number indications to match the numbers on the cross
ribs.
5