
User Instructions

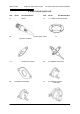

7.8 MODULE HEAT EXCHANGER (Fig. 5.7.2 item 77)
i) Isolate the appliance (Section 7.1)
ii) Gain access (Section 7.2)
iii) Shut of the water supply to the appliance.
iv) Remove the burner head (Section 7.7)
v) Drain the system to below the level of the appliance using the drain off tap at the
base of the heat exchanger.
vi) Remove the boiler thermostat (Section 7.4.2)
vii) Remove the push on connectors to the water pressure switch, flow overheat
thermostat, flow high limit thermostat and flue protection thermostat taking note of
the correct positions.
viii) Remove the condensate trap (Section 7.10)
ix) Remove the pressure gauge phial located next to the drain off tap.
x) Disconnect the flow to the heat exchanger at the union on the heat exchanger
flow manifold.
xi) Undo the nut and olive of the isolating valve fitted directly on the heat exchanger
return pipe.
xii) Remove the nut fixing the strap retaining the base of the heat exchanger and pull
out the strap by unhooking it from its fixing behind the heat exchanger.
xiii) Remove the allen screw securing the top of the heat exchanger to its mounting
bracket.
xiv) Remove the heat exchanger assembly by pulling forward at the top and lifting up
and out of the appliance.
xv) Cut the olive from the heat exchanger return pipe and remove the compression
nut.
xx) Reassemble (Section 7.3)
xxi) Recommission (Section 4 - Commissioning)
7.9 CONDENSATE TRAP (Fig. 5.7.2 item 90)
i) Isolate the appliance (Section 7.1)
ii) Gain access (Section 7.2)
iii) Disconnect the condensate line from the base of the heat exchanger.
iv) Disconnect the condensate line from the base of the flue assembly.
v) Disconnect the condense lines from the projection of the condensate trap from
the base of the cabinet.
vi) Withdraw the condensate trap.
vii) Mop up any spilled condensate.
viii) Reassemble (Section 7.3)
NB: When re-fitting the condensate trap pour water onto the condensate hose
from the base of the heat exchanger until nearly full. Then reconnect the
condensate hose to the base of the heat exchanger.
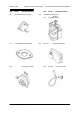
7.11 PRESSURE GAUGE (Fig. 5.7.4 item 211)
i) Isolate the appliance (Section 7.1)
ii) Gain access (Section 7.2)
iii) Shut off the pressure measurement point at the return drain valve located at the
base of the heat exchanger.
iv) Remove the phial from its mounting at the return pipe entry to the base of the heat
exchanger.
v) Press in the catches and push the pressure gauge forward through the control
panel.
vi) Reassemble (Section 7.3)
vii) Refill the system (See Section 4 - Commissioning)
WD53/0/1999 Chapter 7 : Replacement Of Parts The Keston 260 and 340 Condensing Boilers
Installation & Servicing Instructions Page : 42