Audya Series USER MANUAL
KETRON • AUDYA
IMPORTANT SAFETY PRECAUTIONS CAUTION: TO REDUCE THE RISK OF ELECTRIC SHOCK, DO NOT REMOVE COVER (OR BACK). NO USER-SERVICEABLE PARTS INSIDE. REFER SERVICING TO QUALIFIED SERVICE PERSONNEL. Warning sign, within equilateral triangle, is intended to alert the user to the presence of uninsulated “dangerous voltage” within the product’s enclosure that may be of sufficient magnitude to constitute a risk of electric shock to persons.
Table of contents Introduction............................................... 5 Main features................................................ 5 Top panel....................................................... 7 Rear panel..................................................... 8 USB connectors on the front side................ 8 The new panel on Audya 4 and 5................ 9 Connections............................................. 12 AUDIO connections..................................... 12 MIDI connection.
Introduction Thank you for purchasing Ketron Audya Advanced Music Station. In this “User Manual” you can find the descriptions of all the main functions to get started by using the keyboard. Before using the unit, we strongly recommend you to read this manual thoroughly to ensure that you understand the operation of its many useful and convenient functions. After you have finished reading this manual, please keep it in a safe place for future reference. Playing the DEMO songs 1.
Introduction ▀▀ Karaoke A wide range of lyric options to display the text within MIDI files or synchronized to audio files are available. ▀▀ MACRO RECORDING Global recording of the performance’s events (under Menu). Recording starts with Start Rec and stops by pressing the Record button. The file is memorized under the MIDI folder, with the .Msr extension (Macro Song Recording). To start the playback just select the file and press Enter (page 129).
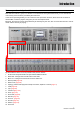
Introduction Top panel The front panel of Audya is divided in various operative sections. In the figure below, each number corresponds to its description. 3 5 NOTE Some buttons and controls on the front panel are marked by a blue serigraphy, meaning that a second function is available accordingly to the selected operative mode.
Introduction Rear panel All the connections to external devices are on the rear panel. In the Figure below, each number corresponds to its description. 1 2 3 4 5 6 7 8 9 1 Headphone Standard stereo jack for the headphone. The Master volume adjusts also the headphone output level. 2 Gain 2 Gain adjustment of the signal input level of the Micro 2 jack. 3 Micro 2 Standard combo mono jack for the connection of a dynamic microphone.
Introduction The new panel on Audya 4 and 5 Multi-Tabs are made of a group of 16 buttons on the left side of the keyboard with which you can activate and control many of the functions provided by the instrument. In the various operating modes you can control the mute percussion sections, direct access to 16 shares of General Midi, control the playlist, change the pitch of the tempered scale.
Introduction ▀▀ MULTI-TABS MENU By pressing the MODE button, the menu management Multi-Tabs will open. By pressing the F1 .. F6 function keys you can activate various modes of operation which will be described in detail in the following section. F1) DRUM ON/OFF: (Figure 1) DRUM ON/OFF mode enables or quickly mute the percussive instrument sections.
Introduction F4) ASSIGN.TABS: (Figure 4) This mode allows to assign functions called by each of the 16 multitabs. You can therefore customize the multi-tabs configuration and assign the desired function to them. In order to make the assignment, simply select the desired multi-tabs by pressing DATA CURSOR (Up and Down) and scroll through the available functions by pressing DATA CURSOR (Left and Right) or using the dial. The following table shows the available functions. Audio Reset Micro Rev.
Connections AUDIO connections Stereo jack connection to a PA system. LINE INPUT 1 and 2 MAIN OUT L/R INPUT L MIXER INPUT R MAIN OUT RIGHT/LEFT AMPLIFIED SPEAKERS Connecting 4 auxiliary outputs to a mixer and to a PA system.
Connections Connecting one or two microphones and one headphones. MICRO 2 MICRO 1 STEREO HEADPHONES MIDI connection MIDI connection to an external interface connected to a computer. AUDIO/MIDI USB INTERFACE (or FIREWIRE) MIDI IN MIDI OUT MIDI OUT USB MIDI IN COMPUTER WITH A DAW APPLICATION (Cubase, Pro Tools, SONAR, Logic, Reaper, Live, Reason, Fruity Loops, Sequel, etc.
Connections VIDEO connection Connecting a VGA monitor. VGA MONITOR VIDEO PORT USB connection USB connection to a computer.
Connections ▀▀ USB connection procedure 1. Connect the USB cable to the USB DEVICE port of Audya, and to the USB port of a computer. 2. After a while, “USB connected” will appear on the display of Audya (Figure A). All the functions on the front panel are disabled. 3. After a while, a screen like Figure B should appear on the screen of your computer. From this windows you should choose the “Open folder to view files using Windows Explorer” option (Figure B).
Display and function buttons Display The heart of Audya is the display. The F1-F5 function buttons to the left, the F6-F10 function buttons to the right and the five User buttons below the display allow you to select the items displayed in the various screens. 1 2 4 1 F1-F5 function buttons Press the five function buttons from F1 to F5 to select one voice (VOICE) or one STYLE or a menu displayed on the display, for example. 2 F6-F10 function buttons The same as above.
Display and function buttons User buttons In addition to the FILL and BREAK selection in Arranger mode and other assignable user functions (see User Assignable on page 140), the five User buttons can access many functions. For example, while in the different operative modes (MENU, DISK, PLAYLIST, STYLE VIEW, DRUM MIXER and so on), these five User buttons allow the selection of further pages that open their own settings menus.
Selecting voices Selecting voices You can find three rows of eight buttons each in the VOICE section on the front panel. The first two rows allow the selection of the voice families, ordered by a common use (see a full list of the voices at the end of this manual). B The third row contains the PROGRAM button and other voices selection buttons. Moreover, there are also the DOUBLE, HARMONY buttons. ▀▀ Selecting a basic voice 1.
Selecting voices ▀▀ Selecting a INS voice 1. Press the RAM INS / SUPERSOLO button of the third row in the VOICE section. The display will show a list of the SUPERSOLO voices stored on the hard disk (Figure 3). 2. Select one voice by using the CURSOR § ¶. 3. Press the ENTER button to load the INS voice into the selected memory location. The display will show the INS voice on the first free location.
Selecting voices dding a second voice to the right hand ▀▀ A (2nd VOICE) 1. Press the 2nd VOICE button on the third row in the VOICE section. 2. According to the PRESET or PROGRAM voice, you will add a second voice to the sound of the right hand. 3. Note that the 2nd VOICE voices can be freely programmed by the user in any PROGRAM. Press the EDIT button and the USER 2 button to open the 2nd VOICE page (Figure 7). For more details on how to create/edit a PROGRAM see on page 48.
Selecting the styles Selecting styles The numeric keypad of the STYLE section allows the selection of twelve style families, divided into various musical genres. B ▀▀ Selecting a PRESET style 1. Select one style family by pressing one of the twelve buttons of the keypad in the STYLE section. For example, press the “POP” family button. 2. The display will show the first ten available styles Press one of the F1-F10 buttons to select one of the ten displayed styles.
Play Control Play Control The PLAY CONTROL section contains all the control functions so you can start playing the keyboard and modify the settings accordingly to your own way of playing. B ▀▀ TRANSPOSER By pressing the [-] and [+] buttons you can transpose the overall pitch in 24 semitones up or down (1 semitone step), including the Arranger (except the drum). The display shows the current TRANSPOSE value (Figure 13).
Play Control ▀▀ BASS The MANUAL, TO LOWEST and BASSIST buttons set the following modes, respectively. MANUAL: sets the manual bass for the left hand. TO LOWEST: sets the lowest note of the chord to the root. For example, when you want to play a bass pedal within a chord progression. BASSIST: allows to play free bass notes on a chord played by using the right hand. For example, when you play bass solos. ▀▀ SPLIT Holding the SPLIT button, a small keyboard at the bottom of the display appears.
Mixer Mixer The Mixer section features nine vertical faders. The first fader at left allows to control the USER functions (see “User Assignable”). The remaining 5 faders control the volumes of the ARRANGER parts and 3 faders the volumes of the VOICES parts. NOTE When the DRAWBARS mode is on, the nine faders of the Mixer will adjust the footage of the organ. For details see on page 20 and on page 97.
Player Player The Player section is a complete multimedia environment for live performances. It’s a mixer consisting of five faders allowing volume control over WAVE, DJ LOOP, MP3, SFX and MIDI file. The five buttons above the faders switch on/off in order to select the tracks for the mix. NOTE When a track of the Player is playing, the corresponding LED flashes. NOTE The Remix On/Off function works only when MIDIFILE is selected, even if it is shown on the WAVE and MP3 player screens.
Player • F7 - LOOP ON/OFF: enables/disables the loop playback of one track. • F8 - PFL ON/OFF: enables/disables the PFL. When PFL is active, the Player is routed to AUX3&4 and AUX3&4 outputs to headphones. This works only if the Player’s volume Fader is set to 0. If different from 0, the output signal is routed to MAIN. The headphones volume is adjusted by the PFL Fader from the USER panel. It doesn’t work with MIDI FILES.
Player-Wave Edit On Wave Player menu a new WAVE EDIT feature located on F9 button. In order to operate with this new function firstly select the wave to edit than select WAVE EDIT button (Figure 20). Once Wave Edit button is pressed a pop up menu will show on display the Import progress activity. When this procedure will be completed the waveform will be displayed on Audya screen. Related at this new waveform screen Audya will show a tools palette to operate on this imported file (Figure 21).
Player-Wave Edit In detail: • • • Preview: Allows preview function of edited waveform with new assigned value Restore: as Restore mean and useful as UNDO of preview use Save: Just to Save an edited file. In order to hear NORM and FADE rendered feature user must select PREVIEW function. As probably know this feature needs a computing time (related of wave length) to elaborate final wave result. Rendering feature will not necessary in case of using START or END features. You ‘ll hear it immediately.
Player-Wave Edit ▀▀ WAVE EDIT on MSP template See MSP editing on page 99. WAVE EDIT menu is available also on MSP template to create your own MSP Select MSP Edit, load your wave file and it will be available on display (Figure 26). Once the wave file will be imported on WAVE EDIT Audya display will show a screen shot alike the previous issue . The main remarkable difference is LOOP (F4) (Figure 27). LOOP feature, as well name say, allows to set a Loop point on the selected wave (previously imported).
Player ▀▀ DJ LOOP The DJ LOOP button enables the DJ LOOP screen where you start playback of the selected audio loop (Figure 29). The fader below adjusts the volume of the track. To navigate in this screen use the cursor buttons, the ENTER and EXIT buttons as described for the WAVE screen. The DJ LOOP song are a particular kind of looping tracks, prepared for several music genres. The USER 5 button allows the JUMP NORM/IMM function (normal/immediate jump).
Player In the lateral menus there are some items that were not present in the previous ones. ▀▀ Page 1/3 F9 - Remix: parameter that allows a MIDI remix (see page 34) ▀▀ Page 2/3 Wave Sync function that lets you synchronize your MIDI tracks with Wave files associated with the MIDI and accurately synced (see description on page 33). ▀▀ Page 3/3 F8 - S. Medley: Medley Sync function. If set to On, it starts the new MIDI file from the beat. F9 - Ch Quant. : Chord Quantization.
Player CROSSFADE If you want to execute an automatic crossfade between the two tracks while playing, press the CROSSFADE button on the panel and follow the procedure below. CROSSFADE between WAVE and MP3 files 1. Press the WAVE button. 2. Select an audio file from the WAVE folder (Figure 33). 3. Press the START button (USER 5) or the ENTER button or the START button on the panel. 4. The WAVE track starts playback and its LED flashes. 5. Press the MP3 button. 6.
Wave Sync Wave Sync WAVE SYNC Environment allows to assign several wave tracks synchronized to MIDI track by MIDI clock. On this feature you can assign Starting /Stop / Repeat measure for each Wave track assigned. 1. WAVE and MIDI tracks must be located on the same folder. 2. Use F8 button to select WAVE SYNC feature .This action allows to Create or Edit your WAVE SYNC files. 3. Enter into the MIDI player and select the MIDI file to be edit and press Load MIDI (F10).
MIDI REMIX MIDI Remix Audya features the MIDI REMIX function which allows to replace original midi file drum track (usually on track #10) with a Drum part of Audya Style (Audio Drum or else). ere how create your own MIDI DRUM ▀▀ H REMIX: 1. Press MIDI button on Player Section than select your own Midi file. (As showed on Figure 1 we have select “Raindrops_Keep_Falli.mid” (metronome tempo as 123 BPM). 2. Press F9 button to activate REMIX ON feature (Figure 43). 3.
MIDI REMIX unctions of the Style and MIDI buttons ▀▀ F (User Style/Disk Area Figure 47). These buttons enable (or disable) style on REMIX while REMIX is running. Moreover REMIX function can be linked with a midi file while is playing. Firstly select your own midi file than activate REMIX function and add your favourite style. User could change your styles while REMIX play easily.
MIDI REMIX ▀▀ LIVE GUITAR REMIX On Midi Remix feature is also possible add Live Guitar (coming from selected style) beside drum part. Live Guitar could be played manually or automatically by Live Guitar REMIX which will extract harmony tune directly from midi file. Live Guitar Remix can be activate on Manual or Autoplay way directly form MENU->KEYBOARD CONTROL> UTILITY (Page #1) -> Remix Live Guitar.
Voicetron Voicetron The Voicetron section has one volume fader for MICRO and one volume fader for VOCALIZER, both with on/off LED button. Once you connect a microphone to the MICRO 1 connector and/or MICRO 2 connector, you can access to a wide range of options for the voice processing. NOTE To access the configuration menus of MICRO and VOICETRON, hold down few seconds the corresponding buttons. B ▀▀ MICRO The MICRO button enables both MICRO 1 and MICRO 2 inputs.
Voicetron ▀▀ Setting a VOCALIZER effect 1. Press the VOCALIZER button. 2. The screen where to choose the VOICETRON PRESETS will appear (Figure 52). 3. Press the F1-F10 buttons to set one of the VOICETRON PRESETS, that is an effect for the microphone connected to MICRO 1 input. 4. Press the CURSOR Ó Á to scroll the pages of VOICETRON PRESETS.
Master Master The Master fader is located at right of the Voicetron section and adjusts the global volume of the instrument. It features a FADE function which enables an automatic fade-out during playback, that is a gradual smooth volume reduction to zero. B Figure 54 ▀▀ FADE By pressing the FADE button, the LED flashes and the volume will be reduced gradually, accordingly to the CROSSFADE settings. Please see MENU > keyboard CONTROL > UTILITY > NEXT PAGE > Fade Time (Figure 54).
Main View Main View The new MAIN VIEW interface allows to display all the items of the main screen in a more easyto-operate way. ▀▀ Activating the MAIN VIEW 1. Press the MENU button on the front panel to open the screen MENU as shown in Figure 55. 2. Press the F4 button corresponding to KEYBOARD CONTROL as shown by the arrow in Figure 55. 3. Press the F10 button corresponding to UTILITY as shown in Figure 56. 4. Press the USER button 5 (NEXT PAGE) as shown in Figure 57. 5.
Main View Autoswitch Time Strictly pertaining to the new MAIN VIEW interface, the AUTOSWITCH TIME function allows to set the switching time up to 60 seconds before the MAIN VIEW switches from other environments. For example, after you choose a style or an instrument, the display switch automatically to the MAIN VIEW after the AUTOSWITCH TIME set by this parameter. ▀▀ Setting the AUTOSWITCH TIME 1. Press the MENU button on the front panel to open the MENU screen. 2.
Main View Main View description Hereunder, you can see the organization of the graphical layout of the MAIN VIEW window. 1 2 3 4 ▀▀ MAIN VIEW Window 1 BPM Tempo It shows the BPM Tempo set for the style or the current filely loaded in the Player. When the Arranger or the Player are playing, the red and green LED light accordingly to the musical division. 2 Transpose It shows the transpoIf value of the right hand or of the current filely loaded in the Player.
Main View F3/F4 – The F3 button (or F4) opens the default window for MIDI files selection. It also shows the value of the volume set on the MIDI Player (Figure 64). More details on “MIDI Player (MAIN VIEW)” section of this manual. F5 – T he F5 button does not open any window. It indicates the MAIN VIEW section corresponding to the mixer parts of the Arranger. In this section the volume values of Drum, Bass, Chord and Lower (Figure 65) are displayed.
Main View MIDI Player (MAIN VIEW) From the MAIN VIEW window you can select directly one of the MIDI files stored on disc and display the karaoke lyrics, if present. ▀▀ Selecting MIDI files from MAIN VIEW 1. In the MAIN VIEW window, press the F3 button (or F4). A list of MIDI files of the MIDIFILE folder will appear (Figure 67). 2. Select using the CURSOR § ¶ buttons or the DATA/VALUE wheel a MIDI file from the list. Our example is “JENNIFER.MID”. 3. Press the ENTER button to start MIDI file playback. 4.
Main View WAVE Player (MAIN VIEW) From the MAIN VIEW window you can select directly the WAV file on disc. ▀▀ Selecting a WAV file from the MAIN VIEW 1. The default MAIN VIEW window allows the selection of MIDI files. For this reason it’s necessary to press the WAVE button of the Player. The list of the WAV file of the WAVE folder will appear (Figure 71). 2. Select a WAV file from the list using the CURSOR § ¶ buttons or the DATA/VALUE wheel. Our example is “Funky Tune.wav”. 3.
Main View MP3/SFX Player (MAIN VIEW) From the MAIN VIEW window you can select directly the MP3 or SFX files on disc. ▀▀ Selecting an MP3/SFX file from MAIN VIEW 1. The default MAIN VIEW window allows the selection of MIDI files. For this reason it’s necessary to press the MP3 button or SFX button of the Player. A list of MP3 files of the MP3 folder (Figure 75) or SFX files of the SFX folder will appear (Figure 76). 2.
Main View DJ LOOP Player (MAIN VIEW) From the MAIN VIEW window you can select directly the DJ LOOP files on disc. ▀▀ Selecting a DJ LOOP from MAIN VIEW 1. The default MAIN VIEW window allows the selection of MIDI files. For this reason it’s necessary to press the DJ LOOP button of the Player. A list of DJ LOOP of the folder DJ_ LOOP will appear (Figure 80). 2. Select a DJ LOOP from the list by using the CURSOR § ¶ buttons or the DATA/VALUE wheel. Our example is “ArtOfSun.djl”. 3.
Program Program For each button of the VOICES section you can create and store a PROGRAM sound. You can modify a PROGRAM by pressing the EDIT button and a button of the VOICES section. ▀▀ Creating a PROGRAM 1. Press the PROGRAM button. 2. Press a button of the VOICES section, for example PIANO. The current PROGRAM will appear (Figure 82). 3. Press the EDIT button. The parameters of the current PROGRAM will be displayed (Figure 83). 4.
Program F2/F7–VOLUME By pressing the F2 or F7 buttons you will highlight repeatdly the voice of which you want adjust the volume. Use the DATA/VALUE wheel or the CURSOR Ó Á buttons to adjust the volume from 0 to 63 of three voices independently (Figure 86). Press the CURSOR Ó Á buttons together to automatically set the volume to zero. F3/F8–SHIFT By pressing the F3 or F8 buttons you will highlight repeatdly the voice of which you want adjust the pitch.
Program VOICE EDIT Press the USER 1 button to access the edit page of each VOICE of the PROGRAM. You will see a screen similar to Figure 90 where all the parameters of the VOICE of the PROGRAM will appear. By using the F1 to F10 buttons you can select a parameter and modify the value using the DATA/VALUE wheel or the CURSOR Ó Á buttons . Press the CURSOR Ó Á buttons together to set the default value (32). • • • • • • • • • • F1–ATTACK: modifies the attack time of the envelope.
Program You can access the LFO parameters by using the F1... F10 buttons. The selected parameter can be modified by using the DATA/VALUE wheel or the CURSOR Ó Á buttons. The value range for each parameter is from 0 to 63. Press the CURSOR Ó Á buttons together to set the default value (32). F1–VIBRATO RATE: vibrato frequency. F2–VIBRATO DEPTH: vibrato depth. F3–VIBRATO DELAY: vibrato delay. F6–LFO RATE: oscillator frequency. F7–LFO TVF: LFO amount on the filter. F8–LFO TVA: LFO amount on the amplifier.
Program 2ND VOICE Press the USER 2 button (2nd Voice) to see a screen like Figure 93 by using the parameters for the second voice (2ND VOICE), that you can activate by pressing the 2ND VOICE button in the VOICES section. Press the F1... F10 buttons to access the parameters of the 2ND VOICE. Modify the values of the selected parameter by using the DATA/VALUE wheel or the CURSOR Ó Á buttons. • • • • • • • • • • F1–2ND VOICE: you can assign an instrument from those of the GM banks.
Program EFF. MODE The USER 3 button opens a screen like Figure 97 where all the parameters for EFF. MODE will appear, that is the effects mode of the PROGRAM. Use the F1... F10 buttons to modify the parameters of the effects mode. Once you select a parameter, you can modify the value by using the DATA/VALUE wheel or the CURSOR Ó Á buttons. • F1/F6–VOICES: you can assign up to three VOICES to the same PROGRAM, as already seen in the first screen of PROGRAM EDIT page.
Program For the ECHO effect (Figure 101) you can choose from the following types: Mono Echo1, Mono Echo2... Mono Echo5 Stereo Echo1, Stereo Echo2... Stereo Echo5 Triple Echo1, Triple Echo2... Triple Echo5 Mono User1 Stereo User1, Stereo User2 Triple User1, Triple User2 For the DIST effect (Figure 102) you can choose from the following types: Overdrive1, Overdrive2, Overdrive3 Tube 1, Tube 2 Distorsion1, Distorsion2, Distorsion3 Hyper Dist. Grunge Fuzz Hot British Org. Over.1, Org. Over.2, Org. Over.3 Over.
Program • • F1/F6–VOICES: you can assign up to three VOICES to the same PROGRAM, as already seen in the first PROGRAM EDIT screen. F2/F7–REVERB: you can adjust the reverb effect send. Values from 0 to 63 (Figure 106). By pressing together the CURSOR Ó Á buttons you set the reverb send to 0. NOTE If in the EFF. MODE page you choose an effect like DIST, DIST+CHO or DIST+ECHO+CHO, you cannot adjust the REVERB send independently for each voice.
Program • • • F1/F6–VOICES: you can assign up to three VOICES to the same PROGRAM, as already seen in the first PROGRAM EDIT screen. F2/F7–RANGE (Figure 111): you can set the split points of the three instruments. You can set the split points for each VOICE playing directly on the keyboard.
Program • • • When the portamento is OFF you can set the MONO or POLY mode for the VOICE. When you set the portamento to any value between 5 and 127, the portamento can be set to LEGATO or POLY: on the first case the portamento acts on the sound in “legato” mode, until a note is released. In the second case, it acts in polyphonic manner, retriggering the portamento every time a note is played.
Program • • • • • • • • • • • These parameters are of course linked to the Harmony parameter, which specifies the voice affected by harmonization. Aft.Morphing: it assigns the morphing to the aftertouch control. Aft.Morph.Coupl.: it assigns the additive morphing to the aftertouch control. Ped.Morphing: it assigns the morphing to the pedal control. Ped.Morph.Coupl.: it assigns the additive morphing to the volume pedal control. Sustain Switch: it switches sounds by using the sustain pedal.
Program • • Cutoff: changes the cutoff of the filter Pit+Cutoff: changes pitch and cutoff Pitch+Filt: changes pitch and filter Pitch+Ampl: changes pitch and amplitude Pit+Fil+Amp: changes pitch, filter and amplitude Pi+Fi+Am+Cut: changes pitch, filter, amplitude and cutoff Slide 1, Slide 2, Slide 3, Slide 4: applies a slide effect Slide Bend: applies a note bending Soft Pitch: applies a slight untuning By pressing the CURSOR Ó Á buttons together you can switch the parameter OFF.
Registration Registration Registration feature mean saving of complete panel setting. Audya allow two different Registration feature : SINGLE and BLOCK . By Registration button user can modify registration content. ▀▀ Creating a SINGLE REGISTRATION 1. After set on layout style tempo, volumes and all parameters related of own performance press SAVE and F1 REGISTRATION button ( Registration name is required ). 2.
Registration 3. After set your own Registration User should assign a related name of it by entering letters or number using keybed ( Figure #126 show i.e. MY REGISTRATION) 4. Press SAVE button (User 5) to complete. NOTE When you save a REGISTRATION in automatic mode, a progressive number of 4 digits is added to the file name: 0001_REGIS.SRG, 0002_REGIS.SRG, etc. Figure 127 ▀▀ Recalling a SINGLE REGISTRATION 1.
Registration 9. To jump to the second page, press the BACK or FORWARD buttons below the display. 10. If you want to replace or delete one SINGLE REGISTRATION, select it by using the F1-F10 buttons and press the USER 2 button (REPLACE) or USER 3 button (DELETE), respectively, and then the ENTER button. 11. Press the SAVE button and give a name to the REGISTRATION BLOCK. Digit a name in the text box by inputting the characters directly from the keyboard. 12.
Registration ecalling a REGISTRATION from the MAIN ▀▀ R VIEW window If the MAIN VIEW function and the NUMERIC ON function are enabled, by pressing the F2 button you can directly recall the REGISTRATION number by using the numeric keypad. 1. From the MAIN VIEW window press the F2 button. “Enter Number ->” will appear (Figure 134). 2. Digit a REGISTRATION number by using the numeric keypad. “Wait Please...” will appear (Figure 135). The corresponding REGISTRATION will be searched and loaded. 3.
Play List Play List By pressing the PLAY LIST button you can access the Play Lists stored on the hard disk. In order to create a Play List, follow the procedure below. ▀▀ Creating a PLAY LIST 1. Press the PLAY LIST button. A screen like Figure 137 will appear showing a PLAY LIST demo. 2. Select PLAY LIST DEMO by pressing CURSOR ¶ and press the EDIT button. 3. Press the CREATE button (User 1). 4. Press one of the F1-F10 buttons. For example, F1. 5.
Key Tunes Key Tunes By pressing the KEY TUNES button in the VOICE section, you can assign a song to each key of the keyboard. You can freely assign any song of the WAVE folder to any key of the keyboard. ▀▀ Creating a KEY TUNE 1. Press the KEY TUNES button. A screen showing “KEY_TUNE_DEMO” will appear (Figure 139), that is a demonstration file to understand KEY TUNES features. 2. Press the USER 3 button (CREATE) in order to create a new KEY TUNE. 3.
Double, Harmony Double, Harmony By pressing the DOUBLE button in the VOICE section, you can activate the function to double the octave of the voice for the right hand. By pressing the HARMONY button in the VOICE section, you can enable the function to harmonize the voice for the right hand. By hold ( for a couple of seconds ) Harmony button User can scroll 20 different selection ( 2 pages menu )(Figure 142).
Style View Style View From the STYLE section on the front panel you can select a style by using the numeric keypad. If the style uses an Audio Style Modeling, please note that a ^ symbol appears before the style name otherwise the name appears without any symbol (Figure 144). In order to view and/or edit the parts of the style, with or without an Audio Style Modeling, you can press the STYLE VIEW button of the PLAY CONTROL section.
Style View For any other part you can set the routing of the effects up to four effects (Figure 149). By using the F1 button you can select the routing of the effects for the parts. Please note that you select the part on the previous VOICE page (USER 1). By using the F2-F3-F4-F5 buttons you select the effect type: REVERB TYPE CHORUS TYPE ECHO TYPE DIST. TYPE By rotating the DATA/VALUE wheel or the CURSOR Ó Á buttons you can set the effect types for each part.
Style View Audio Style Modeling The Audio Style Modeling is the powerful system of Audya sound engine. The place where you can “model” the style is the Style View section. • By entering the Style View section you can see all the sections of the style on the display. Normally, if you select a section, you can change the Program Change by using the DATA/VALUE wheel or choosing directly the sound. You can control the volume with the CURSOR buttons.
Style View The 4 BANK for sections Drum, Piano, Guitar1 and Guitar 2, together with the enhancement of previous existing Libraries for Bank Bass and Arp&Lick makes the Audio Style Modeling a very powerful and easy system to compose new Styles. It’s enough to start from an existing Style and, without programming a note, to scroll the Modeling Libraries while listening in real time the final result and to replace the various parts of the Style using the huge templates available.
Style View • • • The loops are automatically synchronized with the MIDI of the Style. It is possible to associate a different Wave for each Style section, such as ABCD, Fill In, Break, Intro and Ending (See the enclosed documentation for User Audio Drums for further details). Together with the 3.0A is supplied a Demo folder with 4 complete User Audio Drums styles.
Style View The Audio Style Modeling sections 1 - Audio Drum Strings, Synth, Banjo. The Audio Drum is a stereo Wave file containing an audio rhythmic sequence. It can replace the normal Drum Set or be “added” to it. If you want only the Audio Drum, you must set volume of the Drum Set (Drum 1) to 0. It works in place of the Chord 4 of the Style. The selection of the Audio Drum is made globally for the entire Style.
Style View etting an Audio Drum, Groove Bank or Live ▀▀ S Guitar. The selection of the tables for these three parts is the same. This is the procedure to set an Audio Drum. The procedure is the same for the other two parts. With the Arranger stopped, press the STYLE VIEW button. 1. Press the F1 button. 2. “Wait please...” will appear briefly while reading the Audio Style from disc. The part now is called Audio Drum. 3.
Style View ▀▀ Storing the style Once you made all the desired settings, press the SAVE button on the front panel and give a name from the keyboard to store the style in the current position (Figure 159). In the example of Figure 160 the style name is MY_BALLAD. The changes can be stored both for styles containing normal parts and Audio Style Modeling. The style will be stored in the USER STYLE area in the category previously selected.
User Audio Drum User Audio Drum The user can include custom Wave loops instead of the internal AUDIO DRUMS into the Audya Styles. These Loops must be allocated into the folder USER AUDIO DRUMS which is placed on root of Audya (C:). The Loops must have the following characteristics: 44 KHz , 16 bit and the name must have the sign @ followed by the precise BPM indication of the Loop. As an example: HOUSE2@127.wav.
User Live Guitar User Live Guitar User Live Guitar are located on DISK menu on USER LIVE GUITAR Folder (Figure 164). Once you’ll select this folder display menu’ will inform you on related operating menu. On the left part of display you ‘ll assign 4 available Ins bank of selection. On the right part you’ll operate with followed features: Clear All (F6): Allows to clear all memory User live Guitar data. Load GTR (F7): Load selected User Live Guitar.
Edit Pattern Edit Pattern The PATTERN Editor offers all the necessary features to create your own Styles directly on the Ketron AUDYA (Figure 168). ▀▀ Using Pattern Editor to Create or Edit Styles In order to access the Pattern Editor screen, from the default screen, press the User Style button, select a Style to modify (or any User style), then press the EDIT button to access the screen shown here.
Edit Pattern Velocity The Velocity feature allows one to modify dynamic values of events recorded within selected tracks. This function is applicable to all tracks if the Global parameter is set to ON, or on single notes when the Global parameter is set to OFF. The user can select the desired NOTE by highlighting the related display box using the data arrow buttons and either by pressing the corresponding notes on the keybed or using the Dial selection (Figure 169).
Edit Pattern ▀▀ How to EDIT/MODIFY an existing Style In order to modify an existing style simply select it (after you have pressed the USER STYLE button to display the user styles), then press EDIT to access the Pattern Editor as shown in Figure 172. By using the navigation arrows, highlight the Voice of the arrangement part to be modified (for our example we’re using the Bass line). Use the Dial to change the voice for this track. You can use any of the Voice Group buttons (Piano, El.Piano, Chrom … etc.
Edit Pattern ▀▀ How to Create your own Style Here is how to Create your own style from scratch. First select any existing Style from the User Style selection, then press the EDIT button and NEW STYLE (U3/8) (Figure 176). Figure 176 Name the new style using the keybed and press SAVE (U5/10). Upon completion, the Parameter menu will be displayed automatically.
User Styles User Styles Audya features two style families: FACTORY STYLES and USER STYLES . The FACTORY STYLES are the built-in styles of Audya and can be accessed by using the keypad in the STYLE section and the ordinary selection of the style by using the F1-F10 buttons, as already described in the “Styles” chapter on page 17. The styles of this family cannot be modified, meaning that you cannot overwrite them. You can load these FACTORY STYLES into memory and play them.
Style Mode Style Mode By pressing the MODE button of the STYLE section, you can access the functions and the settings of the Arranger. The STYLE MODE main window is similar to Figure 181.
Style Mode AUTO: this mode lets you play 3 or more notes for chord recognition and then play the melody with one or two note max, without altering the tonality of the Arranger. EASY: in easy mode the chord is immediately recognized while the notes are being pressed, without waiting a complete chord with at least three notes. EXPERT: the chord recognition is achieved while the notes are being played by the left hand (with Manual Bass) and playing on the right split.
Style Mode CHORD MODE Once CHORD MODE is selected, you can choose among four operative modes for the automatic chords, by using the CURSOR Ó Á buttons or the DATA/VALUE wheel (Figure 190). • Easy 1 Standard functionality with normal chord recognition. Some chord can be recognized even if they are played partially. For example, you obtain a major chord playing only the root. By using the root and the minor third you obtain the minor chord. By using the root and the seventh you obtain the seventh chord.
Style Mode ▀▀ DRUM (1) • By pressing the USER 2 (DRUM) once you can access to the first edit window of the audio drum (Figure 194): F1–LIVE DRUM: sets the STRETCH or PITCH mode for Audio Style Modeling of the live drum. The STRETCH algorithm (default) guarantees a good audio quality even changing the tempo. The available range is -30% up to +38% of the nominal speed of the wave. The PITCH algorithm matches the tempo change of the sample altering the audio content. The available range is -30% up to +38%.
Style Mode ▀▀ BASS (1) • The USER 3 button (BASS) opens the edit window for the bass part of the Arranger. By using the F1F10 buttons you can set the following options: F1–BASS TO ROOT: (Figure 197) brings all the automatic bass notes to the root of the recognized chord. F2–RETRIGGER: the bass re-triggers by using the root note each time the chord is recognized. F3–PEDALBOARD: enables the functionality of the bass MIDI pedalboard.
Style Mode ▀▀ CHORDS (1) • The USER 4 button (CHORDS) allows to access the chords settings (Figure 201). You can select the CLOSE/PARALLEL mode (except Live Guitar) and NORMAL/RETRIGGER mode for the 5 chords of the Style. In CLOSE mode the chords follow the intervals of the notes closer to conventional harmony rules. In PARALLEL mode the notes of the chords will be transposed without changing the intervals. F1– CHORD 1 (CLOSE/PARAL.): sets the Close or Parallel mode. F2–CHORD 2 (CLOSE/PARAL.): as above.
Style Mode LOWER • • • • • The USER 5 button (LOWER) opens the edit window for the left hand (Figure 203): F1–LOWER 1 HOLD: enables the hold control (Hold) on the first Lower section. The setting is valid for all the Styles. F2–LOWER 2 HOLD: enables the hold control (Hold) on the second Lower section. The setting is valid for all the styles. F3–OFF STOP: when is ON it exclude the the Lowers during the Stop condition. F4–MUTE: global mute of the two Lowers. The setting is valid for all the Styles.
GM Part GM Part When MIDI Player is playing back, you can open the window to control the parts corresponding to the MIDI tracks of the file (Figure 204), by pressing the GM PART button on the PLAY CONTROL section. By using the USER 1-5 buttons you can see the pages where to set all the parameters of the MIDI tracks of the file. The USER buttons allow to edit the following items: GM PARTS FILT. TX/RX FILT.
GM Part ▀▀ FILT. TX/RX (USER 2) By pressing FILTER TX/RX you can access the window where to edit the MIDI transmission filters (Figure 207). By pressing the button again you can access the window where to edit the MIDI reception filters. To change the MIDI transmission/reception parameters, please see the MENU>MIDI section. ▀▀ FILT. TO ALL (USER 3) By pressing FILT. TO ALL, you can set the filter to all (ALL) or to a single MIDI channel (SINGLE).
GM Part ▀▀ UTILITY (USER 5) By pressing UTILITY, you can access the MIDI utility window (Figure 212). Here you can set the following parameters by pressing directly the F1-F10 buttons: • • • • • • • • • • F1–SOFT-THRU: enables the MIDI Thru. F2–MIDI CLOCK IN: enables the MIDI clock reception. F3–MIDI CLOCK OUT: enables the MIDI clock transmission. F4–LOCAL: enables the Local On/Off function of the keyboard. F5–MIDI PORT IN GM: enables the MIDI IN 1 or 2 port for the General MIDI data reception.
Drum Mixer Drum Mixer By pressing the DRUM MIXER button on the PLAY CONTROL section you can access the 10 percussive parts of the drum set (Figure 215). By pressing the F1-F10 buttons you select the percussive parts of the drum: • F1–KICK • F2–SNARE • F3–HI-HAT • F4–CYMBAL • F5–TOM • F6–RIMSHOT • F7–LATIN1: Latin percussion 1. • F8–LATIN2: Latin percussion 2. • F9–LATIN3: Latin percussion 3. • F10–CLAP/FX: hands clap and effects.
Drum Mixer The available values are from 64L to >|< and to 63R, that is totally to the left, in the centre and totally to the right (Figure 219). By pressing the CURSOR Ó Á buttons together you set the PAN value in the centre (>|<). ▀▀ DRUM REMAP (USER 4) By pressing DRUM REMAP, you can access the window where to set a custom map for the percussive parts of the drum. By using the F1-F10 buttons you can select the percussion and then assign the instrument directly to one note of the keyboard.
Drum Mixer 9. Press F1 once more to deselect. 10. Repeat the same procedure for the snare (see below). 11. Press F2 and the Eb1 key on the keyboard (Figure 182). 12. Select “snare015” by using the DATA/VALUE wheel (Figure 183). 13. Press F2 twice to deselect. 14. Press F3 to select a new Drum Remap bank. 15. Press the D1 note and select “snare014” by using the DATA/VALUE wheel. 16. Press F3 twice to deselect. 17. Same procedure for the Hi-Hat. Press F4 and the F#1 key on the keyboard. 18.
Drum Set Drum Set By pressing the DRUM SET button in the PLAY CONTROL section you can access the screen where to select one of the available 53 DRUM SETS plus 20 user sets (Figure 228). By pressing the F1-F10 buttons you select the DRUM SET, while the CURSOR Ó Á or the BACK and FORWARD buttons below the display allow to access the various pages of the DRUM SET.
Drum Set 5. Press F2 (GROUP) if you want change the percussion group (Figure 233) by using the CURSOR Ó Á buttons or the DATA/VALUE wheel: KICK SNARE HI-HAT CYMBAL TOM RIMSHOT LATIN1 LATIN2 LATIN3 CLAP/FX 6. Press F3 (INSTR.) to select an instrument within the percussion group, by using the CURSOR Ó Á buttons or the DATA/VALUE wheel. In our example is “kick18” (Figure 234). By pressing the CURSOR Ó Á buttons together you set “empty” that is no instrument. 7.
Drawbars Drawbars By pressing the DRAWBARS button on the VOICE section, you switch the DRAWBARS mode on. For the selection of the different organ types please see “Selecting the organ DRAWBARS” on page 20. Creating a new organ DRAWBARS To create a new type of organ Drawbars, select one of the 20 organs available from the two DRAWBARS pages (Figure 238). 1. Press the EDIT button on the front panel to access the edit window.
RAM Ins / Supersolo RAM Ins / Supersolo By pressing the RAM INS / SUPERSOLO button in the VOICE section you can access the screen where to select the SUPERSOLO voices, described on page 19. Creating and editing an INS block By pressing the EDIT button you can access the edit screen of the RAM INS / SUPERSOLO voices (Figure 241). By using the F1-F10 buttons you can execute the following functions: • F1 - CLEAR&LOAD: clears the current memory and loads the selected INS voice(s). • F2 - CLEAR SELECT.
MSP function MSP Audya offers a complete Multi Sample Player editor. To access the MSP function, press the WAVE button, choose a file from the list in the WAVE folder and press the EDIT button. ▀▀ Creating an MSP 1. Select a WAV format file from the WAVE folder and press ENTER to load the file into memory (Figure 245). By using the F1-F10 buttons you can access the following functions: F1 - START: sets the start of the note range on the keyboard.
MSP function ▀▀ Saving and loading an MSP 1. When you finish editing, save the MSP by using the USER 5 button (SAVE). Digit a name on the dialogue box by inputting characters directly from the keyboard and press SAVE again (Figure 249). 2. Select an MSP from disc to load it into memory. By pressing the ENTER button, a progress bar will appear. When the file is loaded, you can select it by pressing the INS-EFFECT SFX. It will be treated as an INS voice (Program or MIDI insertion, etc.).
Voice List Voice List By pressing the VOICE LIST button in the VOICE section, the screen of the custom voices will appear. For each of the 16 VOICES (the first two rows) you can access the VOICE LIST button with 20 memory locations each. In this way, you can customize your favourite voice lists to be used for each voice family. ▀▀ Storing a VOICE LIST 1. Select a group ( family sound) by press a VOICE button ( i.e.EL. PIANO). 2. A screen like Figure 250 will appear, showing the first ten memory locations.
User Voice List ▀▀ What is a User Voice List The new User Voice List is controlled from the Voice group Effect/SFX, can be edited independently from the others User Voices and can be associated to Style, Midi, Mp3 and Wave for an automatic recall. User Voice List files (with extension *.UVL) are located per default on folder C: USER VOICE LIST, into 4 subfolders: Midi, Mp3, Style, Wave.
User Voice List MID,WAV and MP3 The same concept of the Style is applied to Mid, Wav and Mp3. Once file is selected press SAVE. On F3 button the display will show: SAVE UVL to MIDI or SAVE UVL to WAVE or SAVE UVL to MP3. By pressing F3 the current User Voice List will be saved on the correspondent User Voice List folders. USER_VOICE_LIST\MIDI or USER_VOICE_LIST\WAVE or USER_VOICE_LIST\MP3 When the User Voice List is saved with same name of the files, then it will automatically loaded (Figure 257).
Menu Menu By pressing the MENU button on the front panel you can access the MENU main page (Figure 258). Here you can find many edit pages where to set the keyboard. The F1-F9 buttons will open the following pages: F1–LANGUAGE F2–MIDI F3–DSP F4–KEYBOARD CONTROL F5–OUTPUT ASSIGN F6–METRONOME CLICK F7–VIDEO MODE F8–AUDIO RECORDING F9–MIDI RECORDING Figure 258 ▀▀ LANGUAGE • Press the F1 button (LANGUAGE) for the selection of the system language (Figure 259).
Menu CHANNEL TX By pressing the F1 button a window like Figure 261 will appear. Here you can set all the MIDI transmission channels for each part of the keyboard by using the F1-F10 buttons. Press the F1 button-10 corresponding to the part and assign the MIDI transmission channel choosing from 1 to 16 by using the CURSOR Ó Á buttons or the DATA/VALUE wheel.
Menu General, Master1, Master2, Accord1, Accord2 You can save the MIDI settings in five Preset, assigned to the USER buttons from 1 to 5: General: General Preset Master1: Master Keyboard Preset Master2: Second Master Keyboard Preset Accord1: MIDI accordion Preset Accord2: Second MIDI accordion Preset The Figure 264 shows the Master2 page (USER 2 button). The following explanation refers to the General Preset. The procedure for the Master1, Master2, Accord1 and Accord2 Presets are identical.
Menu TRANPOSE TX From the first screen of the MIDI menu, by pressing the F3 button a window will appear where to set the MIDI transmission of the parts transposition. By using the F1-F10 buttons or the CURSOR § ¶ buttons you can select the parts to transpose via MIDI transmission, as shown in Figure 268. By using the CURSOR Ó Á buttons or the DATA/VALUE wheel you can assign +/- 36 semitones transposition value in 1 semitone steps.
Menu FILTER PROG.CHANGE RX From the first screen of the MIDI menu, by pressing the F7 button a window will appear where to set the Program Change reception filter (Figure 272).
Menu ▀▀ UTILITY From the first screen of the MIDI menu, by pressing the F4 button, the UTILITY page will open, as shown in Figure 276. Here you can set the following parameters, by pressing directly the F1-F10 buttons: • • • • • • • • • F1–SOFT-THRU: enables the MIDI Thru. The MIDI data to MIDI IN port will be transmitted thru the MIDI Out port. F2–MIDI CLOCK IN: enables the MIDI clock reception.
Menu ▀▀ DSP • From the first screen of the menu, press the F3 button to open the DSP (Digital Signal Processor) settings page, as shown in Figure 278. By using the F1-F10 buttons you can edit the following pages: F1–REVERB: Reverb settings. F2–CHORUS: Chorus settings. F3–ECHO-DELAY: Echo settings. F4–DISTORTION: Distortion settings. F5–ROTOR: Rotor (Leslie) settings. F6–DRAWBAR OVERDRIVE: Organ distortion settings. F7–EQUALIZER: Equalizer settings. F8–WAVE EQUALIZER: Wave file EQ settings.
Menu LEFT/GM REVERB From the REVERB page, by pressing the F2 button (LEFT/GM REVERB) you can access the page for the selection of the reverb for the left hand and the GM parts (Figure 282). The available reverb Preset are the same of those for the right hand seen before. To lock the reverb also when changing Program or Registration or at start-up, press the Lock: ON button, corresponding to the USER 1 button, as shown by the arrow on Figure 283.
Menu CHORUS RIGHT From the CHORUS page, by pressing the F1 button (CHORUS RIGHT) you can access the page for the selection of the Chorus for the right hand (Figure 286). 10 Chorus Presets are available in the first page and 10 in the second, by pressing any CURSOR button or the DATA/VALUE wheel. Press any F1-F10 button to select the corresponding Chorus type: Chorus1, Chorus2 ...
Menu ECHO-DELAY By pressing the F3 button on the DSP page, you can access the ECHO-DELAY screen, as shown in Figure 289. Here you can make the selection of the ECHODELAY type to set into the DSP in order to make it available for PROGRAMS from which you can choose an ECHO algorithm (Figure 290). 10 Echo Presets are available in the first page and 10 in the second, by pressing any CURSOR button or the DATA/VALUE wheel. Press any F1-F10 button to select the corresponding Echo type: Mono Echo1 ...
Menu DISTORTION By pressing the F4 button on the DSP page, you can access the DISTORSION screen, as shown in Figure 293. Here you can select the DISTORTION type to set into the DSP in order to make it available for PROGRAMS from which you can choose a DISTORTION algorithm (Figure 294). 10 Distortion Presets are available in the first page and 10 in the second, by pressing any CURSOR button or the DATA/VALUE wheel. Press any F1-F10 button to select the corresponding Distortion type: Overdrive1 ...
Menu ROTOR By pressing the F5 button on the DSP page, you can access the window ROTOR, as shown in Figure 296. Here you can select the speed of the rotor: F1–SLOW F2- FAST The same function is available by using the two SLOW and FAST buttons of the ROTOR section on the front panel. DRAWBAR OVERDRIVE By pressing the F6 button on the DSP page, you can access the DRAWBAR OVERDRIVE screen, as shown in Figure 297.
Menu EQUALIZER By pressing the F7 button on the DSP page, you can access the EQUALIZER screen, as shown in Figure 299. Here you can select the EQUALIZER type to set as global equalization of the keyboard. 5 Equalizer Presets are available. Just press one of the F1-F5 buttons to select the corresponding Equalizer type: Factory......Flat When you activate an Equalizer Preset you can set the option Lock:On/Off as for the previous effects.
Menu WAVE EQUALIZER By pressing the F8 button on the DSP page, you can access the WAVE EQUALIZER screen, as shown in Figure 301. Here you can select the WAVE EQUALIZER type to set as equalization of the WAVE Player. 5 Wave Equalizer Presets are available. Just press one of the F1-F5 buttons to select the corresponding Wave Equalizer type: Factory......Flat When you activate an Wave Equalizer Preset you can set the option Lock:On/Off as for the previous effects.
Menu ▀▀ KEYBOARD CONTROL • From the first MENU screen, by pressing the F4 button you can access the KEYBOARD CONTROL page where to make the keyboard settings (Figure 304). By using the F1-F10 buttons you can access the following pages: F1–PITCH/VOL/TRANS: Pitch Bend, Master Tune, Master Volume, Keyb Transpose, Player Transpose Lock and Right Boost Level settings. F2–MODULATION: Modulation Wheel sensitivity settings. F3–AFTERTOUCH: Aftertouch settings. F4–EXPR. PEDAL: expression pedal settings.
Menu F6– Bend Value: Bend value of the Slide effect (values +/- 12 semitones). F7– Aft&Port Autoswitch: enables/disables the automatic activation of the Portamento and the Aftertouch when they are set within a PROGRAM. EXPR.
Menu By using the F1-F10 buttons from the LEFT DRUM page (Figure 310) you can set the percussive instruments for the left hand. F1– Bass Drum Instr.1: percussive instrument 1 for the bass (see note). F2– Bass Drum Instr.2: percussive instrument 2 for the bass (see note). F3– Chords Drum Instr.1: percussive instrument 1 for the chords (see note). F4– Chords Drum Instr.2: percussive instrument 2 for the chords (see note). F6– Bass Drum Velo.
Menu ▀▀ FOOTSWITCH • By pressing the F9 button from the KEYBOARD CONTROL page, you can activate the FOOTSWITCH screen (Figure 314), where you can assign the functions to the pedalboard connected on the rear. The optional FS13 pedalboard has 13 functions, to which you can assign any parameter of the keyboard.
Menu UTILITY By pressing the F10 button from the KEYBOARD CONTROL page you can activate the UTILITY screen (Figure 315), where you can enable/disable the following functions: F1– SPDIF In: enables/disables the digital SPDIF In port (values ON/OFF). F2– SPDIF Out: enables/disables the digital SPDIF Out port (values SPDIF/MAIN). The SPDIF volume is controlled by using the S/PDIF-LINE IN (SFX) slider of the PLAYER section. F3– Edit Value Recycle: enables/disables the recycle of the volume, effect send, etc.
Menu F4– KEY TUNE TO CHORD: (values ON/OFF) see procedure below. F5– REG. LOAD MODE: loading behaviour of the right voice into the Registration when a style is playing. Values Mode1 and Mode2. Mode1: the right voice is changed immediately by loading the registration. Mode2: the right voice is changed by the effective change of the Registration, that is at the beginning of the next measure. F6- Dry On Stop: When the style is stopped, enable this option to disable effects on MICRO.
Menu ▀▀ OUTPUT ASSIGN • By pressing the F5 button from the main page of the MENU, you can access to the OUTPUT ASSIGN screen where you can make the routing settings of the internal sources to the outputs on the rear (Main Stereo and separate outputs), as shown in Figure 320. The options are the following: F1–Out3&4: 3 and 4 outputs. F2– Out1&2 Drum: 1 and 2 outputs for the drum and the percussive instruments. F3– Out1&2: 1 and 2 outputs for the right hand, all the drums and MIDI1.
Menu ▀▀ METRONOME CLICK • By pressing the F6 button from the main page of the MENU, you can access to the METRONOME CLICK screen, where to make settings of the metronome (Figure 323). By using the F1-F10 buttons you can set the following parameters: F1–LINK MODE: sets the metronome in the following environments: All, Style, MIDI, Wave, MP3. F2–RUN MODE: sets the start mode of the metronome (Free, Start). F3–VOLUME: output volume from 0 to 63.
Menu ▀▀ AUDIO RECORDING • From the main page of the MENU, press the F8 button to open the AUDIO RECORDING page dedicated to audio recording (Figure 326). By using the F1-F10 buttons you can set the following parameters: F1- MP3 RECORDING: MP3 file recording. F2- MIDI SYNC RECORDING: audio file recording synchronized with a MIDI file. F5- SELECT SOURCE: selection of the recording source, that is SPDIF, MP3-1, WAVE, MICROPHONE/VOICETRON F6- WAVE RECORDING: WAV file recording.
Menu MIDI SYNC RECORDING (file audio recording synchronized with a MIDI file) 1. Press the MENU button and the F8 button (AUDIO RECORDING) to open the audio recording environment. 2. Press the F2 button (MIDI SYNC RECORDING) to show the list of MIDI files within the MIDIFILE folder on the disk (Figure 329). 3. Select a MIDI file from the list. In the example, the file is “Cabaret.MID”. 4. Press the ENTER button to start simultaneously the audio recording of the MIDI file (Figure 330). 5.
Menu Avoiding the MIDI file recording mixed to the source When you make a MIDI SYNC RECORDING by selecting a Main or Keyboard source, also the MIDI file playing will be recorded into the audio file. To avoid this, you can follow two procedures: Manual procedure 1. Select MENU > Out Assign > Out1&2 and set MIDI1 to 1&2 stereo. 2. While recording, the keyboard will be output to MAIN OUT and will be recorded. The MIDI will be present on 1 and 2 outputs without being recorded. Automatic procedure 3.
Menu ▀▀ Recording a MIDI file from the MIDI IN port 1. Press the MENU button and the F9 button (MIDI RECORDING) to enter the MIDI recording environment. 2. You will be prompted to give a name to the file. Digit the name for the MIDI file, directly from the keyboard. 3. Press the F2 button (MIDI PORT IN GM) to set the data recording mode from the external port (Figure 336). 4. Press the USER 5 button (START REC) to start the MIDI recording. 5.
Voicetron Voicetron Once you connect two microphones to the MICRO 1 and MICRO 2 connectors you can access to a bunch of options for the voice treatment. ▀▀ MICRO The MICRO button enables the MICRO 1 input and MICRO 2 input. Connect one or two microphones to the jacks on the rear and adjust the level by using the GAIN 1 and GAIN 2 wheels. ▀▀ VOCALIZER The VOCALIZER button enables the effect processor for the harmonization and the automatic pitch only on MICRO 1. Setting a vocal effect 1.
Voicetron REVERB By selecting the F3 button a REVERB screen like Figure 341 will appear where you can choose one of the available reverbs by using the CURSOR § ¶ buttons or the DATA/VALUE wheel: Off (nessun effect) Church Short Room Cathedral Room Gated Reverb Small Hall Gated Plate Large Hall User1 Short Plate User2 Vocal Plate User3 ECHO By selecting the F4 button a ECHO screen like Figure 342 will appear where you can choose one of the available Echo effects by using the CURSOR § ¶ buttons or the DATA/VA
Voicetron LIMITER By selecting the F7 button a LIMITER screen (only for MICRO1) like Figure 345 will appear where you can choose one of the available Limiters by using the CURSOR § ¶ buttons or the DATA/VALUE wheel: Off -6dB -12dB -18dB User EQUALIZER By selecting the F8 button an EQUALIZER screen (only for MICRO1) like Figure 346 will appear where you can choose one of the equalization Presets by using the USER buttons from 1 to 5, or set the your equalization curve.
Voicetron Saving a microphone effect After you have modified one of the MICRO PRESETS, you can save it by overwriting the same Preset or giving a new name. Here is the procedure to follow. 1. Select a MICRO PRESET. 2. Press the EDIT button on the front panel and edit the parameters as explained above. 3. Once finished, press the SAVE button on the front panel. 4. Type a name by using the keyboard (for example MY_MICRO) and press the USER 5 button (SAVE), as shown in Figure 349. 5.
Voicetron Editing a VOCALIZER effect 1. Select a VOCALIZER effect. 2. By pressing the EDIT button, a window like Figure 353 will appear. 3. Press the F1-F10 buttons to access the parameters of the Preset: F1–DUET: duet effects. F2–TRIO: trio effects. F3–QUARTET: quartet effects. F4–QUINTET: quintet effects. F5–FIXED INTERV.: fixed interval effects. F6–VOCODER: vocoder parameters. F7–VOICES EDIT: voices parameters (up to 5 voices) Volume, Pan, Formant, Detune, Cutoff, Resonance.
Voicetron QUINTET By pressing the F4 button the list of QUINTET effects similar to Figure 357 will appear from which you can choose one of the available quintet effects by using the CURSOR § ¶ buttons or the DATA/VALUE wheel: Standard Open Octave Down Sextet Open FIXED INTERV. By pressing the F5 button the list of FIXED INTERV.
Voicetron EQUALIZER By pressing the F8 button the list of EQUALIZER effects similar to Figure 361 will appear from which you can choose one of the 10-bands graphical equalizer preset by using the USER buttons from 1 to 5, or edit the parameters to set the custom equalization. Select one of the 10 EQ bands by using the CURSOR Ó Á buttons. Modify the value of the selected band by using the CURSOR § ¶ buttons or the DATA/VALUE wheel (values from -14 dB to14 dB).
Voicetron EFFECTS By selecting the F9 button the list of EFFECTS similar to Figure 366 will appear from which you can edit the parameters of the REVERB and ECHO effects. Select the parameter by using the CURSOR § ¶ buttons and edit the value of the 3 parameters by using the DATA/VALUE wheel.
Search Search (Main View) Audya features a useful SEARCH function in order to search files stored in the internal disk or in external USB devices. When is the MAIN VIEW is active, the search engine looks different from the normal view. ▀▀ Searching a file in the MAIN VIEW window 1. Press the SEARCH button. 2. The last open directory of the disc will appear (Figure 370). 3. Use the CURSOR § ¶ buttons or the DATA/ VALUE wheel and the ENTER button to search a folder. 4.
Search Search Audya features a useful SEARCH function in order to search files stored in the internal disk or in external USB devices. ▀▀ Searching a file 1. Press the SEARCH button. 2. The last accessed directory of the internal disk will open (Figure 375). 3. Use the CURSOR § ¶ or the DATA/VALUE wheel and the ENTER button to locate a folder and to search inside. 4. Digit the full name file, or a part of it, by inputting letter and numbers directly from the keyboard.
User Assignable User Assignable By pressing the USER ASSIGNABLE button, located to left of the display, you can access the screen where to assign custom functions to the USER buttons (Figure 378). By using the F1-F5 buttons you can assign up to five USER_TABS_PRES, that is five different functions for the five User buttons below the display. Press one of the F1-F5 buttons and the EDIT button to access the screen like Figure 379.
Text Scrolling Text scrolling In addition to the ordinary lyric functions, showing synchronized text contained in the Standard MIDI files (karaoke), Audya allows to synchronize lyric with any audio and MP3 file. ombining a text file with a MIDI file, an MP3 ▀▀ C or a WAVE file 1. Make the USB connection to access the hard disk of Audya. After connecting, open the WAVE folder and copy a text file (an ordinary TXT file) containing the lyric of a song.
Disk Disk Audya features a bunch of functions dedicated to the disk management. ▀▀ Disk Menu 1. Press the DISK button to see the content of the internal disk (Figure 384). The disk contains a certain number of folders, that you can access by using the CURSOR § ¶ or the DATA/VALUE wheel. The content is: DJ LOOP MSP MIDIFILE STREAM_LIST MP3 USER_VOICE_LIST PLAYLIST USER AUDIO DRUM SFX USER LIVE GUITAR USER STYLES USER DATA WAVE INSTRUMENTS REGISTRATION SYSTEM 1.
USB drive, Search USB drive In addition to the internal disk you can also manage external drive such as pen drives, hard disks, CD players, etc. connected to any of the two USB connectors on the front side. Once you have inserted a USB device into one of the two USB ports, the USB drive will appear on the DISK menu, as in Figure 388. The same functions in the DISK MENU are available also for the files and folders of the USB drive.
Technical Tables Sounds GM Voices BANK A (CC0 Value=0) N° 1 2 3 4 5 6 7 8 9 10 11 12 13 14 15 16 17 18 19 20 21 22 23 24 25 26 27 28 29 30 31 32 VOICE Grand_Piano Pop_Piano Upright Honky El_Piano1 Dx_Piano Harpsichord Clavinet Celesta Glocken Musicbox Vibraphone Marimba Xylophon Tubular_Bell Santur Leslies Jazz_Organ Rock_Organ Church_Organ Theatre_Organ Musette1 Harmonica Accordion1 ClassicFx* Country1* Jazz_Guitar1* Clean* Muted* Distortion* Overdrive* Harmonics N° 33 34 35 36 37 38 39 40 41 42 43 44
Sounds GM Voices 77 78 79 80 81 82 83 84 85 86 87 88 89 Analogs Flanger Brightpad Wiring Synth23 Ramp Synth22 Synth20 Fusion* Synbass6* Synbass7* Synbass8* 2nd_Perc 90 91 92 93 94 95 96 97 98 99 100 101 102 3rd_Perc Click B3_Vibrato Blues_Slow Blues_Fast Lower_8-4 16_1 R&Rol*l Medium_Guit* Strato* Humbuck* Vintage* Fingered* 103 104 105 106 107 108 109 110 111 112 113 114 115 Stops Whaguitar* Hawaian Mandolin Bright_Acoustic* ClassicFx* Pedalsteel Vintage* Reed Silent Fx Polisynth Sci_Fi 116 117 118 1
Sounds GM Voices BANK D (CC0 Value=11) N° 1 2 3 4 5 6 7 8 9 10 11 12 13 14 15 16 17 18 19 20 21 22 23 24 25 26 27 28 29 30 31 32 VOICE Concert_L Concert_R Pop_Hammer Pulse_Clavi El_Piano2 Dx_Tine Soft_Dx Stage_Piano Pop_Slow Synth11 Open_Concert Harps_Wide Harps_Octave ElPiano_Detune Marktree Vibraphon_Wide Marimba_Wide Full_Fast B3_Fast Church_Octave Pipe_Octave Fisa8 Blues_Harp Cassotto Ac_Folk2* Ac_Folk2* Folk&Slide* Jazz_Guitar2* Country2* Thin_Strato* Ac_Nylon1* Jazz_Octave N° 33 34 35 36 37 38 39 40
Audio Drum Audio Drum N° 1 2 3 4 5 6 7 8 9 10 11 12 13 14 15 16 17 18 19 20 21 22 23 24 25 26 27 28 29 30 31 32 33 34 35 36 37 38 39 40 41 42 43 44 45 46 47 48 49 50 51 52 53 54 55 56 57 N° 60'S_POP_01 60'S_POP_02 60'S_POP_03 60'S_POP_04 6_8_BALLAD_01 6_8_BALLAD_02 6_8_BALLAD_03 70'S_BEAT_01 70'S_BEAT_02 70'S_BEAT_03 70'S_BEAT_04 70'S_POP_01 70'S_POP_02 70'S_POP_03 70'S_POP_04 8BEAT1_01 8BEAT1_02 8BEAT1_03 8BEAT1_04 8_BEAT_2_01 8_BEAT_2_02 8_BEAT_2_03 8_BEAT_2_04 8_BEAT_3_01 8_BEAT_3_02 BIGBAND_01 BIGBAND_
Audio Drum Audio Drum N° 172 173 174 175 176 177 178 179 180 181 182 183 184 185 209 210 211 212 213 214 215 216 186 187 188 189 190 191 192 193 194 195 196 197 198 199 200 201 202 203 204 205 206 207 208 217 218 219 220 221 222 223 224 225 226 227 228 N° POP12_8_02 POP12_8_03 POPFOLK_01 POPFOLK_02 POPFOLK_03 POPFOLK_04 POPMIX_01 POPMIX_02 POPMIX_03 POPMIX_04 POPTWIST_01 POPTWIST_02 POPTWIST_03 POPTWIST_04 R&B04_95_01 R&B04_95_02 R&B05_97_01 R&B05_97_02 R&B06_106_01 R&B06_106_02 R&B07_95_01 R&B08_73_01 R&B
Groove (Drum 2) Groove Bank (Drum 2) N° N° N° 1 AFRO_1 40 CONGA_BOLERO1 74 FLAMENCO_F 2 AFRO_2 41 CONGA_BOLERO2 75 FLAMENCO_G 3 AFRO_3 42 CONGA_BOSSA 76 GIPSY1 4 AFRO_4 43 CONGA_CHA1 77 GIPSY2 5 AFRO_5 44 CONGA_CHA2 78 GUAJIRA_A 6 BACHATA_A 45 CONGA_MAMBO 79 GUAJIRA_B 7 BACHATA_B 46 CONGA_MERENG1 186 GUIRA_1 8 BACHATA_C 47 CONGA_MERENG2 187 GUIRA_2 9 BACHATA_D 48 CONGA_RUMBA 80 GUIRA_BACHAT1 10 BATUCADA_A 49 CONGA_SALSA1 81 GUIRA_BACHAT2 11 BAT
Groove (Drum 2) Groove Bank (Drum 2) N° N° 108 JAZZROCK_B 238 RIDE_1_T 109 JIGS 146 RIDE_FAST1 110 LATINDANCE1 147 RIDE_FAST2 111 LATINDANCE2 148 RIDE_MEDIUM 112 MAMBO_A 149 RIDE_SHUFFLE 113 MAMBO_B 150 RIDE_SLOW 114 MAMBO_C 151 ROCK_A 188 MARACAS_1 152 ROCK_B 234 MARACAS_1_T 153 SALSA_A 189 MARACAS_2 154 SALSA_B 235 MARACAS_2_T 155 SALSA_C 190 MARACAS_3 156 SALSA_D 191 MARACAS_4 157 SALSA_E 192 MARACAS_5 158 SALSA_F 115 MARAC_BOLERO1 159 SALSA_G
Bass Bank Bass Bank N° 10 11 12 13 14 15 16 17 18 19 20 21 22 1 2 3 4 5 6 23 24 25 26 7 8 9 306 307 308 309 310 311 312 313 314 315 316 317 318 319 320 321 322 323 324 217 218 219 220 27 28 29 30 31 N° 12_8BALLAD_01 12_8BALLAD_02 12_8BALLAD_03 12_8BALLAD_04 16BEAT_01 16BEAT_02 16BEAT_03 16BEAT_04 16BEAT_05 16BEAT_06 16BEAT_07 16BEAT_08 16BEAT_09 3_4PDOBLE_01 6_8BALLAD_01 6_8BALLAD_02 6_8BLUES_01 6_8WALZ_01 6_8WALZ_02 70BEAT_01 70BEAT_02 70POP_01 70POP_02 8BEAT_01 8BEAT_02 8BEAT_03 8BEAT_04 8BEAT_05 8BEAT_0
Bass Bank Bass Bank N° 120 249 250 251 252 253 330 331 332 333 166 167 325 326 121 122 254 255 256 257 327 328 329 123 124 125 126 127 128 258 259 260 261 262 138 139 134 135 129 130 131 132 133 136 137 288 289 290 292 263 N° MERENGUE_03 NUJAZZ_01 NUJAZZ_02 NUSOUL_01 NUSOUL_02 NUSOUL_03 NUSOUL_04 NUSOUL_05 NUSOUL_06 NUSOUL_07 OBERPOLKA_01 OBERPOLKA_02 OBERWALZ_01 OBERWALZ_02 PDOBLE_01 PDOBLE_02 POLKA POPCHA_01 POPCHA_02 POPCHA_03 POPLATIN_01 POPLATIN_02 POPLATIN_03 POP_01 POP_02 POP_03 POP_04 POP_05 POP_
Arp & Licks Arp & Licks N° 39 40 41 42 43 44 45 46 47 48 49 50 51 52 53 54 55 56 197 57 58 59 60 61 62 63 64 117 118 119 120 121 122 123 124 125 126 127 128 65 66 67 68 69 70 71 72 73 74 75 N° 16GUIT_01 16GUIT_02 16GUIT_03 16GUIT_04 16GUIT_05 16GUIT_06 16GUIT_07 16GUIT_08 16GUIT_09 16GUIT_10 16GUIT_11 16GUIT_12 16GUIT_13 16GUIT_14 16GUIT_15 16GUIT_16 16GUIT_17 16GUIT_18 16GUIT_19 16PIANO_01 16PIANO_02 16PIANO_03 16PIANO_04 16PIANO_05 16PIANO_06 16PIANO_07 16PIANO_08 16STRINGS_01 16STRINGS_02 16STRINGS_03
Arp & Licks Arp & Licks N° 25 26 108 109 110 111 112 113 114 115 116 27 28 29 156 157 158 159 160 161 162 163 164 165 166 167 168 169 170 171 172 173 174 175 176 177 178 179 180 181 182 183 184 185 186 187 188 30 31 N° 8PIANO_T_06 8PIANO_T_07 8STRINGS_01 8STRINGS_02 8STRINGS_03 8STRINGS_04 8STRINGS_05 8STRINGS_06 8STRINGS_07 8STRINGS_T_01 8STRINGS_T_02 8SYNT_01 8SYNT_02 8SYNT_03 8SYNT_04 8SYNT_05 8SYNT_06 8SYNT_07 8SYNT_08 8SYNT_09 8SYNT_10 8SYNT_11 8SYNT_12 8SYNT_13 8SYNT_14 8SYNT_15 8SYNT_16 8SYNT_17 8
Live Guitar Live Guitar N° 7 8 9 10 6 69 1 2 135 136 68 3 4 5 127 11 12 59 88 83 90 114 13 122 14 129 137 15 91 92 93 16 17 18 19 60 20 74 21 22 115 70 89 75 76 66 67 71 N° 16B_ELECT_1 16B_ELECT_2 16B_FOLK_1 16B_FOLK_2 16_SMOOTH 2_STEPS 5TH_MUTE 5TH_SHUFFLE 6-8MARCH_1 6-8MARCH_2 8B_ELECT 8B_FOLK_1 8B_FOLK_2 8B_FOLK_3 8B_FOLK_4 BALLAD_1 BALLAD_2 BALLAD_MIX BALLENATO BEAT_1 BEAT_2 BEAT_3 BEGUINE_1 BEGUINE_2 BLUES_1 BLUES_2 BLUES_EL_6_8 BOSSA_NOVA BUGG_1 BUGG_2 BUGG_3 CNTRY_ 12-8 CNTRY_POP DANCE DISCO DISCO
Styles AUDYA FACTORY STYLES BALLAD 1 @SLOW_BALLAD 2 @POP_BALLAD_1 3 @POP_BALLAD_2 4 @NICE_BALLAD 5 @POP_SONG 6 @GENTLE_R&B 7 @MEDIUM_16_BT 8 @16_BEAT_1 9 @16_BEAT_2 10 @ELECTRO_BALLAD 11 @8_BEAT_1 12 @8_BEAT_2 13 @HEAVY_BEAT 14 @ENGLISH_TUNE 15 @EUROPOP 16 @NEW_TITLE 17 @GUITAR_BALLAD 18 @NEW_BALLAD 19 @COUNTRY_BEAT_2 20 @CLASSIC_BALLAD 21 @FOLK_MELODY 22 @FOLK_BEAT 23 @70’S_BEAT 24 @8_LIGHT_FOLK 25 @MODERN_POP 26 @ITALBEAT 27 @SOFT_BEAT_1 28 @WONDER_LIFE 29 @COUNTRY_BEAT_1 30 @SOFT_BEAT_2 31 @8_BEAT_BALLAD
Styles AUDYA FACTORY STYLES 6 7 8 9 10 11 12 13 14 15 16 17 18 19 20 21 22 23 24 25 26 27 28 29 30 31 32 33 34 35 36 37 38 39 40 41 42 43 44 45 46 47 48 49 50 51 @DJ_DISCO @LIQUID_FUNK(R) @LATIN_DANCE_1 @LATIN_DANCE_2 @REGGAETON_1 @ELECTRO_DANCE @MINIMAL_TECHNO @ROCK_HOUSE @REGGAETON_2 @MODERN_SOKA @HANDS_UP @GIPSY_DANCE @DISCO_NIGHT @DISCO_70’S @VILLAGE_FÊTE @TECHNO_GARAGE @TECH_HOUSE @AFRO&BASS_1 @AFRO&BASS_2 @AFRO&BASS_3 @AFRO_HOUSE @DEEP&BASS_1 @DEEP&BASS_2 @ELECTRO&BASS_1 @ELECTRO&BASS_2 @FUNK&BASS_1
Styles AUDYA FACTORY STYLES 29 30 31 32 33 ROCK_SHUFFLE_SD SHUFFLE_BLUES_SD SOUL_1_SD SOUL_2_SD USA_ROCK_SD COUNTRY 1 @APACHE 2 @BLUEGRASS 3 @COUNTRY_BEAT 4 @COUNTRY_QUARTET 5 @ON_THE_ROAD 6 @KRAMER_BALLAD 7 @OLD_CNTRYWALZ 8 @ROCKABILLY 9 @WALKING_FOX 10 @COUNTRY_ROOTS 11 @IRISH_WALZ 12 @COUNTRY_FOX 13 @COUNTRY_SURF 14 @IRISH_FOX 15 @IRISH_SLOW_FOX 16 @QUICK_STEP 17 @UP_COUNTRY_1 18 @SOFT_BALLAD 19 @WESTERN_1 20 @WESTERN_2 21 @UP_COUNTRY_2 22 @FOLK_ROOTS 23 @IRISH_WALKING 24 BALLAD_12_8 25 COUNTRY_BALLAD
Styles AUDYA FACTORY STYLES 55 56 57 58 59 60 61 62 63 64 65 66 67 68 69 70 71 72 73 74 75 76 77 78 79 BRAZILIAN_SD CALIENTE_SD CHA_CHA_SD(R) EURO_CHA_CHA_SD JAZZ_SAMBA_SD LATIN_JAZZ_SD LATIN_POP_SD LATIN_ROCK_SD MAKOSSA_SD(R) MAMBO_1_SD MAMBO_2_MS MERENGUE_SD(R) MOD_BOSSA_SD NDOMBOLO_SD(R) RAPIDO_SD REGGAETON_SD(R) ROMANTICA_SD RUMBA_FLAM_SD RUMBA_SD SALSA_1_SD(R) SALSA_2_SD SALSITA_SD SAMBA_SD VALLENATO_SD ZOUK_SD(R) R&ROLL 1 @JIVE 2 @SLOW_ROCK_1 3 @SLOW_ROCK_2 4 @ROCKER 5 @SHADOW 6 @PARTY_R&ROLL 7 @RET
Styles AUDYA FACTORY STYLES BALLROOM 1 @ARGENTINO 2 @BEGUINE_1 3 @ITALPOLKA 4 @MAZURCA(R) 5 @WALZ_ROMAGNOLO 6 @TARANTELLA 7 @SLOW_FOX 8 @FOX_TROT 9 @MODERATO 10 @SWING_FOX 11 @BEGUINE_2 12 @ENGLISH_WALTZ 13 @H-GULLY_1 14 @H-GULLY_2 15 @MEDIUM_FOX 16 @QUADRIGLIA 17 @SHUFFLE_FOX 18 @SLOW_WALZ 19 @TANGO_ITALIANO 20 @WIENER 21 @CLASSIC_TANGO 22 @NEW_MAZURKA(R) 23 @NEW_POLKA(R) 24 @NEW_WALZER(R) 25 @VALZER_LENTO 26 SMOOTH_FOX 27 SOFT_POLKA 28 SOFT_WALZ 29 BEGUINE 30 POLKA(R) 31 SLOW_BEAT 32 TANGO_1 33 TANGO_2 34
Drum Set Drum Set Standard 1 14 15 16 17 18 19 20 21 22 23 24 25 26 27 28 29 30 31 32 33 34 35 36 37 38 39 40 41 42 43 44 45 46 47 48 49 50 51 52 53 54 55 56 57 58 59 60 61 Snare001 Roll01 Roll02 Snare002 Snare003 Snare004 Snare005 Snare006 Tom Flam01 Tom Flam02 Crash01 Snare007 Fingsnap 01 Slap Snare008 Scratch Up Scratch Down Sticks 01 Click Metronome01 Metronome02 Kick16 Kick07 Rimshot05 Snare094 Clap03 Snare097 Tom01 Stick12 Tom02 Close01 Tom03 Open04 Tom04 Tom05 Crash02 Tom06 Ride01 Crash03 Ridebell01
Drum Set 40 41 42 43 44 45 46 47 48 49 50 51 52 53 54 55 56 57 58 59 60 61 Snare010 Tom07 Stick01 Tom08 Close01 Tom09 Open01 Tom10 Tom11 Crash02 Tom12 Ride01 Crash03 Ridebell01 Tambourine01 Crash04 Cowbell01 Crash05 Vibraslap Ride02 Bongo_Hi Bongo_Low Power Gm2 14 15 16 17 18 19 20 21 22 23 24 25 26 27 28 29 30 31 32 33 34 35 36 37 38 39 40 41 42 43 44 45 46 47 48 49 50 51 52 53 54 55 56 57 Empty Empty Empty Empty Empty Empty Empty Empty Empty Empty Empty Empty Empty Fingsnap 01 Slap Scratch Up Scratch D
Drum Set 25 26 27 28 29 30 31 32 33 34 35 36 37 38 39 40 41 42 43 44 45 46 47 48 49 50 51 52 53 54 55 56 57 58 59 60 61 Empty Empty Fingsnap 01 Slap Scratch Up Scratch Down Sticks01 Click Metronome01 Metronome02 Kick06 Kick13 Rimshot01 Snare009 Clap01 Snare010 Tom01 Stick01 Tom02 Close01 Tom03 Open01 Tom04 Tom05 Crash02 Tom06 Ride01 Crash03 Ridebell01 Tambourine01 Crash04 Cowbell01 Crash05 Vibraslap Ride02 Bongo_Hi Bongo_Low Analog Gm2 14 15 16 17 18 19 20 21 22 23 24 25 26 27 28 29 30 31 32 33 34 35 36 3
Drum Set Folk 14 15 16 17 18 19 20 21 22 23 24 25 26 27 28 29 30 31 32 33 34 35 36 37 38 39 40 41 42 43 44 45 46 47 48 49 50 51 52 53 54 55 56 57 58 59 60 61 Snare001 Roll01 Roll02 Snare002 Snare003 Snare004 Snare005 Snare006 Tom Flam01 Tom Flam02 Crash01 Snare007 Fingsnap 01 Slap Snare008 Scratch Up Scratch Down Sticks01 Click Metronome01 Metronome02 Kick04 Kick02 Rimshot05 Snare012 Clap01 Snare013 Tom01 Stick02 Tom02 Close01 Tom03 Open01 Tom04 Tom05 Crash02 Tom06 Ride03 Crash03 Ridebell01 Tambourine01 Cr
Drum Set 29 30 31 32 33 34 35 36 37 38 39 40 41 42 43 44 45 46 47 48 49 50 51 52 53 54 55 56 57 58 59 60 61 Scratch Up Scratch Down Sticks01 Click Metronome01 Metronome02 Kick16 Kick06 Rimshot08 Snare020 Clap01 Snare019 Tom07 Stick01 Tom08 Close01 Tom09 Open01 Tom10 Tom11 Crash02 Tom12 Ride01 Crash03 Ridebell01 Tambourine01 Crash04 Cowbell01 Crash05 Vibraslap Ride02 Bongo_Hi Bongo_Low Vintage 14 15 16 17 18 19 20 21 22 23 24 25 26 27 28 29 30 31 32 33 34 35 36 37 38 39 40 41 42 43 44 45 46 Snare001 Roll0
Drum Set Rock 14 15 16 17 18 19 20 21 22 23 24 25 26 27 28 29 30 31 32 33 34 35 36 37 38 39 40 41 42 43 44 45 46 47 48 49 50 51 52 53 54 55 56 57 58 59 60 61 Snare001 Roll01 Roll02 Snare002 Snare003 Snare004 Snare005 Snare006 Tom Flam01 Tom Flam02 Crash01 Snare007 Fingsnap 01 Slap Snare008 Scratch Up Scratch Down Sticks01 Click Metronome 01 Metronome 02 Kick05 Kick16 Rimshot21 Snare092 Clap15 Snare093 Tom01 Stick19 Tom02 Close09 Tom03 Open03 Tom04 Tom05 Crash02 Tom06 Ride03 Crash03 Ridebell01 Tambourine01
Drum Set 47 48 49 50 51 52 53 54 55 56 57 58 59 60 61 Tom29 Tom30 Crash02 Tom31 Ride01 Crash03 Ridebell01 Tambourine01 Crash04 Cowbell01 Crash05 Vibraslap Ride02 Bongo_Hi Bongo_Low Progressive 14 15 16 17 18 19 20 21 22 23 24 25 26 27 28 29 30 31 32 33 34 35 36 37 38 39 40 41 42 43 44 45 46 47 48 49 50 51 52 53 54 55 56 57 58 59 60 61 Snare001 Roll01 Roll02 Snare002 Snare003 Snare004 Snare005 Snare006 Tom Flam01 Tom Flam02 Crash01 Snare007 Fingsnap 01 Slap Snare008 Scratch03 Scratch04 Sticks01 Click Metr
Drum Set 29 30 31 32 33 34 35 36 37 38 39 40 41 42 43 44 45 46 47 48 49 50 51 52 53 54 55 56 57 58 59 60 61 Scratch Up Scratch Down Sticks01 Click Metronome01 Metronome02 Kick49 Kick46 Rimshot12 Snare038 Clap14 Snare077 Tom26 Stick23 Tom27 Close12 Tom28 Open05 Tom29 Tom30 Crash02 Tom31 Ride01 Crash03 Ridebell01 Tambourine01 Crash04 Cowbell01 Crash05 Vibraslap Ride03 Bongo_Hi Bongo_Low Fusion 14 15 16 17 18 19 20 21 22 23 24 25 26 27 28 29 30 31 32 33 34 35 36 37 38 39 40 41 42 43 44 45 46 Snare001 Roll01
Drum Set Brush Gm2 14 15 16 17 18 19 20 21 22 23 24 25 26 27 28 29 30 31 32 33 34 35 36 37 38 39 40 41 42 43 44 45 46 47 48 49 50 51 52 53 54 55 56 57 58 59 60 61 Empty Empty Empty Empty Empty Empty Empty Empty Empty Empty Empty Empty Empty Fingsnap 01 Slap Scratch Up Scratch Down Sticks01 Click Metronome01 Metronome02 Kick03 Kick13 Rimshot01 Snare023 Snare024 Snare025 Tom01 Stick01 Tom02 Close01 Tom03 Open01 Tom04 Tom05 Crash02 Tom06 Ride01 Crash03 Ridebell01 Tambourine01 Crash04 Cowbell01 Crash05 Vibrasl
Drum Set 47 48 49 50 51 52 53 54 55 56 57 58 59 60 61 Timpani07 Timpani08 Timpani09 Timpani10 Timpani11 Timpani12 Timpani13 Tambourine01 Crash04 Cowbell01 Crash09 Vibraslap Crash07 Bongo_Hi Bongo_Low Orchestra 14 15 16 17 18 19 20 21 22 23 24 25 26 27 28 29 30 31 32 33 34 35 36 37 38 39 40 41 42 43 44 45 46 47 48 49 50 51 52 53 54 55 56 57 58 59 60 61 Snare001 Roll01 Roll02 Snare002 Snare003 Snare004 Snare005 Snare006 Tom Flam01 Tom Flam02 Crash01 Snare007 Fingsnap 01 Stick02 Close01 Open01 Ride01 Sticks
Drum Set 29 30 31 32 33 34 35 36 37 38 39 40 41 42 43 44 45 46 47 48 49 50 51 52 53 54 55 56 57 58 59 60 61 Scratch Up Scratch Down Sticks01 Click Metronome01 Metronome02 Kick36 Kick02 Rimshot12 Snare078 Clap03 Snare091 Tom07 Stick12 Tom08 Close09 Tom09 Open03 Tom10 Tom11 Crash02 Tom12 Ride01 Crash03 Ridebell01 Tambourine01 Crash04 Cowbell01 Crash05 Vibraslap Ride02 Bongo_Hi Bongo_Low Rap 14 15 16 17 18 19 20 21 22 23 24 25 26 27 28 29 30 31 32 33 34 35 36 37 38 39 40 41 42 43 44 45 Snare001 Roll01 Roll0
Drum Set Modern 14 15 16 17 18 19 20 21 22 23 24 25 26 27 28 29 30 31 32 33 34 35 36 37 38 39 40 41 42 43 44 45 46 47 48 49 50 51 52 53 54 55 56 57 58 59 60 61 Snare001 Roll01 Roll02 Snare002 Snare003 Snare004 Snare005 Snare006 Tom Flam01 Tom Flam02 Crash10 Snare055 Fingsnap03 Slap Snare008 Scratch Up Scratch Down Sticks01 Click Metronome01 Metronome02 Kick50 Kick11 Rimshot22 Snare050 Clap03 Snare090 Tom38 Stick02 Tom41 Close01 Tom40 Open01 Tom40 Tom39 Crash10 Tom39 Ride04 Crash02 Ridebell03 Tambourine01 C
Drum Set 47 48 49 50 51 52 53 54 55 56 57 58 59 60 61 Tom10 Tom11 Crash02 Tom12 Ride03 Crash03 Ridebell01 Tambourine01 Crash04 Cowbell01 Crash05 Vibraslap Ride01 Bongo_Hi Bongo_Low Pop Jazz 14 15 16 17 18 19 20 21 22 23 24 25 26 27 28 29 30 31 32 33 34 35 36 37 38 39 40 41 42 43 44 45 46 47 48 49 50 51 52 53 54 55 56 57 58 59 Snare001 Roll01 Roll02 Snare002 Snare003 Snare004 Snare005 Snare006 Tom Flam01 Tom Flam02 Crash01 Snare007 Fingsnap 01 Slap Snare008 Scratch Up Scratch Down Sticks01 Click Metronome
Drum Set 21 22 23 24 25 26 27 28 29 30 31 32 33 34 35 36 37 38 39 40 41 42 43 44 45 46 47 48 49 50 51 52 53 54 55 56 57 58 59 60 61 Snare006 Tom Flam01 Tom Flam02 Crash01 Snare007 Fingsnap 01 Slap Snare008 Scratch Up Scratch Down Sticks01 Click Metronome01 Metronome02 Kick23 Kick24 Rimshot20 Snare087 Clap01 Snare037 Tom01 Stick16 Tom02 Stick11 Tom03 Open06 Tom04 Tom05 Crash02 Tom06 Open06 Crash03 Ridebell01 Tambourine01 Crash04 Cowbell01 Crash05 Vibraslap Ride03 Bongo_Hi Bongo_Low Citypop 14 15 16 17 18 1
Drum Set 43 44 45 46 47 48 49 50 51 52 53 54 55 56 57 58 59 60 61 Tom08 Close01 Tom09 Open01 Tom10 Tom11 Crash02 Tom12 Ride01 Crash03 Ridebell01 Tambourine01 Crash04 Cowbell01 Crash05 Vibraslap Ride03 Bongo_Hi Bongo_Low Acid 14 15 16 17 18 19 20 21 22 23 24 25 26 27 28 29 30 31 32 33 34 35 36 37 38 39 40 41 42 43 44 45 46 47 48 49 50 51 52 53 Snare001 Roll01 Roll02 Snare002 Snare003 Snare004 Snare005 Snare006 Tom Flam01 Tom Flam02 Crash01 Snare007 Fingsnap 01 Slap Snare008 Scratch Up Scratch Down Sticks0
Drum Set 20 21 22 23 24 25 26 27 28 29 30 31 32 33 34 35 36 37 38 39 40 41 42 43 44 45 46 47 48 49 50 51 52 53 54 55 56 57 58 59 60 61 Snare005 Snare006 Tom Flam01 Tom Flam02 Crash01 Snare007 Fingsnap 01 Slap Snare008 Scratch Up Scratch Down Sticks01 Click Metronome01 Metronome02 Kick06 Kick13 Rimshot02 Snare043 Snare024 Snare025 Tom13 Stick02 Tom14 Close01 Tom15 Open01 Tom16 Tom17 Crash02 Tom18 Ride03 Crash03 Ridebell01 Tambourine01 Crash04 Cowbell01 Crash05 Vibraslap Ride04 Bongo_Hi Bongo_Low Swing 14 1
Drum Set 46 47 48 49 50 51 52 53 54 55 56 57 58 59 60 61 Open03 Tom04 Tom05 Crash02 Tom06 Ride01 Crash03 Ridebell01 Tambourine01 Crash04 Cowbell01 Crash05 Vibraslap Ride02 Bongo_Hi Bongo_Low U.S.
Drum Set 22 23 24 25 26 27 28 29 30 31 32 33 34 35 36 37 38 39 40 41 42 43 44 45 46 47 48 49 50 51 52 53 54 55 56 57 58 59 60 61 Tom Flam01 Tom Flam02 Crash01 Snare007 Fingsnap 01 Slap Snare008 Scratch Up Scratch Down Stick07 Click Metronome01 Metronome02 Kick03 Kick16 Rimshot12 Snare095 Clap01 Snare096 Tom07 Stick02 Tom08 Close01 Tom09 Open01 Tom10 Tom11 Crash02 Tom12 Ride01 Crash03 Ridebell01 Tambourine01 Crash04 Cowbell01 Crash05 Vibraslap Ride03 Bongo_Hi Bongo_Low Contemporary 14 15 16 17 18 19 20 21
Drum Set 46 47 48 49 50 51 52 53 54 55 56 57 58 59 60 61 Open05 Tom40 Tom39 Crash02 Tom39 Ride02 Crash03 Ridebell01 Tambourine01 Crash04 Cowbell01 Crash05 Vibraslap Ride03 Bongo_Hi Bongo_Low Electro 14 15 16 17 18 19 20 21 22 23 24 25 26 27 28 29 30 31 32 33 34 35 36 37 38 39 40 41 42 43 44 45 46 47 48 49 50 51 52 53 54 55 56 57 58 59 Snare001 Roll01 Roll02 Snare002 Snare003 Snare004 Snare005 Snare006 Tom Flam01 Tom Flam02 Crash01 Snare007 Fingsnap 01 Slap Snare008 Scratch Up Scratch Down Sticks01 Click
Drum Set 21 22 23 24 25 26 27 28 29 30 31 32 33 34 35 36 37 38 39 40 41 42 43 44 45 46 47 48 49 50 51 52 53 54 55 56 57 58 59 60 61 Snare006 Tom Flam01 Tom Flam02 Crash01 Snare007 Fingsnap 01 Slap Snare008 Scratch Up Scratch Down Sticks01 Click Metronome01 Metronome02 Kick15 Kick17 Rimshot19 Snare074 Clap03 Snare076 Tom38 Stick07 Tom41 Stick08 Tom40 Middle08 Tom40 Tom39 Crash02 Tom39 Ride03 Crash03 Ridebell01 Tambourine01 Crash04 Cowbell01 Crash05 Vibraslap Ride01 Bongo_Hi Bongo_Low Pop Super Kit 14 15 16
Drum Set 43 44 45 46 47 48 49 50 51 52 53 54 55 56 57 58 59 60 61 Tom41 Stick03 Tom40 Open07 Tom40 Tom39 Crash10 Tom39 Ride04 Crash02 Ridebell03 Middle09 Crash10 Middle02 Crash10 Open07 Ride03 Maracas01 Maracas02 Power_S.
Voice Preset Voice Preset PIANOS CONCERT_GRAND UPRIGHT_PIANO POP_GRAND HONKY_TONK LATIN_PIANO ROMANTIC_GRAND TINE_PIANO DYNAPIANO HARPSICHORD CLAVI RAGTIME ELECTROMIX PIANO&STRINGS OCTAPIANO JINGLE_PIANO FM&GRAND R&ROLL PIANO_PAD DIGIPIANO HOUSE EL_PIANOS STAGE_73 SUITECASE FM_PIANO1 80’S_MODULE CRISTAL_TX 88_PRO PHASER SWEET_MARK CLAVIMIX TREMOLO_MARK HIGH_TINES FM_PIANO2 ROTOR_E_PIANO ULTRAFUNK E_PIANO_PAD FM_LAYERED CHORUS_E_PIANO 3_OPERATOR VINTAGE DELAY_E_PIANO CHROM CELESTA GLOCKENSPIEL MUSIC_BOX
Voice Preset CAMERA DISCO_STRINGS BAROQUE OCTASTRING_3 VIOLA TZIVAGO SYMPHONY (otm) OPERA PRELUDE STACCATO CHOIR POP_AHH POP_OHH VOCALS DAH TOOH UHH CLASSIC CHOIR SYNVOICE TREBLE_VOICES DIGICHOIR HALOCHOIR DIGIVOICE SMOOTH AHH TUU_UAA CHOIRPAD CHURCH_VOCAL 1 CHURCH_VOCAL 2 SYNTHVOX 1 SYNTHVOX 2 SYNTHVOX 3 BRASS BRASS 1 BRASS 2 MEXICAN JAZZ_TROMBONE DIXIE ® MUTED_TPT SWING_TRUMPET OCTABRASS GOLDEN_TRUMPET FLUGHORN JAZZ_CORNET TROMBONES BRASS&FALL FRENCH_HORN MARIACHI BEBOP_MUTED SOFT_BRASS (otm) LATIN_BR
MIDI Implementation NOTE ON 9nH kk vv NOTE OFF PITCH BEND 8nH kk vv 9nH kk 00H EnH bl bh PROGRAM CHANGE CHANNEL CONTROL 00H CONTROL 01H CONTROL 05H CONTROL 06H CONTROL 07H CONTROL 0AH CONTROL 0BH CONTROL 40H CONTROL 41H CONTROL 42H CONTROL 43H CONTROL 5BH CONTROL 5DH CONTROL 77H CONTROL 78H CONTROL 79H CONTROL 7BH CONTROL 7EH CONTROL 7FH CONTROL 54H CONTROL 55H CONTROL 10H CONTROL 11H RPN 0000H RPN 0001H RPN 0002H NRPN 0108H NRPN 0109H NRPN 010AH NRPN 0110H NRPN 0111H NRPN 0112H NRPN 0113H NRPN 0120H NR
MIDI Implementation Control Change ▀▀ Modulation wheel Status Byte 2 Byte 3 BnH 01H mmH n = LC-1 or HC-1 (lead or harmony MIDI channel) mm = modulation amount : 00H -7FH ▀▀ Portamento time Status Byte 2 Byte 3 BnH 05H ttH n = LC-1 or HC-1 (lead or harmony MIDI channel) tt = portamento time : 00H -7FH (default = 00H) ▀▀ Volume Status Byte 2 Byte 3 BnH 07H vvH n = LC-1 or HC-1 (lead or harmony MIDI channel) vv = volume : 00H -7FH (default = 64H = 100) ▀▀ Pan Status Byte 2 Byte 3 BnH 0AH ppH n = LC-1 or HC-
MIDI Implementation (Vocalizer) Non Registered Parameter Numbers Note: All NRPN messages are to be sent through harmony or lead MIDI channels (HC or LC). ▀▀ System NRPN NRPN NRPN Data MSB Default MSB LSB value Main volumes, modes and switches 96 0 0...127 127 96 01 0, 1 0 Parameter Master volume: affects the whole system output Vocalizer mode: 0 = MIDI Mode: 5 harmony voices driven by MIDI messages sent through the harmony channel.
MIDI Implementation NRPN MSB 96 NRPN LSB 17 Data MSB Default value 0…23 23 96 18 0…11, 12...23, 24...35, 36...47, 48...59, 60...71, 72...83, 84...95, 96...107, 108...119 none Parameter Virtual voice presets: presets for Virtual voice feature. Calling a preset overwrites the current Voice transform (vibrato, formant, tone…) and EQ parameters of the lead voice. Calling a preset also turns “Lead channel processing switch” (NRPN 96-06) on automatically.
MIDI Implementation NRPN NRPN Data MSB LSB MSB Pitch to MIDI conversion 96 11 0, 1...127 96 12 0...4 Default value Parameter Pitch to MIDI switch: enables pitch to midi conversion. Refer to “Pitch output” section for more information about this feature. Note trigger sensitivity: this parameter affects the responsiveness 2 of the algorithm for triggering a new MIDI note. Lower values makes the algorithm require a more stable pitch before sending a Note On message.
MIDI Implementation ▀▀ Lead voice NRPN NRPN MSB 97 97 NRPN LSB 00 01 Data MSB Default value Parameter 0...127 0...64...127 127 64 Lead level: input voice output level Lead pan: same as control 10 on lead MIDI channel (LC) Voice transform parameters 97 02 40...64...88 97 04 0...64...127 97 05 0...38 64 64 38 Transpose: -24...0...
MIDI Implementation 99 99 99 99 18 19 20 21 0...38 0...38 0...38 64...71 38 38 38 64 99 99 99 99 99 99 99 99 99 99 99 99 99 99 99 99 99 99 99 99 99 99 99 99 99 22 23 24 25 26 27 28 29 30 31 32 33 34 35 36 37 38 39 40 41 42 43 44 45 46 64...71 64...71 64...71 64...71 0...64...127 0...64...127 0...64...127 0...64...127 0...64...127 0...127 0...127 0...127 0...127 0...127 0...127 0...127 0...127 0...127 0...127 0...127 0...127 0...127 0...127 0...
MIDI Implementation ▀▀ Effects NRPN NRPN NRPN 84H 4H Compressor 100 00 Data MSB Default value Parameter 0,1...127 0 100 01 0...127 0 100 02 0...127 0 100 03 0...127 0 100 04 0...127 48 100 05 0...127 48 100 06 0...7 0 Compressor switch: 0: Off 1...127: On Attack time: 0=fast attack (0.1 ms), ... 60=1ms. .. . 100= 10ms, 127=slow attack (100ms), exp. curve Release time: 0=fast release (10ms) , ...60= 100 ms, ... 100=1 s. 127=slow release (5s), exp.
MIDI Implementation Band Frequency 1 100Hz 2 160Hz 3 265Hz 4 430Hz 5 700Hz 6 1.1kHz 7 1.9kHz 8 3kHz 9 5kHz 10 8kHz ▀▀ Reset NRPN NRPN MSB 104 NRPN LSB 00 192 KETRON • AUDYA Data MSB 0 Default value Parameter - Soft reset: sets most of the vocalizer parameters to their default value + all notes off.
MIDI Implementation TABS for compatibility SD series F0 26H 7CH Code_tab Status F7H Code_tab = 00H - 7FH Tab code (see list) Status = 7FH Tab pressed Status = 00H Tab released Code_tab list: -------- = Not Used 00h Piano 01h ElPiano 02h Chrom 03h Organ 04h Accordion 05h Guitar 06h Bass 07h String 08h Choir 09h Brass 0ah Sax 0bh Flute 0ch Pad 0dh Synth 0eh Ethnic 0fh Effect 10h Drawbar 11h Drumset 12h --------13h Voicetron 14h --------15h RamSound 16h --------17h --------18h Program 19h GM_Voice 1ah -------
MIDI Implementation 08h Choir 09h Brass 0ah Sax 0bh Flute 0ch Pad 0dh Synt 0eh Ethnic 0fh Effect 18h Transpose Up 19h Stream List 1ah Harmony 1bh Menù 1ch Save 1dh Edit 1eh Enter 1fh Exit 40h Nu0/Folk 41h Nu1/Ballad 42h Nu2/Pop 43h Nu3/Dance 44h Nu4/Party 45h Nu5/RockSoul 46h Nu6/Country 47h Nu7/SwingJazz 48h Nu8/Latin 49h Nu9/RockRoll 4ah */Unplagged 4bh #/Ballroom 4ch Octave Down 4dh Octave Up 4eh GM Part 4fh Style View 50h TempoSlow 51h TempoFast 52h GM Voice 53h Dial Up 54h Dial Down 55h Fade 56h FRE
MIDI Implementation CHORUS Chorus Type for compatibility SD series* F0 26 7B 01 00 Type F7 Type: 00h Chorus1 01h Chorus6 02h Chorus2 03h Chorus6 04h Chorus4 05h Phaser1 06h ------07h Flanger1 Chorus Type Right F0 26 7B 11 03 Ch.Type F7 Chorus Type left/gm F0 26 7B 15 03 Ch.Type F7 Ch.
MIDI Implementation 07h Stereo Echo3 08h Stereo Echo4 09h Stereo Echo5 11h Stereo User2 12h Triple User1 13h Triple User2 Echo/Delay Time* F0 26 7B 29 00 Ec.Time F7 Ec.Time: 00h - 7f h Echo/Delay Volume* F0 26 7B 2a 00 Ec.Vol. F7 Ec.Vol.: * beside MIDI port used will be drive Right or GM/Left part 00h - 7f h Echo/Delay Feed* F0 26 7B 2b 00 Ec.Feed F7 Ec.Feed: 00h - 7f h Echo/Delay Filter* F0 26 7B 2c 00 Ec.Filter F7 Ec.
MIDI Implementation ARABIC MODE ACTIVE/INACTIVE F0 26 7B 0F 03 Val F7 Val = 0 disactive; Val != 0 active MASTER TUNE F0 26 7B 0c 00 d1 d2 F7 Data1 00H-0CH high nibble;Data2 00H-0FH low nibble Es. Data1=06h Es. Data1=00h Es.
MIDI Implementation LEFT LEVEL F0 26 7B 1c 00 Level F7 Level : 00h - 7fh MIDIFILE LEVEL F0 26 7B 1d 00 Level F7 Level : 00h - 7fh GENERAL MIDI VOLUME F0 26 7B 38 00 Level F7 Level : 00h - 7fh DRAWBAR VOLUMES F0 26 7B 40 00 Drawbar vol F7 Drawbar: 40h - 48h Drawbar = 49h percussion Drawbar = 4ah click vol: 00h - 7fh MICRO Micro Preset F0 26 7B 00 03 Mic.Preset F7 Mic.
MIDI Implementation FOOTSWITCH F0 26 79 03 footswich Status F7 04h Stereo 3/4 05h Mono 4/4 06h Stereo 4/4 07h Mono Triplet 08h Stereo Triplet 09h Mono Tap 0eh Stereo 4/4 Tap 0fh Mono Triplet Tap 10h St. Triplet Tap 11h User1 12h User2 13h User3 Status=0 off Status=127 ON footswitch: 00h Sustain 10h Break 3 01h Soft 02h Sostenuto 03h Arr.A 04h Arr.B 05h Arr.C 06h Arr.D 07h Int.End.1 08h Int.End.2 09h Int.End.
MIDI Implementation Voicetron Lead on/off F0 26 7B 6E 00 Status F7 03h Country Duet 04h Chained Duet 05h Standard Trio 06h Standard Trio 2 07h Chained Trio 08h Stand.
Specifications Technical data KEYBOARD Audya: 76 semi-weighed buttons, 8 dynamic curves. Pitch, modulation, aftertouch and portamento controls. Operating system updatable via USB port. 17 volume slider controls (with 1 assignable). 10 assignable user tab functions. Audya 5: 61 semi-weighed keys, 8 dynamic curves, Pitch & Modulation Joystick, Aftertouch, Portamento, 17 Volume slider controls (1 assignable), Operating system updatable via USB port 10 display User Tab.
Specifications ACCORDION Accordion functions with international and Belgian system. Controllable dynamics of bass and chords. Octave selectable on manual bass and chord. Manual drum on bass and chords. DSP EFFECTS 16 new DSP multi-effects. Reverb, chorus, flanger, delay, phaser, tremolo, tap delay 4/8, whawha, distortion, overdrive, slow/fast rotor, parameters 4-band equalizer.
Notes KETRON • AUDYA 203
KETRON s.r.l. Via Giuseppe Taliercio n. 7 60131 Ancona (Italy) Tel. +39 071 285771 Tel. +39 071 2857748 www.ketron.it email: ketron@ketron.