
Operation Manual


Menu
110 KETRON • AUDYA
▀
DSP
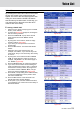
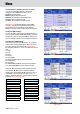
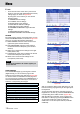
• From the first screen of the menu, press the F3
button to open the DSP (Digital Signal Processor)
settings page, as shown in Figure 278.
By using the F1-F10 buttons you can edit the
following pages:
F1–REVERB: Reverb settings.
F2–CHORUS: Chorus settings.
F3–ECHO-DELAY: Echo settings.
F4–DISTORTION: Distortion settings.
F5–ROTOR: Rotor (Leslie) settings.
F6–DRAWBAR OVERDRIVE: Organ distortion
settings.
F7–EQUALIZER: Equalizer settings.
F8–WAVE EQUALIZER: Wave file EQ settings.
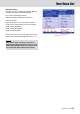
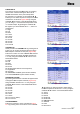
REVERB
By pressing the F1 button on the DSP page, you can
access the REVERB window, as shown in Figure 279.
Here you can select the following parameters:
F1– RIGHT REVERB: selection of the reverb for the
right hand (opens another window).
F2– LEFT/GM REVERB: selection of the reverb for
the left hand and the GM parts (opens another
window).
F6– Right Level: reverb amount settings for the right
hand (values 0-63).
F7– Left/GM Level: reverb amount settings for the left
hand and the GM parts (values 0-63).
F8– Micro Level: reverb amount settings for the
microphone (values 0-63).
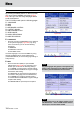
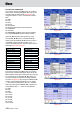
RIGHT REVERB
From the REVERB page, by pressing the F1 button
(Right Reverb) you can access the page for the
selection of the reverb for the right hand (Figure 280).
10 reverb Presets are available in the first page and
10 in the second, by pressing any CURSOR button or
the DATA/VALUE wheel. Press any F1-F10 button to
select the corresponding reverb type:
Studio1 and Studio2
Club1 and Club2
Hall1 and Hall2
Theatre1 and Theatre2
Stage1 and Stage2
Church1 and Church2
Hangar
Galaxy
Space
User1, User2, User3, User4 and User5 (see details
later)
After you select the effect for the right hand, you can
hear the result by playing directly on the right split of
the keyboard.
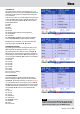
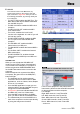
To lock the reverb also when changing Program or
Registration or at start-up, press the Lock: ON button,
corresponding to the USER 1 button (Figure 281).
After the effect type selection, exit by pressing the
EXIT button or directly by pressing the MENU button.
To store the reverb type at start-up press the
SAVE button on the front panel and F6 (CUSTOM
STARTUP).
Figure 278
Figure 279
Figure 280
Figure 281
NOTE
By pressing the CURSOR
Ó Á
buttons together you
set the value to 0.