
Operation Manual

16 KETRON • AUDYA
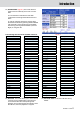
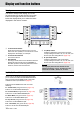
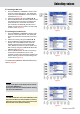
Display
F1, F2, F3, F9 and F10 function buttons
The heart of Audya is the display. The F1-F5
function buttons to the left, the F6-F10 function
buttons to the right and the five User buttons
below the display allow you to select the items
displayed in the various screens.
1
F1-F5 function buttons
Press the five function buttons from F1 to F5 to
select one voice (VOICE) or one STYLE or a menu
displayed on the display, for example.
2
F6-F10 function buttons
The same as above.
3
User buttons
In Arranger mode, the five User buttons below the
display will select five FILLS or five BREAKS. In
the other operative modes they will select various
functions, menus and user functions.
4
(Back) button
It allows to display the previous five functions
corresponding to the User 1/6, 2/7, 3/8, 4/8, 5/10
buttons (see User Assignable on page 140).
5
(Forward) button
It allows to display the next five functions
corresponding to the User 1/6, 2/7, 3/8, 4/8, 5/10
buttons (see User Assignable on page 140).
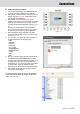
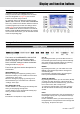
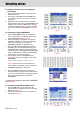
The F1, F2, F3, F9 and F10 function buttons allow
you to access the AUDIO STYLE MODELING when
they are used in STYLE VIEW mode, in the PLAY
CONTROL section (see details on page 67).
Press the STYLE VIEW button and one of the
following:
F1 - Audio Drum (see groove list on page 147)
Press F1 to set the AUDIO DRUM part.
F2 - Groove Bank (see groove list on page 149)
Press F2 to set the GROOVE BANK part.
F3 - Bass Bank (see groove list on page 151)
Press F3 to set the BASS BANK part.
F9 - Arp & Lick (see groove list on page 153)
Press F9 to set the ARP&LICK part.
F10 - Live Guitar (see groove list on page 155)
Press F10 to set the LIVE GUITAR part.
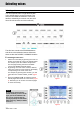
1
4 3 5
2
B
B
NOTE
The serigraphy below the User buttons has the
following numbering: 1/6, 2/7, 3/8, 4/8, 5/10. In this
manual we use USER 1, USER 2, etc., for short.
Display and function buttons