
Operation Manual


8
save the combination of the two files and pull-up the Groove automatically when the midifile is started again you need to go back to the
MIDIFILE section by pressing the relative key and press the SAVE key. In the window that appears you can add the starting beat of the
Groove and the End beat. In this way you can activate the Remix on the beat specified. Press Enter after you have completed the settings.
In the Song Setup window that appears, select the mode desired (refer to the user manual for further details on Song Set up) and press
Enter. To play back the combination, simply select the midifile, press Enter, wait for the Groove to be loaded and play everything. It takes
a large amount of memory to manage the Grooves. If the HD supplied (20 GBytes) has been replaced with one with more memory, the
internal RAM memory of the instrument may not be enough to load these files. In such case, the machine would trigger the error message:
Out of Memory.
DRUM REMIX START STOP BARS
The possibility of establishing the starting and end beat has also been extended to the Drum Remix functions that utilise internal Styles
(refer to the user manual for further information on Drum Remix). In this case again, when you save, a page similar to that of the previous
point appears in which you can set the parameters required to Start/Stop the rhythm associated with the song. For Midifiles with Drum
Remix produced with previous software releases, the Start beat is set on beat 0 while the Stop beat is set at the end of the midifile.
USB TO MIDI
From the Midi settings menu you can set the USB to
MIDI operating mode, which is used to transmit and
receive MIDI information via the USB connection.
This function proves very useful to connect the
MIDJAY unit to a Pc without a midi interface (usually
all portable computers).
When set in one of the two Modes available (Mode
1, Mode 2) the USB connection of the MIDJAY unit
stops working as a removable HD and configures
itself to transmit and receive MIDI data. Once you
have set one of the two Modes, simply connect the
USB cable to the PC and the operating system will
acknowledge the device and enable its use as a MDI peripheral unit.
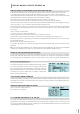
In the case of Windows XP © the MIDJAY unit is acknowledged as
Composite Audio Peripheral unit and installed with the name of USB
Speakers. To utilise, receive and transmit midi data, you need to set
the corresponding device in the software of Midi Sequencing.
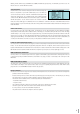
The illustration that follows shows the correct setting for Sonar ©
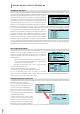
The MIDJAY unit avails of two different operating modes for the Midi
USB.
Mode 1 is suitable when you wish to record the midi data produced
by the MIDJAY unit on a sequencer. For example, it proves useful
when you wish to record MIDI data generated by a style or played
by the internal voices and when the MIDJAY unit is set on Play Mode
Keyboard. In this configuration, the midi data are sent to the MIDJAY
unit, which processes them and sends them back to the PC. In this
case, the Soft Thru function of the PC must be DISABLED.
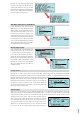
Mode 2 reproduces the classic “cascade” connection between
Master Keyboard, Pc and MIDJAY, ideal for playing and recording
MIDI sequences. The Midi data are sent to the Pc, which sends them
towards MIDJAY or other external devices. The Soft Thru function of
the PC must be ENABLED.
EASY HD RECORDING
This is used to rapidly activate an HD Recording session in whichever contextual menu the instrument is working. By simply pressing
the RECORD and START keys together at the same time, the MIDJAY unit starts an HD recording session, generating a file denominated
D
RUM REMIX
S
TART
S
T
O
P BAR
S
E
A
S
Y HD RE
CO
RDIN
G
US
B T
O
M
IDI