
Operation Manual


SINGLE RAM STYLE
When the LED is lit it is used to directly enter the number of the style stored on disk and to be immediately loaded in RAM.
CUSTOM STYLE This is used to select a style from the internal memory. CUSTOM STYLE is disabled as soon as SINGLE is pressed to
load styles in volatile RAM from disk, in all the other cases the LED is always lit as default setting.
SELECTION, DATA ENTRY AND CONFIRMATION PUSH BUTTONS
These are used to explore the display, together with the function push buttons, to enter parameters and to confirm a procedure or otherwise.
PAGE + PAGE - When the display shows that there are more pages following the first one (as for Voice and Style), the PAGE + push but-
ton is used to move one page forwards and PAGE – to go back a page. The PAGE + and PAGE – push buttons, with the
LED of the DISK push button lit, are used to select the hard disk rather than the disk drive. In these cases, to move onto
the following pages of a directory, the musician must use the CURSOR +/- push buttons. In the main page the PAGE +
and PAGE – push buttons directly control the Tempo value of the Arranger.
CURSOR +, CURSOR - When there are a number of parameters to be modified within a menu or the function push buttons do not directly rela-
te to a parameter (as in the case of the parameters situated in the middle of the display), these push buttons are used
to move between the parameters to select that to be modified. In the Disk environment the CURSOR +/- push buttons
are used to select following groups of files that are not shown on the display. The presence of following or previous
pages to that in use is pointed out by symbols or seen under or above the group of files displayed. In the main
page the CURSOR + and CURSOR – push buttons are used to Transpose all the SD1 musical sections in steps of one
semitone. To reset the transposition, simply press the two push buttons together at the same time.
VALUE +, VALUE - These are used to change the value of a parameter selected. The initial value of the parameter is reset by pressing the
VALUE + and VALUE – push buttons together at the same time, even after the parameter has been modified. On the
main page the VALUE buttons allow you to balance the Arranger and Lead volumes.
SAVE/ENTER This is used to store and save on disk at the end of some modification procedures.
EXIT This push button is pressed once to return to the main page of the display. EXIT is disabled in the menus dedicated to
the Sequencer and Song Play where the SEQUENCER or SONG PLAY push buttons are to be pressed again to return to
the main page of the display.
The twelve STYLE push buttons are used to enter the number of a folder or file while managing the hard disk or modifying parameters, where
they take over the function of a numeric keypad.
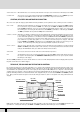
THE DISPLAY, THE MAIN PAGE AND THE FUNCTION PUSH BUTTONS
Fig. 1 illustrates the main page of the display from which access is gained to the programming functions using the function keys at the side of
the display together with the dedicated push buttons. Based on the functions called up the display changes the parameters and enables their
selection thanks to the push buttons at the side of the display (or function keys from F1 to F10, called so as they have a different function
depending on the page displayed). Therefore simply press the function push button that indicates the parameter to enable or select the same
parameter. When the parameters are situated in the middle of the display then they are selected using the CURSOR + and CURSOR – push but-
tons. While you will find detailed descriptions of the modification pages further on, below is a description of the single parameters that are
displayed.
Number, name and volume of the style: This indicates the name and number of the style currently in use. Use the STYLE push buttons to call
up another one. To modify the volume press the VALUE + and VALUE – push buttons, which in this page are used as Balance.
SD1 Owner’s Manual
8
Style number and name
Style volume
Split note
Transpositon
Selected timbre
Timbre volume
Second Voice
Played chord
Right hand volume
Style tempo
Left hand volume
Accompaniment sections volumes