INDEX Welcome to the XD9-XD3 Connections Control panel and push button functions Parameter management A guide on how to start playing Voices and User Voice Program and One Touch Drawbars Drum Set Arranger Using a MIDI pedal for the bass Pattern Edit Power On Set Up Song Play, Midi file and Karaoke Drum Remix Video Out and Karaoke Recording a Midi file .KAR, .MID (Midi files) & .
Welcome to the XD9-XD3 Welcome to the XD9 Congratulations on having chosen a Ketron keyboard. If you read this manual carefully, which provides detailed descriptions on each single procedure, you will be able to fully exploit and customise the instrument according to your own taste and way of working without any problems whatsoever.
Connections Connections 1 3 2 6 4 5 10 8 7 9 The XD9 is provided with all the audio and MIDI connections as required by current standards including the sockets for the pedals needed for its optimum use. The only optional extras are the video interface and the two pedals. CONNECTIONS ON THE REAR MICRO 1 OUTPUT: Monophonic 1/4’’ jack direct audio output of the input signal of Micro 1 processed by the Vocalizer but not by the 1 internal effects like Reverb or chorus.
Connections GAIN: Controls the gain of the microphone audio inputs. MICRO INPUT: Unbalanced 1/4’ mono audio jack input for two microphones, (if a stereo-mono adapter is used). The Micro Input signal can be processed by the inner Vocalizer of the XD9 and by the global effects. Without the adapter, only one microphone can be used. FURTHER ELEMENTS OF THE XD9 HARD DISK The optional hard disk allows you to store Midi files, Patterns and any other files processed by the XD9.
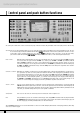
Control panel and push button functions Control panel and push button functions The control panel is divided into sections according to the group of functions related to the push buttons. From left to right you will see the following: VOLUME Two rows of four push buttons that are used to control the general volume for the Drums, Bass, Chords and Right sections. The volume can be muted by pressing the right-hand and left-hand VOLUME push buttons of that section together at the same time.
Control panel and push button functions THE DISPLAY, THE MAIN PAGE AND THE FUNCTION PUSH BUTTONS Style volume Selected sound Style number and name Sound volume Split note Second Voice Transposition Played chord Style tempo Right hand volume Accompaniment sections volumes Left hand volume From the main page of the display, the programming functions can be accessed using the function push buttons at the side of the display together with the dedicated push buttons.
Control panel and push button functions F7 EDIT VOICE/DRAWBARS: This is used to modify the main parameters relating to the sound such as the envelope, the filter and the LFOs. When a Drawbar sound is selected (pressing first USER VOICE and selecting then the BASS-FX 12 bank using the Voice push buttons group), the EDIT VOICE/DRAWBARS push button allows you to access programming and to display the single Drawbars to create new organ sounds.
Control panel and push button functions SONG PLAY This enables the playback of Midi files. It is also used to call up Midi file chains, to display the words and to transpose the whole Midi file. DISK+SONG PLAY Pressed down at the same time allow you to record on disk (as a Midi file) whatever is played on the keyboard. PATTERN When the LED is lit, this allows you to select Styles loaded in RAM from the floppy disk or from the hard disk.
Control panel and push button functions the Arranger follows by changing the parts to suit. If the LED is switched off, the accompaniment will only work as long as the chord is held down on the keyboard, but the drum tracks will continue to play regardless. SLOW This decreases the Tempo value of the Arranger or of the Sequencer. FAST This increases the Tempo value of the Arranger or of the Sequencer.
Parameter management Parameter management Before going into the actual programming subjects, the musician should first be aware of how the menus and parameters of the XD9 work. The rules that are listed in this chapter are valid for all the following sections and are crucial to controlling the keyboard in the best way possible.
A guide on how to start playing A guide on how to start playing You will certainly want to instantly know how to use some functions of the XD9 such as how to call up Styles and Voices, reproduce Midi files, how to use the Arranger, how to use a MIDI accordion and the Vocalizer with a microphone. If this is the case then this section is just up your street.
A guide on how to start playing CONTROLLING PLAYBACK (REPRODUCTION) Whether you have loaded a song from floppy or hard disk, some commands are offered on the control panel to modify some reproduction parameters in real time. ● To reproduce the song press the START push button. ● To stop the procedure press the START push button once more. ● To pause the current playback of a midifile, press the CONT/PAUSE push button.
A guide on how to start playing HOW TO SELECT A STYLE There are ten STYLES push buttons to the left of the display, each of which indicates a musical genre. For each of these Ketron has foreseen up to a maximum of 30 Styles. The individual Style is called up using the relative function key (FF1-FF10), situated at the side of the display which when pressed, immediately calls up the Style for the Arranger.
A guide on how to start playing ● ● ● ● ● To cut-out the accompaniment tracks, except for the drum tracks, when no chord is played, disable the HOLD function using the dedicated HOLD push button (the LED switches off). To balance the volume of the Arranger with the lead played on the part of keyboard to the right of the split point, press these push buttons: BALANCE +/- (VALUE +/-). To restore the original tempo of the Style, press the PAGE +/- push buttons simultaneously.
A guide on how to start playing The XD9 can work with up to two microphones connected to the dedicated front mic input. The Micro input is processed by the Vocalizer, namely the effect with which the vocals can be naturally harmonized either according to the chords played, or a harmony track of a Midi file or the notes played on the keyboard. What you need is a good microphone, a cable and the XD9.
A guide on how to start playing THE REGISTRATIONS All the parameters dealt with up to this point, and many more can be saved and called up instantly thanks to the 198 Registrations. The handiness of the Registration function becomes clearer as you go along and are crucial when playing live as they are used to call up all the settings of an automatic accompaniment or a Midi file with words and audio files.
Voices and User Voice Voices and User Voice One of the fundamental features of the XD9 is its sound quality and consequently the synthesis technology exploited that is based on multisamples processed by subtractive synthesis, frequency modulation and additive synthesis. The samples have been developed over the last few years by a team of international programmers.
Voices and User Voice USER VOICES As we have already explained, the XD9 is also a powerful synthesizer based on samples. We have chosen to limit the editable parameters to just those essential for most common use. Any modification made to a voice can be saved in one of the 120 memory locations in the User Voice bank, divided into twelve groups of ten User Voices each. To call up a User Voice follow the normal procedures used for calling up a Voice (mentioned above).
Voices and User Voice F4 Release: This sets the value of the Release segment that can be modified using the VALUE +/- push buttons. F5 Level: This sets the value of the total volume of the voice that can be modified using the VALUE +/- push buttons. To simplify programming of the envelope, the display also shows a graph, the segments of which change proportionally with the values set for the ADSR. F6 Resonance: This sets the Resonance value that can be modified using the VALUE +/- push buttons.
Voices and User Voice LFO AND VELOCITY Press F10 LFO Velocity to access the parameters dedicated to the use of the LFO and the velocity to control some crucial voice parameters. To select a parameter, use the CURSOR +/- push buttons and the VALUE +/- push buttons to modify the value. Below is the description of the individual parameters: LFO 1 (DCO) Rate: This establishes the modulation frequency or speed of the LFO dedicated to the pitch. Higher the value, faster will be the vibrato.
Program and One Touch Program and One Touch PROGRAMS A number of voices are often used simultaneously to enhance the voice of the lead part, namely the right section to the right of the keyboard split point. The simplest method is that of using the Second Voice but for more demanding musicians, up to four Voices (separately combined together) can be exploited. Using the Programs the musician can obtain a remarkably versatile voice for the right hand and also right along the keyboard.
Program and One Touch tion appears immediately at the bottom right part of the display, which is used to enable the harmonization function for that Voice. Only one Voice within the Program can use the harmonization. function and it is distinguished from the others by the H” written under the name. If the Harmony function has already been applied to a Voice, it will be automatically disletter “H abled when the same function is set on another Voice.
Program and One Touch F4/F9 Amount: This controls the signal entity to be sent to the multi-effect and, in particular, to the pre-selected algorithm, that can be modified using the VALUE +/- buttons which, if pressed together at the same time, will set the value to zero. F5/F10 Delay e Chorus: These control the signal entity to be sent to the delay or the chorus, when an appropriate algorithm has been selected.
Program and One Touch SAVING AND LOADING A PROGRAM Once a Program has been modified or programmed, it must be saved in the memory or on disk for future recall or use. It is advisable to save your favourite programs in RAM due to the fact that these are immediately available and can be recalled instantaneously. Programs which reside in DISK have to be loaded into RAM prior to being used. PROCEED AS FOLLOWS TO SAVE A SINGLE PROGRAM IN RAM ● ● ● ● Select the program to be saved.
Program and One Touch ONE TOUCH With all these voices on board, you will soon notice that you do have some voices that you use more often than others. These ‘favourite’ voices can be stored in a special location in memory (One Touch) which renders quick access and recall during live performances. The XD9 already contains Ketron’s favourite voices within the current One Touch locations as default but you can later edit and replace these with your favourite voices.
Drawbars Drawbars Thanks to the very powerful sound engine of the XD9, it is possible to also reproduce very accurately the sounds of classic electromagnetic organs, among which the Hammond ©‚ certainly is the most famous one with the most important timbre. If you do not know what an electromagnetic organ is, keep in mind that their timbres used to be mixed using so-called drawbars, with a specific harmonic corresponding to each of them.
Drum Set Drum Set The rhythm section of the XD9 uses both the regular Drum Sets and the Live sampled drum loops. The regular Drums are assigned to the Drum 1 track (MIDI channel 10), whereas the Live Drums are assigned to the Drum 2 track (MIDI channel 9) within a style. The XD9 is equipped with 24 preset Drum Sets and 24 additional User Drum Sets that can be freely programmed by the user. Live Drums can be programmed and modified only within a Style, from the Arrange View menu.
Drum Set group can be modified from value 1 to 15 using the VALUE +/- buttons. The third page is used to control the reverb quantity of the single groups to be selected with the relevant function keys. The reverb quantity of the selected group can be modified from value 1 to 15 using the VALUE +/- buttons. The fourth page is used to control the pan value (stereo position) for the single groups to be selected with the relevant function keys.
Arranger Arranger The Arranger is the heart of the automatic accompaniment of the XD9. It allows you to create a dynamic and versatile arrangement using the Styles and their controls. A Style is a group of short sequences relevant to major, minor and seventh tonalities or different tonalities combined with each other.
Arranger FILL IN 1, 2, 3: These are Style variations with the duration of one bar, used as short harmonic intervals to enhance the rhythm. When the Arranger is activated and one of these three pushbuttons is pressed, a Fill-In bar is entered, and at its end the Arranger goes back to the conditions previous to the Fill In.
Arranger LEFT CONTROL: FIRST PAGE F1 Jump Intro: Works in combination with the INTRO 1, 2, 3 push buttons. When enabled, and with the Arranger in Stop condition, after having pressed one of the three INTRO push buttons, the Arranger starts playing only the bars of the relevant Ending. When the Arranger is playing, pressing one of the INTRO 1, 2, 3 push buttons causes the Arranger to play the bars of the Intro selected and to continue playing the currently activated Arrange.
Arranger F2 Retrigger & Mode: This calls up the Retrigger function and the relevant editing page. It is set by default on the bass and Chord 2 track of the Style, thus allowing you to repeat the fundamental note every time a chord is changed. If the retrigger is activated also for the accompaniment tracks, these repeat the chord programmed on the first step of the first Style measure. The following parameters are available: F1 Drum: not utilised.
Arranger the muted sections will be automatically re-activated. The Interactive Arrange parameters are: F1 Brass: When this is selected, the brass of the automatic accompaniment will be muted while a lead is played on the Right section. F2 Intro: When this is selected, the Interactive Arrange of the Brass will be activated also for the Intro’s. F3 Ending: The same as F2 Intro but dedicated to the Ending F5 Escape: Returns to the previous page of the Left Control menu.
Arranger button repeatedly. F4 Overdrive: It gradually saturates the sound controlled by the optional Volume Pedal. It is one of the effects required to simulate jazz and rock organs in the best way possible. The Overdrive cuts out the use of the Distortion effect. F5 Distorsor: This enables the Distortion effect on the Right section, cutting out the use of the Overdrive.
Arranger PLAY CONTROL: SECOND PAGE F1 2 ND Sustain: Activates or deactivates the Sustain on the Second Voice F2 2 ND Split: This is used to define the split point of the keyboard, dedicated to the Right section, above which the timbre assigned to Second Voice will not be playing. The relevant note can be selected using the keyboard.
Arranger F1 Low 1 Hold: pressing repeatedly the function push button F1 activates the storage of the notes played with Lower 1 while the Arranger is playing. In this way you will still hear the notes played with Lower 1 on the left to the split point of the keyboard, even after you have stopped playing them. Hold on Lower 1 is activated by default, since usually a strings or pad voice is used. F2 Low 2 Hold: the same as F1 Low 1 Hold, but dedicated to the second sound assigned to Lower 2.
Arranger F3 Lower Lock: Activating this, the Lower 1 & 2 sounds are ‘locked’, i.e. the voice used for the Lower voices remains the same, even if you change the Style. F4 Tempo Step: If selected with the relevant function push button and modified with the VALUE +/- push buttons, this function allows you to define the value by which the Tempo is to be increased or decreased by each single press of the RIT ACC (TAP) push button.
Arranger Once the voice has been selected, use the CURSOR +/- buttons to determine if the modification has to refer to all the Arranger parts (Global mode) or only to the one currently in use (Single mode). The Global/Single parameter can be shown on the bottom of the display or above the box where the title of the Style in use is shown. Live Drums are excluded. The sound choices made in Global or in Single mode applies also to the two Lower parts and the Drum 1 track.
Arranger For each Lower part or track it is possible to establish which effect (Chorus, Delay or Distortion) will be used to process the voice further to the quantity of the effect applied. To modify this setting, select the track or the part using the relevant function button, then press the same function button repeatedly until the effect to be assigned is displayed. On the selected track or part, use the VALUE +/- push buttons to enter the quantity of effect to be applied to the timbre.
Using a MIDI pedal for the bass Using a MIDI pedal for the bass The XD9 enables the connection of a MIDI pedal to control the manual bass line and to set the chords. The MIDI reception channel is to be set for the bass part on the same transmission channel as the pedal, by proceeding as follows: ● Connect the MIDI pedal to MIDI In 2 (Keyboard). ● From the main page of the display press F6 MIDI. ● Select F2 Channel Receive.
Pattern Edit Pattern Edit With all the current styles on board plus the bonus styles offered within RAM, there is still the eagerness for some to create their own styles … totally from scratch. The XD9 can be used to record new Styles both in real time and also by exploiting a MIDI connection to automate and speedup the process when recording from an external source. The XD9 is compatible with Patterns of the MS series.
Pattern Edit As for the recording principles, for each Part you must establish which tonality is to be recorded between Major, Minor, Seventh, Seventh Major, Seventh Minor and two combinations that are required to keep the rhythm and lead structure unaltered while modifying only the tonality. Once the tonality has been selected, establish which Part is to be recorded using F1 and the relative track, by selecting it with push buttons CURSOR +/-.
Pattern Edit F4 Metronome: When enabled, the XD9 will use a Stick sound to count the tempo. F5 Save: This is used to save the modifications permanently in the memory. F6 Value Quantize: In registration mode it may be handy to take the notes to a temporal grid, the value of which can be modified using the VALUE +/-push buttons. The lack of Quantize is pointed out by “Real”, whereas maximum Quantize has a value of 2. The letter “T” indicates values arranged in triples.
Pattern Edit F1 Tempo: Its default setting is 120 bpm. This value can be modified using the SLOW and FAST or VALUE +/-push buttons. F2 Time Signature: This establishes the musical division. The values can be modified using the VALUE +/- push buttons and by pressing F2 Time Signature again to change the position in the division. F3 Autocrash: If enabled (√), a ‘Crash’ will be played automatically at the end of every Fill In, Break and Intro.
Pattern Edit F4 COPY This is accessed from the initial Pattern Edit page, to copy a whole existing Pattern (or Part of it) to the Pattern being edited. Note: If the Pattern being modified already has some tracks recorded, then the source tracks or Parts must have the same time signature and the same length in beats as the destination tracks. The copy function is used to define not only the original Part but also the track within the Part to be copied.
Pattern Edit F9 MIDI RECORD From the main Edit Pattern display screen, you can have access to Midi Record F6. Thanks to this function, you can record the Pattern directly from a complete sequence transmitted by an external Computer or Sequencer. To record a Pattern from a Sequencer/Computer: ● Connect the Midi In 2 of the instrument to the Midi Out of the Computer and the Midi Out of the instrument to the Midi In of the computer.
Power On Set Up Power On Set Up It will soon become clear to you that each time you power on the XD9, there are some features that always default to values set by Ketron (which you almost always have to change or modify prior to using the keyboard). Some of the most important settings programmed for the use of your XD9 can be stored in such a way that they are automatically called up when turning the instrument on, thus avoiding loss of time involved during re-programming.
Song Play, Midi files and Karaoke Song Play, Midi files and Karaoke Playback of Midi files has never been any easier. With the direct play feature of the XD9, midi files can be played back and recorded instantaneously to disk (either HD or FD). Song Play is accessed using the dedicated push button on the control panel and is used to reproduce and organize Midi files, whether they are on hard disk or floppy disk.
Song Play, Midi files and Karaoke Edit function of the Disk Utility menu should be used. Refer to the specific section of this chapter. This function is used to create a chain with a maximum of 32 Midi files, saved as .CHN files and displayed in F5 Dir of Song Play with the letter “c” in front of the name. HOW TO CONVERT A .KAR MIDI FILE TO A .MID MIDI FILE The XD9 allows you to convert a Midi file having .KAR format. Press DISK to access the Disk menu. Use PAGE +/- to select the disk containing the .
Song Play, Midi files and Karaoke F2 Count: This has a double function. It displays the number of the beat as the Midi file is being played. By pressing the relative function push button on the other hand it leads directly to the Effects page where the effects for the Midi file can be set. This page is described in the Effects section. To return from Effect page to the Song Play page, press EXIT.
Song Play, Midi files and Karaoke The XD9 allows for two different editing methods: the first is based on displaying one track or Part at a time, the second shows the setting of the single parameter for all sixteen parts. Once the Midi file has been started for a few beats, press F1 GM Part to access the editing pages.
Song Play, Midi files and Karaoke filter using the F10 On/Off push button. The filter is enabled when “ON” appears next the MIDI message to be filtered.
Song Play, Midi files and Karaoke SAVING THE PARAMETERS MODIFIED The parameters that can be saved within a Midi file are indicated in the table and also include the volume balance between Midi file and keyboard, the Tempo value, the settings of the Drum Mixer, the voice for the Right section and the settings for the Vocalist track. The saving function is called up only when the Midi file is stopped and must be used only within the F1 GM Part menus.
Drum Remix Drum Remix To liven up or simply modify a song, all you have to do usually is change the rhythm structure of the drums or the percussion instruments, which is always contemplated in the remix of famous songs and dance. When the user changes the drum track, he also often modifies the balance of the individual percussion instruments too, with a crescendo in the number of instruments that make up a rhythm track.
Video Out and Karaoke Video Out and Karaoke The optional video card allows you to use a TV set or a computer monitor (or a LCD monitor) to display messages, words set in syllables from a Midi file or to duplicate the display of the XD9. The options for the video output are grouped in the Song Play menu that is enabled using the dedicated push button.
Recording a Midi file Recording a Midi file Everything that is played on the XD9, including the automatic accompaniment and the changes made on the control panel, can be recorded as a Midi file directly to a Floppy Disk or Hard Disk. Everything recorded can later be modified using a sequencer software for PC/Mac. Considering the fact that the accompaniment tracks use sounds in standard General MIDI, it is also possible to quickly create some arrangements which will also be compatible with other GM modules.
.KAR, .MID (Midi files) & .TXT (text) files .KAR, .MID (Midi files) & .TXT (text) files The karaoke function is used to show the words (Lyrics) of a Midi file being reproduced on the display, aligning the text in syllables via some graphic solutions. The words of a Midi file are handled as meta events and therefore there are Midi files + Lyrics with .MID and .KAR. extensions. Generally, all there is in a .
.KAR, .MID (Midi files) & .TXT (text) files Whatever the status of the Arranger (running or stopped), access can be gained to the loading of TXT files at any time: ● ● ● ● ● ● ● Press the DISK push button. Choose between Floppy Disk or Hard Disk using the PAGE +/- push buttons. If you choose Hard Disk you must find the Folder bearing the TXT files. Once you have found the .TXT file to be loaded using the VALUE +/- push buttons, enable RAM loading using F2 Load.
Using the microphone Using the microphone The XD9 can use two separate microphones if an optional adapter is utilised to divide the stereo input into two microphone inputs. Input Mic 1 is the only one that can exploit the built-in Vocalizer plus it is provided with a separate audio output to allow the lead voice signal be processed with an external mixer. To use both microphones correctly, you have to adjust the input gain using the dedicated cursor on the front panel to reach an ideal noise signal level.
Using the microphone F9 Effects: When enabled (On), the effects will be applied to the microphone input, whereas when set to Dry no Reverb effect is sent to the microphone input. If Dry On Stop is selected, the effects will be applied on the microphone signal only when the Arranger or a Midi file is being played. After the Arranger and the Midi file have stopped playing, the XD9 disables the effects on the microphone and re-enables them as soon as the Arranger or the Midi file starts playing again.
Vocalizer Vocalizer The Vocalizer produces particular types effects used to harmonise the audio signal on the microphone input according to some specific rules. It is dedicated to the human voice, and adds two or three notes to the single note sung into the microphone, thus creating a vocal duo or trio utilising the sound of the voice on the microphone input.
Vocalizer F4 Octave: transposes the voices that have been added to the lead by +/- two octaves. When set on Automatic, the voices will remain within the octave of the note that has been sung. Can be modified with the VALUE +/- buttons. F5 Hold: this will be present only if the harmonisation mode is set on Keyboard Harmony; if activated, this function allows you to store the notes recognised by the Vocalizer as you change from one chord to another.
Vocalizer F8 Vocalize To Arranger: the buttons controlling the Arranger may be assigned a different algorithm to be chosen among those available for the harmonisation mode selected in F3 Modes. In the centre of the display the Start, Stop, Arrange A, B, C, D, Fill 1, 2, 3 and Break sections can be selected with the CURSOR +/- buttons, and one of the available algorithms can be assigned to them acting on the VALUE +/- buttons.
Vocalizer Duet Up: 3 Open 1: 3 Open 2: the note sung. If the note sung is the third of the cord, the Vocalizer creates the keynote in the bass, belonging to the lower octave. If the note sung is the fifth of the chord, the Vocalizer creates the third in the bass, but still belonging to the same octave as the note sung. If the Vocalize Lead is active (On), the note sung is doubled. Performs the third above the note sung. If the Vocalize Lead is active (On), the note sung is doubled.
Vocalizer algorithms, the direct microphone signal is muted so as to allow the effects stand out better. You may restore it pressing F1 Direct and the VALUE +/- push buttons. Just try and listen to these algorithms: this will be better than any description we can offer in this manual. The algorithm parameters can be modified using F7 Filter and can be saved in a Vocal Set.
Vocalizer out needing to modify all the registrations. If you wish to prevent a Vocal Set stored within a registration from being called up, proceed as follows: ● ● ● ● ● On the first page of the display press F3 Utility. Select F5 Regis. Menu Call up F3 Keyb&Util Page 1/2 Using the CURSOR +/- buttons select Vocalize and press F10 Select to disable the loading of the Vocal Set stored in a Registration. Set the value to Off. Press F7 Save to store the settings.
Effects Effects The DSPs of the XD9 are capable of producing Reverb, Chorus, Delay and Modulation effects that can be applied to the Upper and Lower parts, to the accompaniment tracks and to external audio signals. The XD9 employs up to three DSPs to generate the global Reverb; and for the Upper parts, an additional three groups of Chorus, Delay and Distorsor effects that can work both in parallel and in series in Programs and in parallel for the automatic accompaniment tracks and the Lower parts.
Effects The XD9 does not only choose the algorithm to be assigned to the DSPs but it also allows its substantial modification and saving in dedicated memories. To modify an algorithm - first of all, it must be selected among Chorus, Delay and Distorsion, simply by pressing the function push button and choosing the algorithm. Without doing anything else at this stage press F10 Edit to access the menu.
Registrations Registrations This is one exiting feature of the XD9 that captures the over-all settings of the keyboard at any one time and thanks to these special memory locations, all the control panel settings and the main parameters that control the XD9 can be called up instantly. Once the Registrations have been programmed they make it easy to quickly change the Style, the Voice variations, the settings of the effects and above all the automatic call-up of the TXT files.
Registrations CALLING UP AND SAVING A REGISTER OF THE SINGLE REGISTRATION GROUP The call-up function of a Single Registration is enabled by setting to Single the F7 Registration Mode parameter in the F3 Utility menu. Then enter the number of the Single Registration/Register contained on the floppy disk or in the folder currently selected on the hard disk to call it up.
Registrations F2 Drum Mixer: This is used to disable the control of the parameters of Drum On/Off, Drum Volume, Drum Reverb, Drum Pan, Manual Drum F3 Keyb&Util 1/2: This is used to disable the control of the parameters of Octave, Portamento, Harmony, Pianist, Vocalizer, 2nd Sustain, 2nd Split, Velocity Curve, Rotor Wheel F3 Keyb&Util 2/2: This is used to disable the control of the parameters of Accordion, Modulation Assign, Modulation Rate, Tune, Vibrato, Portamento Time, Bend Parameter, Footswitch, Arabic
Utility Utility The Utility menus are used to control the physical controllers, the MIDI accordions, the pedals and a group of parameters that modify the general performance of the XD9. From the main page of the display, press F3 Utility to access the first page indicated as 1/2 at the top right part of the display. To select the other page use the PAGE +/- push buttons. The single groups of parameters, to which other menus correspond, are enabled using the relative function push buttons.
Utility F3 Pitch: This calls up a new menu dedicated to controlling the tuning. The parameters available are the following: F1 Tune: The value indicated in Hertz, that can be modified +/- 100 Cents using the VALUE +/- push buttons, establishes the fine tuning of the whole sound generator of the XD9. By pressing the two VALUE +/- push buttons together at the same time the standard tuning of 440 Hz is reset. F2 Vibrato: When Off, it disables the vibrato on the timbres that use it.
Utility The Footswitch menu also uses the F5 Escape function, to return to the initial Utility page and F10 Default to reset the original settings. Once the modification has been completed, save the settings by pressing SAVE/ENTER to save in Flash RAM using F10 Save. or to cancel the procedure use F5 Escape or to return to the default Footswitch menu, use F4 Undo.
Utility F3 Harm. Mode: SAVE/ENTER to access the list of memory locations that can be selected using the CURSOR +/- push buttons. F10 Save saves the scale in the location selected at the time and F5 Escape returns to the previous page. The thirteen Arabic scales saved can be easily called up while playing live using the optional pedal switches FS 6 and FS 13. This makes it possible to use the HARMONY push button to activate the Arab scale instead of calling up the Harmony function.
MIDI Accordions MIDI Accordions The XD9 can be managed by an Accordion connected via MIDI, thanks to the fact that the attribution of the MIDI channels to the single parts of the keyboard, the bass transposition, the velocity and also the use of the bass voices can be controlled. The controls directly depend on the MIDI implementation of the Accordion therefore, for very simple MIDI accordions some of the functions described hereafter may not be available.
MIDI Accordions SAVING THE PARAMETERS FOR THE MIDI ACCORDION Thanks to the Power On Set-up function, all the settings of the parameters described can be saved, which will be called up automatically when the XD9 is turned on. To enable this procedure, press the SAVE/ENTER push button and then select F3 Power On Set-up. Press F10 Save to save the settings in Flash RAM. Further details on Power On Set-up are given in the dedicated section.
MIDI MIDI MIDI is a communication protocol used to transmit and receive commands, messages and events that are then translated by the compatible musical instrument into notes, events and commands. This protocol is used to connect a computer with dedicated programs to the XD9, to control other sound modules or keyboards directly from the XD9 and to connect the XD9 to an Accordion, a Sax or a MIDI guitar.
MIDI using the CURSOR +/- push buttons. The effect entity can be programmed using F3 Chorus/Distorsor/Delay. F1 Volume: This modifies the volume of the whole track. The value can be changed using the VALUE +/- push buttons which, if pressed together at the same time, reset the value. F2 Reverb: This modifies the reverb of the complete part. You may vary the value using the VALUE +/- pushbuttons which, if pressed at the same time, put the value to zero.
MIDI Vocalize: track dedicated to the control of the Vocalizer Based on the choice made, Drumset, Live Drum, Voice and Vocal Set can be called up or otherwise. Whereas in the case of Voice and Drumset mode the Voice and Drumset are called up normally. For Drum 2 and Vocal Set the Live Drums and Vocal Sets must be selected using the VALUE +/- push buttons. The modification of operational mode of a track can make the song incompatible with modules in General MIDI.
MIDI THE PARAMETERS OF THE MIDI MENU F1 Channel Transmit: This is used to associate a MIDI transmitting channel on the MIDI OUT to each section. The following functions are also available: F4: this switches between the Channel Transmit page and Channel Receive page. F5 Escape: This returns to the initial page of the MIDI menu. F10 MIDI Setup: This calls up the settings already put in order and saved to use the XD9 via MIDI.
MIDI F7 Program Change Tx: For each section you can establish whether the Program Change message associated with the Voice in use is also to be transmitted to MIDI Out. The transmission function is enabled or disabled using the F10 Select push button. The 2nd/Prog section refers to the Second Voice and to the Program memory, processed as a Single Voice. The Voice sections 1, 2, 3 and 4 refer to the single Voices of a Program.
MIDI CALLING UP THE PROGRAMS, THE ONE TOUCH MEMORIES AND THE REGISTRATIONS VIA MIDI Program: Send the relative Program Change to the MIDI channel associated to the Right section. To assure good reception, before you send the Program Change, ensure that the PROGRAM push button is enabled (LED lit). One Touch: send the relative Program Change on the MIDI channel associated to the Right section.
DISK DISK The XD9 can be supplied with a Hard Disk and has a standard Disk drive for Floppy Disks of 720 Kb (DD) or 1,4 MB (HD). The XD9 uses the DOS format for the Floppy, therefore the same floppy disk can be used to exchange files from PC or Mac. The direct connection to a PC on the back of the control panel is used to directly control the contents of the Hard Disk via PC, by means of KetronFT, a free application that can be downloaded from the www.ketron.it internet pages.
DISK F2 Load: This is used to load the file found at the time in the appropriate memory if no file is selected using F10 Select. If on the other hand one or a number of files have already been selected using F10 Select, only those pointed out with the ‘>’ symbol will be loaded. Another very handy possibility for the Folder with just a few files is that of selecting the whole contents by pressing the VALUE +/- push buttons together at the same time.
DISK Once you have chosen the Folder, you can return to the Floppy Disk using the PAGE +/- push buttons for the next steps. First of all, select the files to be copied using the following buttons: ● ● ● VALUE +/- to go from one file to the next within those displayed. CURSOR +/- to go to the next group of files, if they exist. F10 Select to confirm the files to be copied, next to which an arrow appears to confirm that the selection has taken place.
DISK F7 Rename: This is used to re-name the file selected or simply identified using the keyboard keys and the CURSOR +/- push buttons. The following remain enabled: F5 Escape: This cancels the procedure. F10 Exec: This confirms the procedure.
DISK F9 Utility: This is used to control some parameters such as the Tempo and the transposition of a Midi file, the formatting of the Hard Disk, the creation of chains of Midi files and the operational control of the Hard Disk. The options possible are the following: F1 Info: This displays the capacity of the Hard Disk, the space available, the number of the Folder and files stored and the percentage of space available.
DISK Whatever the case, if you stop a Midi file using the START push button, Song Play will loose the data of the chain permanently and you will have to re-load them. The same applies to all Juke-Box controls, disabled when a chain is in use. Just the words can be displayed. F8 Chain List: This displays all the chains of Midi files already stored within the Folder in use. F9 Disk Control: This calls up a number of functions required to control the Hard Disk.
DISK F9 Utility: This calls up a page with the following options: F1 Info: This displays the free space on Floppy and the number of files stored. F2 Tempo: This is used to modify the Tempo of a Midi file stored in the Folder currently in use. Once the Midi files are displayed, select that desired using the VALUE +/- and CURSOR +/- push buttons, then press F10 Exec. A window appears where the difference in steps of 1 can be entered compared to the original Tempo using the VALUE +/- push buttons.
DISK use the VALUE +/- push buttons. Once you have found the Midi file, press the COUNT/PAUSE/RESTART push button again to start Song Play again with the new Midi file. Whatever the case, if you stop a Midi file using the START push button, Song Play will loose the data of the chain permanently and you will have to re-load them. The same applies to all Juke-Box controls, disabled when a chain is in use. Just the words can be displayed.
Technical tables
Technical Tables INDEX Specifications Preset program changes Presets GM Voices Drum Sets Live Drums (DRUMS 2) Midi Banks & Prog.
Technical Tables Specifications KEYBOARD POLYPHONY SOUND GENERATION FLASH SOUNDS USER VOICES 1 TOUCH DRAWBARS PROGRAMS 61 keys velocity sensitive. 6 Velocity curves. (XD9 only) 64 notes. 32 Multitimbral. 24 Mb PCM ROM. 290 Presets Sounds. 292 GM Voices. More than 1000 Percussive sounds. (optional board) 8 Mb Preset Voices – Disk rewritable. 110 User Voices. Editing : A,D,S,R, Cut Off, Resonance, Effects. 60 programmable 1 Touch Sounds. To Style assignment. 10 Digital Drawbar effects.
Technical Tables Preset program changes P. CH.
Technical Tables 62 63 64 65 66 67 68 69 70 71 72 73 74 75 76 77 78 79 80 81 82 83 84 85 86 87 88 89 90 91 92 93 94 95 96 97 98 99 100 101 102 103 104 105 106 107 108 109 110 111 112 113 114 115 116 117 118 119 120 121 122 123 124 125 126 127 128 Brass Synbrass 1 Synbrass 2 Altosoft Blowed Tenor Rocksax Circus Growlsax Baritone Clarinet Oberduet Flute Recorder Andes Bottle Shakuhashi Whistle Ocarina Technosynt 1 Synclead Square Maxisynth Rave Calliope Plate Sawlead Galaxy Technopad Magicpad Icerain Glockpa
Technical Tables Presets PIANO Grand Rock Grand Octapiano Honky Tonky Clavinet Dx Piano Rodes Stage Vintage Elpiano Upright Latin Piano Jingle Harpsichord Electropno Mark Piano Funkypno Mellow EP Piano&Stgs Elpno&Pad CHROM Celesta Marimba Vibraphon Glocken Xylophon Chimes Music Box Tinkle Bell Dry Vibes ORGAN Dark Jazz Gospel Slow B3 Theatre Click Organ Drawbars Rotary Church 1 Church 2 Church 3 Tone Wheel Rocker Pop Organ Rotor Rock Organ Jazzy Jazz Organ Full Leslies Rock B3 ACCORD.
Technical Tables GM Voices Synbass 3 Synbass 4 Synbass 5 Ends Melotom Syntom Fretslide Seashore Bird Telephone Helicopter Applause Gunshot BANK A (CONTROL CHANGE 00, VALUE=0) PROGRAM CHANGE 01 02 03 04 05 06 07 08 09 10 11 12 13 14 15 16 17 18 19 20 21 22 23 24 25 26 27 28 29 30 31 32 33 34 35 36 37 38 39 40 41 42 43 44 45 46 47 48 49 50 51 52 53 54 55 56 57 58 59 60 61 62 63 64 NAME Grand Rock Upright Honky Rodes Dx Piano Harpsich Clavinet Celesta Glocken Music Box Vibraphon Marimba Xilophon Bell Santur
Technical Tables BANK B (CONTROL CHANGE 00, VALUE=1) PROGRAM CHANGE 01 02 03 04 05 06 07 08 09 10 11 12 13 14 15 16 17 18 19 20 21 22 23 24 25 26 27 28 29 30 31 32 33 34 35 36 37 38 39 40 41 42 43 44 45 46 47 48 49 50 51 52 53 54 55 56 57 58 59 60 61 62 63 64 102 XD9-XD3 PROGRAM CHANGE NAME Jingle Electric House Elopiano Stage Pno Funky Pno Fm Piano 1 Fm Piano2 Toybox Chimes Mallets Long Vibes Malimba Carillon Tinkles Windchimes Rotary Jazz organ 2 Drawbars Positive Master Diatonic Jazzfisa Bandoneon Spa
Technical Tables Drum Sets PROGRAM CHANGE 1 9 10 11 12 17 25 26 28 29 30 33 41 49 57 58 59 65 66 73 121 122 123 124 NAME Standard Folk Acoustic Pop Jazz Dry Hard Rock Dance Techno Pregressive Rave Hip-Hop Fusion Brush Orchestra Contemporary Jazzman MS Drum Latin 1 Latin 2 Rock&Roll Urban Electro Country R&B Live Drums (DRUMS 2) BANK PROGRAM NAME (C.C.
Technical Tables Midi Banks & Prog.
Technical Tables Styles 8 BEAT DANCE PARTY FOLK 1 2 3 4 5 6 7 8 9 10 11 12 13 14 15 16 Pub Song Italbeat Piano Ballad Smooth Beat Slow Ballad Folksinger Urban Soft&Sweet Guit&Organ 70's Beat Laura Tune 90 Beat Shuffle Beat Slow Beat 12 Beat English Rock 17 18 19 20 21 22 23 24 25 26 27 28 29 30 31 32 33 34 35 36 Dance 80 Remix Nochemix Dance Hit Dj Samba Disco Night Latin Dance 1 Latin Dance 2 Tecno 1 Tecno 2 Toy Dance House 60 Revival Rumba Dance Disco 70 Disco Down Disco Fever New Soul Latin House
Technical Tables Midi implementation NOTE ON 9nH kk vv NOTE OFF 8nH kk vv 9nH kk 00H EnH bl bh PITCH BEND PROGRAM CHANGE CHANNEL AFTERTOUCH CONTROL 00H CONTROL 01H CONTROL 05H CONTROL 06H CONTROL 07H CONTROL 0AH CONTROL 0BH CONTROL 40H CONTROL 41H CONTROL 42H CONTROL 43H CONTROL 5BH CONTROL 5DH CONTROL 77H CONTROL 78H CONTROL 79H CONTROL 7BH CONTROL 7EH CONTROL 7FH CONTROL 54H CONTROL 55H CONTROL 1EH CONTROL 1FH CONTROL 10H CONTROL 11H RPN 0000H RPN 0001H RPN 0002H NRPN 0108H NRPN 0109H NRPN 010AH NRP
Technical Tables Vocalizer control list CONTROL 5CH NRPN 6002H NRPN 6003H NRPN 600AH BnH 5CH cc BnH 65H 60H 64H 02H 06H vv BnH 65H 60H 64H 03H 06H vv BnH 65H 60H 64H 0AH 06H vv NRPN 600BH NRPN 6104H NRPN 6105H NRPN 6106H NRPN 6304H NRPN 6305H NRPN 6306H NRPN 6307H NRPN 6308H NRPN 6309H NRPN 630AH NRPN 630BH NRPN 630CH NRPN 630DH NRPN 630EH NRPN 630FH NRPN 6403H NRPN 6405H NRPN 6406H NRPN 6407H NRPN 6414H NRPN 6415H NRPN 6416H NRPN 641AH NRPN 641BH NRPN 641CH BnH 63H 60H 62H 0BH BnH 63H 61H 62H 04H BnH 6
Technical Tables System exclusive Ketron XD9-XD3 TABS F0H 26H 7CH Code_tab Status F7H Code_tab = 00H - 7FH Tab code (see list) Status = 7FH Tab pressed Status = 00H Tab released ****** = Not Used Code_tab list: 00H Piano 01H Chrom 02H Organ 03H Accord 04H Guitar 05H Strings 06H Brass 07H Sax&Flute 08H Pad 09H Synt 0AH Ethnic 0BH Effect 0CH ****** 0DH ****** 0EH ****** 0FH ****** 10H ****** 11H ****** 12H ****** 13H ****** 14H ****** 15H ****** 16H ****** 17H ******.
Technical Tables 09H In./End.
Technical Tables CHORUS PARAMETERS F0H 26H 7BH Cho_par 00H Value F7H Cho_par: 3BH 74H 75H 76H 77H Chorus Volume "" Delay "" Feedback "" Rate "" Depth Value 0 - 7FH " 0 - 7FH " 0 - 7FH " 0 - 7FH " 0 - 7FH DELAY PARAMETERS F0H 26H 7BH Delay_par 00h Value F7H Delay_par: 2BH 2CH Delay Feed " Filter Value 0 - 7FH " 0 - 68H Delay Time: F0H 26H 7BH 29h 00H Time_Center(0-7FH) Time_Left(0-7FH) Time_right(0-7FH) F7H Delay Volume: F0H 26H 7BH 2Ah 00H Vol_Center(0-7FH) Vol_Left(0-7FH) Vol_right(0-7FH) F7H D
Technical Tables MASTER TUNE F0H 26H 7BH 0CH 00h Data1,Data2 F7H Data1 00H-0CH high nibble Data2 00H-0FH low nibble Es. Data1=06h Data2=04h no tune (64h) Es. Data1=00h Data2=00h -100% tune Es.
Technical Tables FIXED VELOCITY CURVE VALUE F0H 26H 7BH 16H 00H Value F7H Value = 01H-7FH GM PART KEY-SHIFT F0H 26H 7BH 1AH 00H GMPart Shift_value F7H GMPart = 00H-10H Shift_value = 10H-70H; No Shift=40H LEFT LEVEL F0H 26H 7BH 1CH 00H Left_level F7H Left_level 00h-7FH SONG_BALANCE F0H 26H 7BH 1DH 00H Song_balance F7H Song_balance 00h-7FH REGISTRATION BANK & NUMBER F0H 26H 7BH 1EH 00H Numc Numd F7H Numc=0-1 Numd = 0-99 Example: Numc=1 Numd=16 select regis number 116 GM FILTER F0H 26H 7BH 2FH 00H Ev
Technical Tables GENERAL MIDI VOLUME F0H 26H 7BH 38H 00H Value F7H Value 00-7FH default: 7FH GENERAL MIDI PAN F0H 26H 7BH 39H 00H Value F7H Value 00-7FH default: 40H DISK MIDI PORT F0H 26H 7BH 30H 00H Value F7H Value: 00h == Midi GM 01h == Midi keyboard Value: 00h == Unlock 7fh == Lock LOCK KEYBOARD MULTIPLE EFFECTS F0H 26H 7BH 32H 00H Value F7H PITCH SHIFT OFF F0H 26H 7BH 27H 00 Part_Off F7H MSP or WAVE NAME assignment to GM part Part 00h - 0Fh M= MSP; W = WAVE; I=INS Part_Off 00h - 0fh (0-15) F0
Technical Tables Vocalizer System exclusive list Assign Gm Part to Vocalizer: F0H 26H 7BH 33H 00H Part Value F7H Part: 00H-0FH GM Part Value: 00H = Off Assign vocalizer Mode: Only with Value=2 Midi Notes are sent to vocalist F0H 26H 7BH 34H 00H Value F7H Value: 00H Autochord mode 01H Autochord2 mode 02H Harmony mode 03H Fixed Interval mode 04H Vocal Effects mode Vocalizer Preset: F0H 26H 7BH 35H 00H Value F7H Value: AUTOCHORD Value: 0 = Trio Standard 1 = Trio Up 2 = Trio Down 3 = Trio Octa1 4 = Trio
Technical Tables Vocalizer Pitch Bend on/off F0H 26H 7BH 6DH 00H Value F7H Value: 00H Off 7fH On Value: 00H Off 7fH On Vocalizer Lead on/off F0H 26H 7BH 6EH 00H Value F7H XD9-XD3 115
XD9-XD3
Notes XD9-XD3 XD9-XD3 117
Notes 118 XD9-XD3
Notes XD9-XD3 119
Stampa: FLAMINI srl - Osimo (AN) - 5/2002 120 XD9-XD3