USE & CARE GUIDE B145 SINGLE-CUP BREWING SYSTEM BREWING EXCELLENCE ONE CUP AT A TIME ™ Please read and save these instructions. Pour des directives en français, veuillez vous reporter à la page 13.
SAFE OPERATION & USE IMPORTANT SAFEGUARDS When using electrical appliances, basic safety precautions should be followed, including the following: 1. Read all instructions before using. 13. Do not let the cord hang over the edge of the table or counter, or touch hot surfaces. 14. To disconnect, press the Power Button on the top of the Brewer to ‘OFF’ status and then remove the plug from the wall outlet. Do not touch hot surfaces. Use handles and knobs when available. 15.
CAUTION: There are two sharp needles that puncture the K-Cup® portion pack, one above the K-Cup® Holder and the other in the bottom of the K-Cup® Holder. To avoid risk of injury, do not put your fingers in the K-Cup Chamber. CAUTION: There is extremely hot water in the K-Cup® Holder during the brew process. To avoid risk of injury, do not lift the Handle or open the K-Cup® Chamber during the brew process.
SECTION 1 SET-UP & OPERATION Helpful Hints Unpacking Instructions 1. Keep your Brewer turned ‘ON’ at all times. 1. Place Brewer box on a large steady surface (such as a table or countertop) or on the floor. Open the box. To brew a fresh cup of coffee or tea anytime you want, we suggest you keep your Brewer turned ‘ON’ all the time. However, you can set the Brewer to automatically turn off two hours after your last brew.
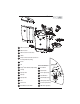
Features Model B145 Brewer A D O E G B F M H C J I K N A Water Reservoir Lid B Water Reservoir C Water Reservoir Lock Tab Slots D Handle E K-Cup® Portion Pack Holder (E and F are the K-Cup Holder Assembly) F Funnel G Lid H K-Cup® Portion Pack Assembly Housing L W Controls and Indicators P Brew Button I Housing Q Power Button J Drip Tray Plate R Power Light (Green) K Drip Tray S Auto Off Button L Drip Tray Base T Auto Off Light (Green) M Vent U Heating Light (Red
Set-Up & First Brew IMPORTANT: You cannot use your Keurig brewer until it has been primed for its first use as set forth below. Please note, a K-Cup® should not be used for the Priming Sequence. NOTE: If Brewer has been exposed to temperatures below freezing, allow Brewer at least two hours to reach room temperature before priming. A frozen or extremely cold brewer will not prime properly and can cause damage. Priming your Brewer 1. Unwrap cord and plug the brewer into a grounded outlet. 2.
Ready to Brew your First Cup K-Cup® portion pack Handle NOTE: If you do not push the flashing Brew Button in 60 seconds, the Brew Button will be disabled to prevent accidental activation. Re-activate the Brew Button by raising and lowering the Handle completely, without removing the unused K-Cup®. 9. The blue Brew Button on the LED Control Center will be on while brewing. K-Cup Chamber 1.
Adding Water The LED Control Center of your Brewer will indicate when the water level in the reservoir is low or if the Water Reservoir has been removed by illuminating the blue light next to ‘ADD WATER’. The Brewer will not allow you to brew when the blue 'ADD WATER' light is illuminated. 4. Press and hold the Drain button. Water will start to flow from the vent nozzle into the Water Reservoir. It will continue to flow for as long as the button is depressed.
SECTION 3 CLEANING & MAINTENANCE Cleaning External Parts Regular cleaning of the Brewer’s external components is recommended. 1. Never immerse the base unit in water or other liquids. The Housing and other external components may be cleaned with a soapy, damp, non-abrasive cloth. 2. The Drip Tray can accumulate up to 230 ml (8 oz) of overflow. The Drip Tray and Drip Tray Plate should be periodically inspected and rinsed clean.
NOTE: The Brewer will continue to function even when the amber 'DE-SCALE' light is illuminated. However, if you do not de-scale soon after it is displayed, continued scale build-up could damage the Brewer. If this occurs, the amber light next to 'DE-SCALE will begin to blink to alert you to the potential damage to the Brewer if you do not de-scale immediately. You should promptly de-scale using the procedures outlined below once the 'DE-SCALE' light illuminates on the LED Control Center. De-Scaling a.
SECTION 4 TROUBLESHOOTING SITUATION SOLUTION Brewer does not • Plug Brewer into an independent outlet. have power • Check to be sure that it is plugged in securely. • Plug into a different outlet. • Reset the power outlets’ circuit breaker if necessary. • Make sure that the Power Button has been turned on and the power light is illuminated. Brewer will not brew when used for the first time • The Brewer must be primed for use by filling the internal hot water tank before the first brew.
SECTION 5 WARRANTY Keurig warrants that your Keurig Model B145 Brewer will be free of defects in materials or workmanship under normal use for one year from the date of purchase. Keurig will, at its option, repair or replace the Brewer without charge upon its receipt of proof of the date of purchase. If a replacement Brewer is necessary to service this warranty, the replacement Brewer will carry the remaining warranty of the original product. Keurig will cover all shipping costs for authorized returns.
MANUEL D'UTILISATION ET D'ENTRETIEN FONCTIONNEMENT ET UTILISATION SANS DANGER RÈGLES DE SÉCURITÉ IMPORTANTES Lorsque vous utilisez des appareils électriques, vous devriez suivre les mesures de sécurité de base suivantes : 13. Ne pas laisser le cordon d’alimentation pendre d’une table ou d’un comptoir ni entrer en contact avec une surface chaude. 1. Veuillez lire toutes les instructions avant l’utilisation. 14.
ATTENTION : Le godet K-CupMC est perforé par deux aiguilles, une au-dessus du support à K-CupMC et l'autre au fond du support à K-CupMC. Pour éviter tout risque de blessure, ne pas mettre les doigts dans le compartiment de la K-Cup. SYSTÈME D'INFUSION GOURMET UNE TASSE À LA FOIS DE KEURIG® ATTENTION : L'eau se trouvant dans le support à K-CupMC durant l'infusion est extrêmement chaude.
SECTION 1 RÉGLAGES ET FONCTIONNEMENT DE LA CAFETIÈRE Conseils utiles Déballage de la cafetière 1. Laissez votre cafetière en marche en tout temps. 1. Placez la boîte de la cafetière sur une grande surface plane, comme une table ou un comptoir, ou sur le plancher. Ouvrez la boîte. 2. Retirez le Guide de démarrage et le Manuel d'utilisation et d'entretien ainsi que tout autre document. 3. Couchez l'emballage sur le côté, en plaçant le dessus de la boîte vers vous. 4.
Caractéristiques A Modèle de cafetière B145 D E O F G M B H C J I K N A Couvercle du réservoir d'eau B Réservoir d'eau C Fentes pour languettes de verrouillage du réservoir d'eau L D Poignée E Support à godet K-CupMC (E et F forment l'assemblage du support à K-Cup) F Entonnoir G Couvercle H Boîtier de l'assemblage du support à godet K-CupMC I Boîtier J Plateau à tasse K Cuvette d'égouttage L W V U S T Q Commandes et voyants P Bouton d'infusion (BREW) Q Bouton de mise
Réglages et première infusion IMPORTANT : N'utilisez par votre cafetière Keurig avant de l'avoir préparée pour une première utilisation, tel qu'indiqué ci-dessous. REMARQUE : Si la cafetière a été placée dans un endroit où la température était sous le point de congélation, laissez-lui au moins deux heures pour atteindre la température ambiante avant d'effectuer un cycle de préparation. Une cafetière gelée ou très froide ne pourra pas être préparée convenablement et risque d'être endommagée.
Infusion de votre première tasse Poignée Godet K-CupMC 9. Le bouton d'infusion (BREW) bleu de l'afficheur de messages à DEL restera allumé pendant l'infusion. Compartiment de la K-Cup 1. Le voyant vert à côté du bouton d'infusion de l'afficheur de messages à DEL sera allumé pour indiquer que la cafetière est en marche. 2. Placez une tasse sur le plateau à tasse. 3. Soulevez la poignée, et le support à K-CupMC s'ouvrira.
Ajouter de l’eau Lorsque le niveau d'eau du réservoir est bas ou lorsque le réservoir a été enlevé, le voyant bleu Ajouter de l'eau de l'afficheur de messages à DEL de votre cafetière s'allumera. Il est impossible de faire une infusion lorsque le voyant bleu Ajouter de l'eau (ADD WATER) est allumé. 4. Appuyez sur le bouton de vidange (DRAIN BREWER) et maintenez-le enfoncé. L'eau commencera à s'écouler de l'évent dans le réservoir d'eau.
SECTION 3 NETTOYAGE ET ENTRETIEN Nettoyage des pièces Il est recommandé de nettoyer régulièrement les éléments externes de la cafetière. 1. Ne plongez jamais la base de l'appareil dans l'eau ni dans un autre liquide. Le boîtier et les éléments externes de la cafetière peuvent être nettoyés à l'aide d'un chiffon non abrasif et d'eau savonneuse. 2. La cuvette d'égouttage peut recueillir jusqu'à 237 ml (8 oz) de liquide. La cuvette d'égouttage et le plateau à tasse doivent être vidés et rincés régulièrement.
VOYANT DE DÉTARTRAGE REMARQUE : La cafetière continue de fonctionner même lorsque le voyant de détartrage (DE-SCALE) orange est allumé. Cependant, si un détartrage n'est pas effectué rapidement lorsque le message s'affiche, le tartre qui continuera à s'accumuler pourrait endommager la cafetière. Dans ce cas, le voyant de détartrage (DE-SCALE) orange commencera à clignoter pour vous avertir que des dommages pourraient être causés à la cafetière si vous ne procédez pas immédiatement à un détartrage.
SECTION 4 DÉPANNAGE PROBLÈME La cafetière ne fonctionne pas SOLUTION • Branchez la cafetière séparément. • Vérifiez que la cafetière est bien branchée. • Branchez la cafetière dans une autre prise. • Réenclenchez le disjoncteur au besoin. • Assurez-vous que le bouton de mise en marche (POWER) a été actionné et que le voyant est allumé. La cafetière n’infuse • Vous devez effectuer un cycle de préparation pour remplir le réservoir interne d'eau chaude avant la première infusion.
SECTION 5 GARANTIE Autres limitations Keurig garantit que chaque cafetière Modèle B145 est exempte de tout défaut de pièces ou de fabrication, sous réserve d'une utilisation normale, pendant un an à partir de la date d'achat. Keurig réparera ou remplacera, à son choix, la cafetière défectueuse sans frais à la réception d'une preuve de la date d'achat.
Made in China Keurig, Keurig Brewed, Brewing Excellence One Cup at a Time, and K-Cup are trademarks or registered trademarks of Keurig, Incorporated. All other trademarks used herein are the property of their respective owners. Toutes les autres marques de commerce utilisées dans le présent guide sont la propriété de leur propriétaires respectifs. © 2008 Keurig, Incorporated All rights reserved. Tous droits réservés. TO CONTACT CUSTOMER SERVICE: www.keurig.