
Cov lus qhia

Demo Kit Quick-Start Guide
Introduction
Page 2 of 15
DevSuite Quick-Start Guide – Rev. 65 onsemi reserves the right to change products or specifications without notice.
© 2022 onsemi All rights reserved.
‡Products and specifications discussed herein are for evaluation and reference purposes only and are subject to change by onsemi
without notice. Products are only warranted by onsemi to meet onsemi’s production data sheet specifications.
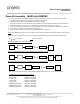
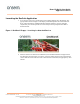
Demo Kit Contents
Before you begin setting up the camera, please verify the components included in your particular kit.
Please note that there are several types of kits.
Full Demo Kit contents
• onsemi development kit baseboard (Demo3)
• onsemi sensor headboard with lens
• USB3 cable, camera tripod
Headboard-only Demo Kit contents
• onsemi sensor headboard with lens
MARS and Adapter (sold separately) contents – Requires Demo3 baseboard (sold separately)
• onsemi MARS sensor (parallel or MIPI interface)
• onsemi MARS ISP (optional – parallel, MIPI, or Ethernet interface)
• onsemi MARS Adapter
• Demo3 Adapter; for parallel interface sensor or ISP
• Demo3-MIPI Adapter; for MIPI interface sensor or ISP
• ETH Adapter; for Ethernet interface ISP
MARS SERDES (sold separately) contents – Requires contents listed in MARS and Adapter
• onsemi Deserializer
• onsemi Serializer
• onsemi SERDES coax cable
Note on MARS and SERDES; it is best to work with your onsemi representative to ensure you have the correct
combination of Demo3, MARS Adapter, SERDES Deserializer/Serializer, and sensor or ISP/Sensor.
Note: Ensure that your Adapter interface matches the MARS or Deserializer purchased – it is printed on the
headboard.
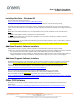
Demo Kit Assembly – Full and Headboard-only Demo Kit
1. Connect the headboard and baseboard via the 26-pin female connector located on the back of the baseboard
and the 26-pin male header on the back of the sensor headboard.
2. For a full demo kit, screw the mini-tripod into the tripod mounting block.
3. For optional auxiliary boards, refer to their User Guide.
Demo Kit Assembly – MARS Only
1. Connect the headboard and MARS Adapter via the 26-pin female connector located on the back of the
baseboard and the 26-pin male header on the back of the adapter.
2. Connect the MARS board to the Adapter via the mini-connector.
Note; if an ISP / Sensor combination, connect the ISP (no lens) to the Adapter and then the sensor to the ISP.
3. Screw the mini-tripod into the tripod mounting block of the baseboard.