OPERATING INSTRUCTIONS 6 & 12 Channel Component Distribution Amp HD View12 Model KD-DA6 & KD-CDA12 Like HD View12 also by KDS, the HD HD View 6 provides economical signal distribution from any HDTV or SDTV Component Video source (YPrPb) to component HDTV-ready monitors. It uniquely resolves current connectivity problems experienced by HDTV manufacturers and retailers, by effectively "gluing" together HDTV equipment manufactured to diverging technologies.
HD View 6 UL LISTED Model KD-DA6 OPERATING INSTRUCTIONS Safety Instructions – Please be sure to follow these instructions for safe operation of your unit ****************************************************** Read these instructions. Keep these instructions. Heed all warnings. Follow all instructions. Do not use this apparatus near water. Clean only with dry cloth. Do not block any ventilation openings. Install in accordance with the manufacturer’s instructions.
HD View12 Model KD-CDA12 OPERATING INSTRUCTIONS Introduction: Welcome to the world of Key Digital’s Personal Home Theater high resolution content distribution amplifiers. In today’s world where personal Home Theatres are elevated to new levels each and everyday in terms of Video and Audio resolution it is key to have best possible equipment handling this audio and video material in the delivery from “Source” and “Display” device.
HD View 6 Model KD-DA6 OPERATING INSTRUCTIONS Note before attempting to Hookup: The KDS-CDA12 and KD-DA6 have similar performance and installation instructions. In essence the KD-CDA12 is double KD-DA6 housed in one robust unit. The following instructions will apply to both units except when specifically noted. Product Hookup: *When unpacking the unit make sure to make all hookups before plugging in the power adapter.
HD View12 Model KD-CDA12 OPERATING INSTRUCTIONS input signal to all of the output connectors (the component video and audio output connectors are marked “output” the KD-DA6 has one bank of 6 (Marked 1 through 6) sets of output connectors. The KD-CDA12 has two banks (Marked Channel 1 and 2, each corresponding to their respective inputs) of 6 each output connectors.
HD View 6 Model KD-DA6 OPERATING INSTRUCTIONS sure to use heavy shielded good quality cable like Key Digital TechFlex heavy gauge AV cable (refer to main catalog for cable selections, or KeyDigktal interactive website: ww.key digital.com. Now that all the input(s) are done it is time to connect the outputs to the respective “Display” devices. Run each of the individual set of output connectors to their respective “Dusplay” devices.
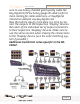
HD View12 Model KD-CDA12 OPERATING INSTRUCTIONS The KD-CDA12 can be configured in 3 separate modes: Mode1: 2 inputs each driving 6 outputs each ‡ 2X6 Mode (factory Default). Mode2: 1 input driving 12 outputs with the unused input driving the next amplifier ‡ NX12 mode. Mode 3: 1 Input driving 12 outputs ‡ 1X12 mode. Mode 1: The KD-CDA12 has two sets of inputs! This essentioally allows for independent connection of two “Source” devices and usage of the KD-CDA12 as two separate KD-DA6’s.
HD View 6 Model KD-DA6 OPERATING INSTRUCTIONS inputs is for receiving the Source or input signal; the other input is used for the “Loop-Through” signal, for passing the signal to the next amplifier in the chain of series. Either input can be used as the “Source” input or as the “Loop-Through” input (to send the signal to the next KD-CDA12 or KD-DA6.
HD View12 Model KD-CDA12 OPERATING INSTRUCTIONS _1 2 3 4 _5 _6 7 8 SW1 OFF ON ON OFF ON ON ON OFF _________________________________________________________________________________________________ _ SW2 OFF ON ON OFF ON ON OFF ON * Please refer to the illustration for NX12 Daisy Chain.* * Note: The factory default setting of the dipswitched is 2x6 mode! * Now that all the installation is done it is recommended to double check all connections before connecting the external power supply.
HD View 6 Model KD-DA6 OPERATING INSTRUCTIONS * Since the KD-DA6 and the KD-CDA12 are powered devices they will produce a minimal amount of heat, therefore it is recommended to leave enough room around the unit to dissipate this heat. * Troubleshooting: If, after properly connecting all of the devices in the system, the unit fails to properly distribute the “Source” signal, try any of the suggestions below. No power to the unit.
HD View12 Model KD-CDA12 OPERATING INSTRUCTIONS There is no signal displayed on the “Display” device. Verify the Sync or Green connector on all of your video connections; make sure it is connected to the correct input/output jack of the “Source” as well as the “Display” device.
HD View 6 Model KD-DA6 OPERATING INSTRUCTIONS compatible with the “Display” device. Make sure that the “Source” signal is of a valid format that can be displayed by the connected “Display” device; for example: if the “Display” device connected is not capable of handling HDTV compatible video signals make sure that the “Source” device is set to output SD (Standard definition or 480i) compatible signals. I have a picture but there is noise or “hum bars” visible in the image.
HD View12 Model KD-CDA12 OPERATING INSTRUCTIONS When using the Digital Audio connection “PCM” or coaxial audio, make sure that the “Display” device is capable of decoding this compressed bit stream of audio information. Most often when using the “PCM” audio function, the audio will be connected to a Dolby Digital® capable AV-Receiver or amplifier. KEY FEATURES for KD-DA6 & KD-CDA12 Enables signal distribution any HDTV or SDTV Component Video source to Component Cideo HDTV ready monitors.
HD View 6 Model KD-DA6 OPERATING INSTRUCTIONS Metal Enclosure. Cost effective. 2 years parts and labor warranty. Warranty: All Key Digital products are backed by a limit two year parts and labor warranty. For warranty information or RMA (Return Authorization instructions) please contact Michael@keydigital.com or call (718)796-7178, ext. 10.
HD View12 Model KD-CDA12 OPERATING INSTRUCTIONS 75 Ohm terminated Componenet Video. Audio: Standard “line” type high impendance two-channel, L, R. Each L or R could be used for PCM digital audio. Cable Recommendation: Each run of YprPb cable MUST be the same length (300’ max.). KD-DA characteristics: Size: 4” x 8” x 1-13/16”. Weight: 3lbs [1,4 Kg.] Power: +/- 5V DC. 110-120 VAC, 60HZ (7 watts).
HD View 6 & 12 Model KD-DA6 & KD-CDA12 OPERATING INSTRUCTIONS The unit may be oriented horizontally, or mounted vertically on a wall. Use 2 #8 or M4 screws to hang the unit (keyhole slots are provided on the base of the unit). If installing into sheet-rock or hollow walls, provide proper screw support with bolts or sheet-rock anchors. Warranty: 2 years parts and labor. Warranty: All Key Digital products are backed by a limit two year parts and labor warranty.