
Instruction Manual


10
E SK-1000 IM
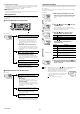
How to Switch Banks
Banks can be switched by either of the methods below.
• Front panel commands on the amplifier.
• Use the external inputs (Bank A input, Bank B input)*
* If the bank switching method is set to external input, and bank A input or bank
B input is set for the external input, banks can be switched with the external
input.
"10. External input" (page 15)
"11. Bank switching method" (page 16)
Key Lock Function
The key lock function prevents unwanted button operations during measurement.
When the key lock function is active, operations other than switching the main
screen and canceling the key lock function are disabled.
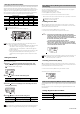
Starting the Key Lock
While pressing the [MODE] button on the main screen, press S or T button for 2
seconds or more.
After [Loc] blinks on the main display (upper level) for several seconds, the main
screen is restored.
If buttons other than display switching button on the sub display (lower level) are
operated in the key-locked state, [Loc] is displayed on the main display (upper
level) and setting change operation is ignored.
Canceling the Key Lock (Unlock)
While pressing the [MODE] button, press S or T button for 2 seconds or more.
After [
unL] blinks on the sub display (lower level) for several seconds, the main
screen is restored.
HOLD
HI
V
kV
ALARM
BANK
ZERO SHIFT
TIMING
TEMP %RH
HI LO R.V.
0
1
2
3
LO
GO
Lock set
HOLD
HI
V
kV
ALARM
BANK
ZERO SHIFT
TIMING
TEMP %RH
HI LO R.V.
0
1
2
3
LO
GO
Lock canceled
4. Setting Various Functions
This chapter describes the various functions of the SK Series.
Basic Settings and Advanced Settings
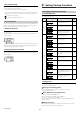
List of Setting Items
The following items can be set.
Setting Screen
This section describes operations and the setting screen to modify the basic
settings and the detailed setting.
How to go to the setting screen
Press the [MODE] button for approx. 2 seconds on the main screen.
The setting screen appears.
Basic operations on the setting screen
Changing the setting value: S / T button
Go to the next setting item: [MODE] button or X button
Return to the previous setting item: W button
Skip the rest of the settings and finish: Press and hold the [MODE] button for
approx. 2 seconds.
Setting screen view
The setting item is displayed on the main display (upper level) and the setting
value is displayed on the sub display (lower level).
Type Setting item Description
Reference
page
Basic
settings
1.Measurement range
Set the measurement range. 11
2.Averaging rate
Set the number of samples to average. 11
3.Output state
Select the output state (N.O./N.C.) of the
judgment output to turn ON/OFF
according to the judgment value.
11
Advanced
settings
4.Distance setting
Set the distance correction. 11
5. Area scaling
Set the area scaling. 12
6. Hold function
Set the method to use in holding the
judgment value (P.V.)
12
7.Timing input
Set the timing input type used for the
hold function.
14
8.Hysteresis
Set the hysteresis value for the tolerance
setting value.
14
9.Analog output scaling
Set the analog output scaling for the
judgment value (P.V.).
14
10.External input
Select the functions of the four external
inputs.
15
11.Bank switching method
Set the bank switching method. 16
12.Zero shift value memory
function
Set whether to store in the nonvolatile
memory (EEPROM) the state of the
display as shifted by the zero shift
function.
16
13. Display digit
Set the number of displayed digits of the
judgment value (P.V.) and the internal
measurement value (R.V.).
16
1. rnG
2. AvE
3. out
4. dst
5. HLd
6. HLd
7. tiM
8. HYS
9. AnG
10. in
11. bnK
12. SFt
13. dSP