Owner’s Manual 215-00121 10/06 Rev A KF-OB Olympic Bench
Table Of Contents Before You Start 3 Important Safety Information 4 Assembly 5-10 Parts List 11 Exploded View 12 Warranty Information 13
Before You Start THANK YOU for making this unit a part of your exercise program. Keys Fitness assures the very best in value, appearance, durability and biomechanics. This manual will guide you through the assembly process. If at any time you are having trouble with the assembly or use of this product, then please contact us at our Keys Fitness Help line. We have trained service technicians on site to take care of you, our valued customer.
Important Safety Information Prior to assembly, remove components from the box and verify that all the listed parts were supplied. NOTE: Hand tighten bolts and nylon nuts until machine is fully assembled. Read all precautions and instructions in this manual before using this equipment. WARNING! efore using this unit or starting any exercise program, consult your B physician. This is especially important for persons over the age of 35 and/or persons with pre-existing health problems.
Assembly
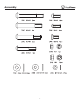
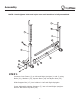
Assembly NOTE: Hand tighten bolts and nylon nuts until machine is fully assembled. STEP 1 Connect Cross Frame (3) to Left and Right Uprights (1 and 2) using Bolts (31), Washers (37), Square Plate (18) and Nylon Nuts (35). Slide Support Bar (17) into holders in Left and Right Uprights. Insert Adjustable Weight Supports (7) into Left and Right Uprights. Secure with Short Pop Pins (16).
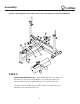
Assembly NOTE: Hand tighten bolts and nylon nuts until machine is fully assembled. STEP 2 Connect Main Frame (4) to Cross Frame (3) using Bolts (31), Washers (37) and Nylon Nuts (35). Connect Guide Frame (5) to top of Main Frame (4) using Bolt (30), Washers (37) and Nylon Nut (35).
Assembly NOTE: Hand tighten bolts and nylon nuts until machine is fully assembled. A A STEP 3 CARRIAGE ASSEMBLY (A): Slide Adjustable Pin (11) down into Carriage (8) and secure with Washer (37) and Nylon Nut (35). Connect Spring (27) to Adjustable Pin (11) and Carriage (8). Connect Decline Handle (6) to Guide Frame (5) using Bolt (32), Washers (38) and Nylon Nut (36).
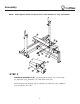
Assembly NOTE: Hand tighten bolts and nylon nuts until machine is fully assembled. B B STEP 4 CARRIAGE ASSEMBLY (B): Connect Seat Support (10) to Carriage (8) with Bolt (29), Washers (37) and Nylon Nut (35). Connect Back Pad Support (9) to Carriage (8) with Bolt (29), Washers (37) and Nylon Nut (35).
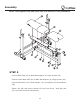
Assembly NOTE: Hand tighten bolts and nylon nuts until machine is fully assembled. STEP 5 Connect Back Pad (12) to Back Pad Support (9) using Screws (34). Connect Lower Back Pad (44) to Back Pad Support (9) using Screws (34). Connect Seat Pad (13) to Seat Support (10) using Bolts (33) and Washers (38). Insert L Pin (28) and screw in Knob (15) into front of unit - both (28) and (15) are used to secure attachments.
Parts List KF-OB Parts list Rev A Ref # Part # description Qty 1 223-00967 UPRIGHT, RIGHT KF-OB 1 2 223-00968 UPRIGHT, LEFT KF-OB 1 3 223-00970 CROSS FRAME, KF-OB 1 4 223-00969 MAIN FRAME, KF-OB 1 5 223-00971 GUIDE FRAME, KF-OB 1 6 219-00492 DECLINE HANDLE, KF-OB 1 7 223-00972 ADJUSTABLE WEIGHT SUPPORT, KF-OB 2 8 223-00973 CARRIAGE, KF-OB 1 9 223-00974 SUPPORT, BACK PAD KF-OB 1 10 223-00974 SUPPORT, BACK PAD KF-OB 1 11 210-00015 ADJ PIN FOR SEAT 1 12 228-0022
Exploded View 12
Warranty Information KEYS FITNESS PRODUCTS, L.P. LIFETIME WARRANTY This Warranty applies in the United States and Canada to products manufactured or distributed by Keys Fitness Products, LP (“Keys”) under the KEYS brand name. The warranty is non-transferable and valid only to the original purchaser.
Keys Fitness Products, L.P.