
User manual
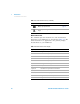
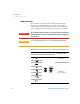
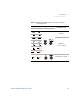
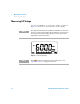
Table Of Contents
- Agilent U1231A, U1232A, and U1233A Handheld Digital Multimeter
- Table of Contents
- List of Figures
- List of Tables
- 1 Introduction
- 2 Making Measurements
- 3 Multimeter Features
- 4 Multimeter Setup Options
- Using the Setup Menu
- Setup Menu Summary
- Setup Menu Items
- Changing the variation count
- Enabling and changing the Smooth refresh rate
- Enabling and changing the voltage alert level
- Changing the beep frequency
- Changing the auto power-off (APO) timeout
- Changing the LCD backlight timeout
- Adjusting the LCD backlight intensity
- Enabling the LED flashlight timeout
- Adjusting the LED flashlight intensity
- Changing the minimum measurable frequency
- Changing the continuity test alerts
- Changing the power-on greeting tone
- Resetting the Setup items
- Changing the scale conversion value
- Enable the AC/DC mV measurement
- Enable open continuity test by default
- Changing the temperature unit
- 5 Characteristics and Specifications

2 Making Measurements
Measuring AC Voltage
32 U1231A/U1232A/U1233A User’s Guide
Measuring AC Voltage
Set up your multimeter to measure AC voltage as shown in
Figure 2- 2. Probe the test points and read the display.
Figure 2-1 AC voltage display
NOTE
AC voltage measurements measured with this multimeter are returned as
true rms (root mean square) readings. These readings are accurate for sine
waves and other waveforms (with no DC offset) such as square waves,
triangle waves, and staircase waves.
NOTE
Press to measure the frequency of the AC voltage source. See
“Measuring Frequency” on page 61 to learn more.
S
h
i
f
t
E
s
c