
User manual


Calibration 2
U2300A Series DAQ Service Guide 33
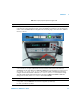
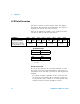
Tabl e 2- 3 Step-by-step descriptions for Figure 2-10
Step Descriptions
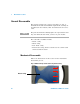
Step 1 Before power on the DAQ device, open the DAQ device’s metal casing. Refer to “Dismantle Procedures” for
more information to disassemble the unit. Then, power on the DAQ device and warm it up for approximately 30
minutes. Connect the DMM to U37 on the daughter board. The following images shows the location of U37 and
the way to connect it.
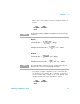
Step 2 Ensure that the DAQ device’s driver is installed in the computer before connecting it to the computer. The driver
can be obtained from the Agilent USB Modular Instrument U2300A & U2700A Series Product Reference
CD-ROM. Measure the voltage difference at U37 with the DMM. If the measured voltage is more than 5 V, send
the command “
CAL:VREF:TUNE MINUS” to decrease the voltage, otherwise if the measured
voltage is less than 5 V, send the command “CAL:VREF:TUNE PLUS” to increase the voltage.
Tune the voltage until the measured voltage is in the range of 4.9999 V and 5.0001 V. When the
tuning process is done, send “CAL:VREF” to save it in the EPROM.
Step 3 Power cycle the DAQ device by turning on and off the DAQ device.
Step 4 Measure the voltage at U37 again to ensure the measured voltage is in the range of 4.9999V to 5.0001 V. If there
is any problem occurs, the DMM will not measure the voltage in the specified range.
Proceed to self calibration procedure.
U37