USB Wireless LAN CARD User Manual
Content 1. Product Introduction………………………………………………………………………………..2 2. USB Wireless LAN CARD Installation ……………………………………………………………4 3. Software Installation………………………………………………………………………………...6 4. Appendix………..…………………………………………………………………………………..
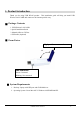
1. Product Introduction Thank you for using USB WLAN product. This installation guide will help you install USB Wireless LAN CARD and connect to the Internet quick & easy. ■ Package Contents 1. USB Wireless LAN CARD 2. Quick Installation Guide 3. Manual & Driver CD Disc 4. USB cable (Optional) ■ Form Factor High performance antenna 90° LED Indicator: Green: Connected Blinking: Not connected ■ System Requirements 1. Desktop/ Laptop with USB port and CD-ROM driver 2.
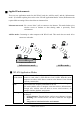
■ Applied Environments There are two application modes for this WLAN card, the “Ad-Hoc mode” and the “Infrastructure mode”. (For further explain, please refer to the “WLAN Application Modes” below) Different modes require different settings. Please check the environment first. Infrastructure mode: Via “Access Point” (AP) to connect to the Internet. This mode further gives wireless access to Internet or data sharing under a previously wired environment.
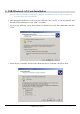
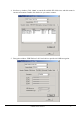
2. USB Wireless LAN Card Installation Note: The screens showed below are from Windows 2000. For other Windows system, the steps are the same, but the screens shown will be a little different. 1. After plugging USB Wireless LAN Card, the USB stick, into your PC, it will automatically find and alert a New USB Device. Click “Next” to continue. 2. You’ll see the following screen. Please choose the default item (with “Recommended”) and click “Next”. 3.
3. Your PC will recognize the device of “USB Wireless LAN Card”, and click “Next” to install driver. 4. Finally, click the “Finish” to leave this dialogue window. 5. After installation, please check whether the installation is success. Start→Setting→Control Panel Double click “System”→click “Hardware”→Device manager→Network Adapters. If the install is success, it should include “USB Wireless Lan CARD” item.
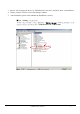
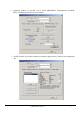
3. Software Installation 1. Insert the “Manual & Driver CD-ROM” into the CD-ROM driver of your PC, and you’ll see the software installation window as shown below. 2. Click “Setup Driver & Utility”, and choose the “default” item through the installation process. 3. After successful installation, you’ll see the new icon appear in the Icon Tray. 4. The software will automatically search for available APs for connecting to the Internet. 5. If the installation fell, the Icon appeared is in red color.
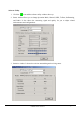
Software Utility 1. Click the icon and the software utility window shows up. 2. Status window allows you to change Operation Mode, Channel, SSID, Tx Rate, Int Roaming, and Radio. It also shows the connecting signal and quality for you to adjust related infrastructures and configurations. 3. Statistics window: It shows the real time transmitting and receiving status.
4. Site Survey window: Click “Scan” to search all available WLAN devices and their status in current environment. Double click the device you want to connect. 5. Encryption window: USB Wireless LAN Card is able to provide 64/128Bit encryption.
6. Advanced window: It provides you to adjust PREAMBLE, Fragmentation Threshold, RTS/CTS Threshold, and Power Save function. 7. Profiles window: It provides customers to change settings and save them in the configuration file.
8. Info window: It shows the latest software version and MAC address.
Appendix 1. Operation Mode: USB Wireless Lan Card has two modes, ‘Infrastructure’ and ‘Ad-Hoc’. The default setting is “Infrastructure”. (Please refer to the Product Introduction) 2. Channel: The channel setting should follow the regulation of the local government. For ‘Infrastructure’ mode, the channel does not need to be set. It will automatically change to the same channel as AP’s. In ‘Ad-Hoc’ mode, users can change the channel to match the connected computer. 3.
8. 9. is ‘auto’. PREAMBLE: This function determines the PREAMBLE TYPE that physical layer’s PLCP will use. There are three modes to choose: LONG, SHORT, and AUTO. The default setting is AUTO, and the system will automatically choose the optimized mode. Tx Power Level (mW): Does not open to change. 10. Fragmentation Threshold: This configuration determines whether needs to fragment the Frame during transmit.