
Installation Guide

Quick Installation Guide
1. Check Installaton Kit
2. Check your window length and type.
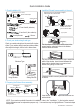
4. Install the Exhaust hose assembly to the unit .
5.
6.
7.
8.
3. Preparing the Exhaust Hose assembly
Unit Adaptor (square or round)
Exhaust hose
Bolt
Window Slider Adaptor
Window Slider A Window Slider B
or
Check your window length and choose the fit window
slider. If your window length need two window sliders,
after adjust the length, use the bolt to fasten them.
Hung Window Sliding Window
Windows Type
2 Foam Seals A (Adhesive)
2 Foam Seals B (Adhesive)
Security Bracket
2 Screws
Foam Seal C (Non-adhesive)
Window slider A Window slider B
Bolt
Window slider A
Window slider A
Unit adaptor
( square or round)
Window slider
adaptor
Exhaust hose
Press into
or or
Press into
Exhaust hose
assembly
Type round Type square
or
Make sure the hook of the adaptor is aligned
with the hole seat of the air outlet.
Hook
Hole Seat
Lower groove
adaptor
Type round
Type square
Make sure the adaptor is
inserted into the lower
groove of the air outlet.
Cut the adhesive foam seal A and B strips to the
proper lengths, and attach them to the window
sash and frame as shown.
Foam seal B
(Adhesive type-shorter)
Foam seal A
(Adhesive type)
Cut the non-adhesive foam seal C strip to match the
width of the window. Insert the seal between the
glass and the window frame to prevent air and
insects from getting into the room.
If desired, install the security bracket with 2 screws
as shown.
Insert the window slider adaptor into the hole of the
window slider.
CP023I-MFBAZDY 16120600000289
NOTE: If you need more detail information for installation, refer to the " Installation " in the instruction manual.
All the illustrations are for explanation purpose only. Your machine may be slightly different. The actual shape
shall prevail.
Foam seal C
(Non-adhesive type)
2 Screws
Security Bracket