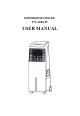
EVAPORATIVE COOLER 972-1004-W USER MANUAL
Thanks for your support and choice of our unique tower fan, in order to help you use the product more conveniently, please read this manual book before using the product. Wish our product can bring comfort and pleasure in your daily life. Contents I. SAFETY……………………………………...……3 II. DESCRIPTION OF THE COOLER………………………6 III. CONTROL PANEL & DISPL AY WINDOW…………….7 IV. WATER FILLING INSTRUCTIONS……………………...9 V. TECHNICAL PARACHNICAL…………………….…….10 VI. WARRANTY…………………..……………………….
I. SAFETY Read all instructions carefully before setting up and operating the cooler. Please keep this instruction manual for future reference. This manual is designed to provide you with important information needed to setup, operate, maintain, and troubleshoot your cooler. Failure to follow these instructions may damage and/or impair its operation and void the warranty. NOTE: Air Cooler can be used right out of the box, with no assembly.
12. DO NOT leave the operating appliance unattended for any extended period of time. 13. DO NOT let children play with this appliance, packaging or plastic bags. 14. If the unit is damaged or if it malfunctions do not continue its use. Refer to the Troubles hooting Guide or contact us at 877.891-7333. Place the unit on a level floor. 15. Never locate the product where it may fall into a bathtub or other water container. Store in a dry area when not in use. 16.
27. It is recommended to change the water in the water tank every 24 hours. 28. It is also recommended to empty the tank and wipe it thoroughly with sanitizing wipes on a regular basis. 29. After water is filled, do not tilt or attempt to move the air cooler in order to prevent water splashing. 30. This appliance has a polarized plug (one blade is wider than the other). To reduce the risk of electric shock, this plug is intended to fit in a polarized outlet only one way.
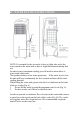
II. DESCRIPTION OF THE COOLER 1. 2. 3. 4. 5. 6. 7. 8. Operation Panel Display Window Air outlet Water Filling Box Water level display window Rear Wheels Front Locking Casters Remote control storage area 9. Handle 10. Power Cord Winding Frame 11. Power Cord 12. Air Filter Screen 13. Automatic Filling Nozzle 14. Water Tank 15. Water Plug NOTE: Press the “Cooler / Air Washer” button to start the evaporative cooling.
III. CONTROL PANEL & DISPL AY WINDOW GENERAL USE 1. When unit is initially plugged in, there will be two beeps after which the cooler enters a stand-by mode. However, the cooler will not be powered on, so none of the buttons on the control panel will function except for the “ON/ Speed” button. 2. Press the “On / Speed” button to power the unit on. 3. The cooler will at first function at medium speed, but will change to low speed automatically after 3 seconds.
4. Press the “Cooler / Air Washer” button to turn the water cooling function on or off. This will turn the water pump on to run water over the air washing media. NOTE: This is the evaporative cooling feature. This function also acts as a humidifier. 5. Press the “Swing” button to turn on and off vent oscillation. 6. “Timer” button – Press this button to set the timer in half hour increments up to 7.5 hours. The “timer” display will change accordingly. 7.
IV. WATER FILLING INSTRUCTIONS NOTE: It is normal for the air cooler to have a slight odor or for the water stored in the water tank to have a slight discoloration during first use. In order to enjoy maximum cooling you will need to ensure there is water in the water tank. This product features a low water protection. If the water level is low, the unit will beep continuously for five seconds and turn off the water cooling function.
Using the remote control: 1. 2. 3. Open the battery cover of the remote control, and insert two1.5VAAAbatteries. Please point to the receiver when using the remote control. If the battery voltage is low, please open the battery cover as shown in the figure and replace with new batteries. Please note the positive pole and the negative pole of the battery. Replace battery cover. V.
One-Year Limited Warranty For a period of one year from the original purchase date, the manufacturer will either repair or replace defective components in accordance with this Limited Warranty. This warranty is between manufacturer and the original purchaser and is valid only when accompanied by the original purchaser’s sales receipt showing original date of purchase and location of purchase. Replacements under this warranty revert back to the date of original purchase for future warranty.