
Manual


ENGLISH
Chapter 2: Installaon
24
DVR User’s Manual
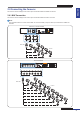
2.8 Connecng to Network
For remote monitoring, connect the DVR to the internet via wired network connecon.
VIDEO
INPUT
LAN
RS-485VGA
12V
CAUTION
RISK OF ELECTRIC SHOCK
DO NOT OPEN
HDMI
5
6
7
8
1
2
AUDIO
OUTPUT
1
2
3
4
VIDEO
INPUT
AUDIO
INPUT
VIDEO
OUTPUT
RS-485 ALARM
SENSOR
G1234G5678
CAUTION
RISK OF ELECTRIC SHOCK
DO NOT OPEN
HDMI
5
6
7
8
1
2
AUDIO
OUTPUT
1
2
3
4
13
14
15
16
9
10
11
12
VIDEO INPUT
3
4
AUDIO
INPUT
VIDEO OUTPUT
LAN
VGA
IR-EXT
12V
LAN
Internet
RJ-45 cable
Notebook/PC
Tablet PC
Mobile Phones
16-Channel DVR
4-Channel / 8-Channel DVR
1 Plug one end of the RJ-45 cable to the LAN port on the back of the DVR.
2 Plug the other end directly into a LAN port on a router or network switch.
Aer connecng, congure your DVR for network communicaon. See “4.4 Seng the Network” on page 53 for
further details.
2.9 Connecng to Other Devices
You can connect other devices such as a mouse and a USB storage drive to the DVR. Connect them to the USB port on
the back or the front of the DVR.
VIDEO
INPUT
LAN
RS-485VGA
12V
CAUTION
RISK OF ELECTRIC SHOCK
DO NOT OPEN
HDMI
5
6
7
8
1
2
AUDIO
OUTPUT
1
2
3
4
VIDEO
INPUT
AUDIO
INPUT
VIDEO
OUTPUT
RS-485 ALARM
SENSOR
G1234G5678
CAUTION
RISK OF ELECTRIC SHOCK
DO NOT OPEN
HDMI
5
6
7
8
1
2
AUDIO
OUTPUT
1
2
3
4
13
14
15
16
9
10
11
12
VIDEO INPUT
3
4
AUDIO
INPUT
VIDEO OUTPUT
LAN
VGA
IR-EXT
12V
4-Channel / 8-Channel DVR
16-Channel DVR