
User Manual
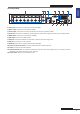
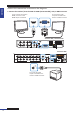
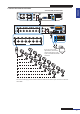

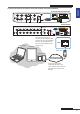
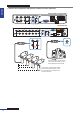
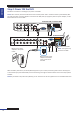
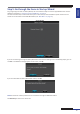
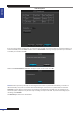
Table Of Contents
- About this Manual
- Quick Setup Guide
- Understanding the Live Viewing Screen
- Basic DVR Operation
- Accessibility Features
- Operating the DVR
- Main Menu
- Display: Live
- Display: Output
- Display: Privacy Zone
- Record: REC Para
- Record: Schedule
- Record: Record Setup
- Search: Record Search
- Search: Event Search
- Search: Log
- Network: Network
- Network: Remote Stream
- Network: Email
- Network: DDNS
- Alarm: Motion
- Device: HDD
- Device: PTZ
- Device: Cloud Storage
- System: General
- System: Users
- System: Info
- Advanced: Maintain
- Remote Access Via Web Client
- Appendix

ENGLISH
Easy Link PRO Series: Quick Setup Guide
18
DVR User’s Manual
Step 4: Power ON the DVR
Follow the instrucons on the diagram, to power on the DVR.
NOTE: The 4-channel / 8-channel DVR do not have a classical power switch. The device starts up automacally aer
you apply the power via power adapter. As to 16-channel DVR, aer you apply the power via power adapter, use the
Power switch to turn on the DVR.
RS-485 ALARM
SENSOR
G 1234G5678
HDMI
5
6
7
8
1
2
AUDIO
OUTPUT
1
2
3
4
13
14
15
16
9
10
11
12
VIDEO INPUT
3
4
AUDIO
INPUT
VIDEO OUTPUT
LAN
VGA
IR-EXT
12V
VIDEO
INPUT
LAN
RS-485VGA
12V
CAUTION
RISK OF ELECTRIC SHOCK
DO NOT OPEN
HDMI
5
6
7
8
1
2
AUDIO
OUTPUT
1
2
3
4
VIDEO
INPUT
AUDIO
INPUT
VIDEO
OUTPUT
12V
B) Plug in the power
adapter to the power
outlet.
A) Connect the power
adapter to the Power
input on the rear of
the DVR.
4-Channel DVR / 8-Channel DVR
16-Channel DVR
C) Switch on the DVR.
NOTE: This applies only
to 16-channel DVR.
Aer the DVR is powered on, the Startup Wizard appears on your monitor/TV screen (please see the next step). If it
is the rst me you power ON the DVR, we recommend to go through the wizard and ll in the various setup opons
available.
NOTE: If you decide to skip the Startup Wizard, you can sll access all the setup opons later via the DVR’s OSD menu.