
User Manual
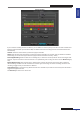
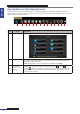
Table Of Contents
- About this Manual
- Quick Setup Guide
- Understanding the Live Viewing Screen
- Basic DVR Operation
- Accessibility Features
- Operating the DVR
- Main Menu
- Display: Live
- Display: Output
- Display: Privacy Zone
- Record: REC Para
- Record: Schedule
- Record: Record Setup
- Search: Record Search
- Search: Event Search
- Search: Log
- Network: Network
- Network: Remote Stream
- Network: Email
- Network: DDNS
- Alarm: Motion
- Device: HDD
- Device: PTZ
- Device: Cloud Storage
- System: General
- System: Users
- System: Info
- Advanced: Maintain
- Remote Access Via Web Client
- Appendix

ENGLISH
Easy Link PRO Series: Quick Setup Guide
DVR User’s Manual
21
Record Schedule
If you know the recording schedule in advance, you can dene it in this step but you can do it also later via OSD menu.
Please be noted that aer you format the HDD, the default connuous recording from the connected cameras start
automacally.
Channel: Select the channel where you want to apply the schedule.
Week: Select the day of the week where you want to apply the schedule. For example, aer you dene the schedule
for Monday, you can use the Copy funcon to apply the same schedule for Tuesday ~ Friday.
Normal (N) Recording: When the me slot is marked green, it means the channel performs normal recording for that
me slot. If you do not want to record all 24 hours in a specied day, click on the green slot to mark it No Record (gray
slot).
Moon (M) Recording: When the me slot is marked yellow, it means the channel records only when a moon is
detected during that me slot. We recommend to use this type of recording. The moon recording means that the
recording is triggered only if a movement is detected.
Alarm Recording (for 16 channel only): When the me slot is marked red, the channel records only when the alarm is
triggered during that me slot.
Click Next Step to move to the next screen.