
User Manual


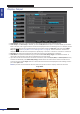

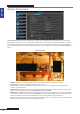


Table Of Contents
- About this Manual
- Quick Setup Guide
- Understanding the Live Viewing Screen
- Basic DVR Operation
- Accessibility Features
- Operating the DVR
- Main Menu
- Display: Live
- Display: Output
- Display: Privacy Zone
- Record: REC Para
- Record: Schedule
- Record: Record Setup
- Search: Record Search
- Search: Event Search
- Search: Log
- Network: Network
- Network: Remote Stream
- Network: Email
- Network: DDNS
- Alarm: Motion
- Device: HDD
- Device: PTZ
- Device: Cloud Storage
- System: General
- System: Users
- System: Info
- Advanced: Maintain
- Remote Access Via Web Client
- Appendix
ENGLISH
Easy Link PRO Series: Operang the DVR
60
DVR User’s Manual
Record: Schedule
Normal recording / moon triggered recording only takes place according to the set schedule. If it is not set correctly,
the consequences may be lead to losing important video coverage. Aer you set the schedule, please make sure you
enable recording for the channel in REC Para menu. See “Record: REC Para” on page 59.
The recording schedule lets you to set up a schedule daily and hourly by normal (connuous) recording and moon
recording.
Slot for Normal
recording
Slot for Moon
recording
4-Channel/8-Channel Schedule
Slot for Alarm
recording
16-Channel Schedule
By default, the record mode for all connected channels is set to Normal. It means the DVR will connuously record 24
hours a day to ensure that you will not miss any important happenings. However, the disadvantage is that the HDD
space will become full very fast.
• Channel: Select the channel where you want to apply the schedule.
• Week: Select the day of the week where you want to apply the schedule. For example, aer you dene the
schedule for Monday, you can use the Copy funcon to apply the same schedule for Tuesday ~ Friday.
• Normal (N) Recording: When the me slot is marked green, it means the channel performs normal recording for
that me slot. If you do not want to record all 24 hours in a specied day, click on the green slot to mark it No
Record (gray slot).