
User Manual
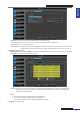
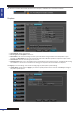
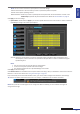
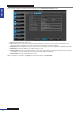

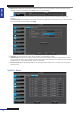
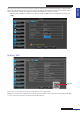

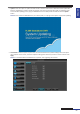

Table Of Contents
- About this Manual
- Quick Setup Guide
- Understanding the Live Viewing Screen
- Basic DVR Operation
- Accessibility Features
- Operating the DVR
- Main Menu
- Display: Live
- Display: Output
- Display: Privacy Zone
- Record: REC Para
- Record: Schedule
- Record: Record Setup
- Search: Record Search
- Search: Event Search
- Search: Log
- Network: Network
- Network: Remote Stream
- Network: Email
- Network: DDNS
- Alarm: Motion
- Device: HDD
- Device: PTZ
- Device: Cloud Storage
- System: General
- System: Users
- System: Info
- Advanced: Maintain
- Remote Access Via Web Client
- Appendix

ENGLISH
Easy Link PRO Series: Operang the DVR
DVR User’s Manual
83
NOTE: You can set four channels to upload photos to the cloud storage.
Channel: Select the four channels where you want to upload the photos to Dropbox.
Interval: Set the photo uploading interval.
Moon Detecon: Enable if you want to upload photos to Dropbox when the camera detects a moon. Click
Moon Setup if you have not yet set the moon area. Please see “Alarm: Moon” on page 76.
Click Apply to save the sengs.
• Upload Video: Enable and click Apply if you want to upload videos from the cameras when a moon is detected.
Click Setup to congure the video upload opons.
Channel: Select the channel where you want to upload the videos to Dropbox. When the day/me slot is
marked yellow, it means the videos are uploaded to Dropbox when a moon is detected during the
specied day/hour.
NOTE:
• You can only choose one channel where to upload videos.
• In one hour the system uploads maximum 3 footages.
• The maximum duraon of each uploaded footage is 10 seconds.
Click Apply to save the sengs.
Click Acvate Cloud to let the DVR to link to Dropbox. When the linking is done, an acvaon e-mail will be sent to the
Receiver’s e-mail account. Please see “Using Cloud Storage” on page 43.
If you successfully receive the cloud acvaon e-mail, you do not need to congure the advanced e-mail sengs.
TIP: See the connecon status below the screen. For example, a nocaon of a successful connecon:
NOTE: Every me the cloud storage account is changed or HDD is formaed, you must acvate cloud again to
recognize the changes.