
User Manual
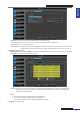
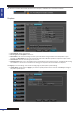
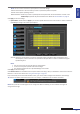
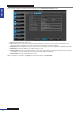

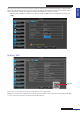


Table Of Contents
- About this Manual
- Quick Setup Guide
- Understanding the Live Viewing Screen
- Basic DVR Operation
- Accessibility Features
- Operating the DVR
- Main Menu
- Display: Live
- Display: Output
- Display: Privacy Zone
- Record: REC Para
- Record: Schedule
- Record: Record Setup
- Search: Record Search
- Search: Event Search
- Search: Log
- Network: Network
- Network: Remote Stream
- Network: Email
- Network: DDNS
- Alarm: Motion
- Device: HDD
- Device: PTZ
- Device: Cloud Storage
- System: General
- System: Users
- System: Info
- Advanced: Maintain
- Remote Access Via Web Client
- Appendix

ENGLISH
Easy Link PRO Series: Operang the DVR
DVR User’s Manual
85
System: General
• Date/Time: You can set the date and me manually or allow the DVR to update automacally, using the NTP
(Network Time Protocol). If you decide to modify manually then click on the date/me box and via on-screen
keyboard enter the current date and me.
• Date Format: Dene the format of the date. For example, if you keep the default MM/DD/YY and today’s date is
November 19th, 2013, the date appears on the footages as 11/19/2013.
• Time Format: Dene the format of the me. For example, if you keep the default 24Hour and the current me is
5:29:54 PM, the me appears on the footages as 17:29:54.
• DST: Stands for Daylight Savings Time. Make sure if in your country the DST is observer or not.
Typically the clocks are adjusted forward one hour near the start of spring and are adjusted backward in autumn.
Although NTP (Network Time Protocol) allows you to synchronize the DVR with a remote me server over
Internet, please be noted that some of the NTP servers are not fully compable with DST. To congure the DST
manually, click Setup and ll in the requested data.
When you have nished with the sengs, click Apply.