
User Manual
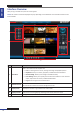
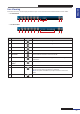
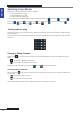
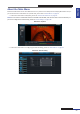
Table Of Contents
- About this Manual
- Quick Setup Guide
- Understanding the Live Viewing Screen
- Basic DVR Operation
- Accessibility Features
- Operating the DVR
- Main Menu
- Display: Live
- Display: Output
- Display: Privacy Zone
- Record: REC Para
- Record: Schedule
- Record: Record Setup
- Search: Record Search
- Search: Event Search
- Search: Log
- Network: Network
- Network: Remote Stream
- Network: Email
- Network: DDNS
- Alarm: Motion
- Device: HDD
- Device: PTZ
- Device: Cloud Storage
- System: General
- System: Users
- System: Info
- Advanced: Maintain
- Remote Access Via Web Client
- Appendix

ENGLISH
Easy Link PRO Series: Remote Access Via Web Client
DVR User’s Manual
95
Live Viewing
From the Live screen, use the Display Controls to open or close the channels and switch between screen modes.
• 8-channel DVR
1 2 3
4 5 6
10
8
7
9
• 16-channel DVR
1 2 3
4 5 6
10
8
7
9
No. Buon Descripon
1
Open All Channels
Click to open all channels for viewing.
2
Close All Channels
Click to close all channels for viewing.
3
Previous
Click to view the previous channels.
4
Next
Click to view the next channels.
5
Full Screen
Click to view the channels in full screen mode.
6
Stretch
Click to stretch the screen. Click it again to return to the original
proporons.
7
Display / Hide Screen
Modes
Click to display or hide the screen mode icons.
8 Screen Mode Icons Click a screen mode icon to switch the screen display.
9
PTZ Control
Click to set the video size. A menu opens.
You can choose Original proporon or stretched.
NOTE: This opon is available if you open a channel in full screen
mode.
10
Audio
Turn o or turn on the audio.