
Owner's manual

ENGLISH
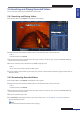
Chapter 5: KGuard Web Client
DVR User’s Manual
75
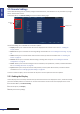
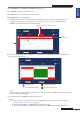
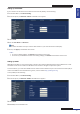
3 On Record Mode, select Schedule. The Schedule buon appears.
4 Click Schedule to display the Schedule screen.
5 On Channel, select the channel that you want to record.
6 On Record Type, click a recording type:
• Alarm: To record the video only when the alarm is triggered within the specied me. If the alarm is not
triggered, the recording is not performed. See “5.5.3 Seng the Alarm” on page 76 for further details.
• Normal: To record the video within the specied me.
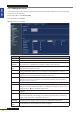
Time
(24-hour format)
The √ icon indicates the selected record type.
Day
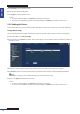
6 Click a space on the grid to mark the schedule. The space changes color depending on the selected record type.
Click as many spaces as desired.
Cursor posion Alarm recording is set
No scheduled recording Normal recording is set
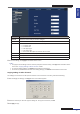
« TIP »
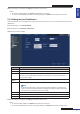
To copy the same schedule from one day to another, select the source day on the Copy eld, then select the target
day on the To eld, then click Copy.
7 To save the schedule, click Apply at the boom of the screen.
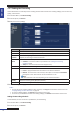
« TIP »
• To apply the same schedule to other channels, click Copy To at the upper-right corner of the screen. See
“Copying Sengs To Other Channels” on page 60.
• To revert to default sengs, click Default at the boom of the screen.
• To cancel any modicaons and retain the exisng schedule, click Refresh at the boom of the screen.