ITEM #0616271 LED OUTDOOR HANGING LANTERN Kichler® is a registered trademark of The L.D. Kichler Co. All Rights Reserved. MODEL #39477 Français p. 10 Español p. 19 ATTACH YOUR RECEIPT HERE Serial Number Purchase Date Questions, problems, missing parts? Before returning to your retailer, call our customer service department at 1-800-554-6504, 8 a.m. - 4:30 p.m, EST, Monday - Friday.
PACKAGE CONTENTS B A D C H I K G J F E PART A B C D E F DESCRIPTION Canopy Mounting Bracket Threaded Nipple Hex Nut Shade Shade Housing QTY 1 1 1 3 1 1 PART G H I J K 2 DESCRIPTION Fixture Loop Screw Collar Ring Screw Collar Loop Fixture Body Chain QTY 1 1 1 1 1
HARDWARE CONTENTS AA Wire Connector Qty: 3 BB Short Machine Screw Qty: 2 SAFETY INFORMATION Please read and understand this entire manual before attempting to assemble, operate or install the product. • • • • • • WARNING IMPORTANT: NEVER attempt any work without shutting off the electricity. Go to the main fuse box, or circuit breaker, in your home.
PREPARATION Before beginning assembly of product, make sure all parts are present. Compare parts with package contents list. If any part is missing or damaged, do not attempt to assemble the product. Estimated assembly time: 30 minutes to 1 hour Tools Required for Assembly (not included): Phillips screwdriver, flathead screwdriver, wire strippers, electrical tape, ladder, safety glasses. ASSEMBLY INSTRUCTIONS 1. Screw shade (E) onto shade housing (F). 1 F E 2.
ASSEMBLY INSTRUCTIONS 3. Once the proper position of the threaded nipple (C) and bracket (B) has been determined, secure with 3 hex nuts (D) as follows: • • • Screw 1st hex nut (D) onto the threaded nipple (C) and tighten against the raised portion of the bracket (B). Screw 2nd hex nut (D) onto the threaded nipple (C) and tighten against the flat portion of the mounting bracket (B). Screw the third hex nut (D) onto threaded nipple (C) and tighten against the screw collar loop (I). 4.
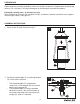
ASSEMBLY INSTRUCTIONS 5. Using the open chain links on chain (K), attach one end to screw collar loop (I) and the other end to fixture loop (G). Weave the fixture electrical and ground wires through every other chain link and pass through threaded nipple (C) into outlet box. Lower the screw collar ring (H) and canopy (A) over the chain (K). 5 Outlet Box I C K A H G 6.
ASSEMBLY INSTRUCTIONS 7. Pass canopy (A) over the screw collar loop (I). Attach screw collar ring (H) to screw collar loop (I) to secure canopy (A). 7 A I H CARE AND MAINTENANCE • Always be certain that electric current is turned off before cleaning this item. • Use a soft, moist cloth with mild non-abrasive soap to clean fixture. Never use glass cleaner on fixture, as it will damage the metal finish. • All glass shades may be washed in a towel-lined sink with warm water and mild soap.
WARRANTY Kichler Lighting warrants that its products will be free from defects in material and workmanship for one (1) year from the date of purchase by the Original Purchaser. LED Rail, LED Lanterns. LED Wall Sconces, LED Pendants and LED Chandeliers for single family residences are warranted for one (1) year on the Light Engine and all other electrical components.
REPLACEMENT PARTS LIST For replacement parts, call our customer service department at 1-800-554-6504, 8 a.m. - 4:30 p.m., EST, Monday - Friday. PART A B C D E H I K AA BB DESCRIPTION Canopy Mounting Bracket Threaded Nipple Hex Nut Shade Screw Collar Ring Screw Collar Loop Chain Wire Connector Short Machine Screw A PART # C39477 XBAR01 TN18200 NUT18 G39475 SCG-RZ SCL-RZ CHAIN-RZ WC001 SCR832X050 B C I K E D AA H BB Printed in China Kichler® is a registered trademark of The L.D. Kichler Co.